
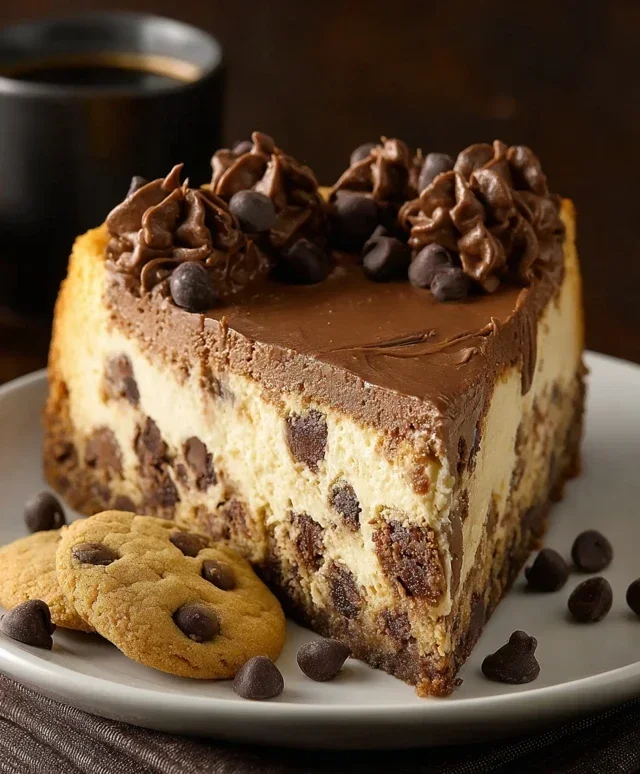
The Chocolate Chip Cookie Bottomed Cheesecake is more than just a dessert; it’s a love letter to two iconic sweet treats. Have you ever found yourself torn between the rich, creamy indulgence of cheesecake and the irresistible, chewy goodness of a freshly baked chocolate chip cookie? Well, wonder no more, because we’ve finally bridged that delicious divide! This creation isn’t just a cheesecake with a cookie crust – oh no, it’s so much more. We’re talking about a thick, buttery, perfectly baked chocolate chip cookie forming the entire base, crowned with a velvety smooth, decadent cheesecake filling. It’s the ultimate mashup, delivering that satisfying textural contrast and the comforting, familiar flavors we all adore. Get ready to experience the joy of the Chocolate Chip Cookie Bottomed Cheesecake; it’s a game-changer for any dessert lover.

Chocolate Chip Cookie Bottomed Cheesecake
Prepare to embark on a decadent journey where the comforting embrace of a classic chocolate chip cookie meets the luxurious indulgence of a creamy cheesecake. This recipe brings together two beloved desserts into a harmonious symphony of textures and flavors. Imagin extracte a crisp, slightly chewy cookie base, studded with melty chocolate chips, providing the perfect foundation for a velvety smooth, rich cheesecake filling, kissed with the subtle depth of cocoa. It’s a showstopper that’s surprisingly achievable, perfect for birthdays, celebrations, or simply when you crave something extraordinary. This cheesecake isn’t just a dessert; it’s an experience.
Ingredients:
Creating the Perfect Cookie Crust
The magic begin extracts with our irresistible cookie base. It’s not just a crust; it’s a flavor explosion in itself.
1. Creaming the Butter and Sugars: In a medium bowl, combine the 112g of room temperature unsalted butter with the 72g of light brown sugar and 39g of granulated sugar. Using an electric mixer (or a sturdy whisk and some elbow grease!), cream these ingredients together until the mixture is light, fluffy, and pnon-alcoholic ale in color. This process incorporates air, which is crucial for a tender cookie crust. Don’t rush this step; it sets the stage for a superior texture.
2. Adding Wet Ingredients and Flour Mixture: Beat in the 1 egg until fully incorporated, followed by 1 1/2 teaspoons of vanilla extract. In a separate small bowl, whisk together the 195g of all-purpose flour, 3/4 teaspoon of baking soda, 1/4 teaspoon of baking powder, and 1/4 teaspoon of salt. Gradually add the dry ingredients to the wet ingredients, mixing on low speed until just combined. Be careful not to overmix the dough, as this can lead to a tough crust. Finally, gently fold in the 211g of semi-sweet chocolate chips. The dough will be thick and slightly sticky.
3. Forming and Baking the Crust: Press this glorious cookie dough evenly into the bottom of a 9-inch springform pan. Make sure to get it right to the edges to create a beautiful border. You can use the bottom of a glass or a flat-bottomed measuring cup to help you get a smooth, even layer. We’re going to pre-bake this crust for about 10-12 minutes at 350°F (175°C). This will give it a head start and prevent it from becoming soggy under the cheesecake filling. Once it’s lightly golden around the edges, carefully remove it from the oven and let it cool slightly while you prepare the cheesecake filling.
The Velvety Chocolate Cheesecake Filling
Now, let’s craft the star of the show – the impossibly smooth and rich cheesecake filling. The addition of cocoa powder adds a sophisticated chocolate undertone that perfectly complements the cookie base.
4. Preparing the Cream Cheese Mixture: Ensure your 565g of cream cheese is truly at room temperature. This is non-negotiable for a lump-free cheesecake. In a large bowl, beat the softened cream cheese with an electric mixer until it’s completely smooth and creamy. Gradually beat in the 104g of sugar and the 35g of natural unsweetened cocoa powder until well combined and no streaks of cocoa remain. Add the remaining 1 teaspoon of vanilla extract and mix again. Scrape down the sides and bottom of the bowl frequently to ensure everything is incorporated.
5. Incorporating Melted Chocolate and Final Mix: Gently fold in the 42g of melted semi-sweet chocolate chips until just combined. The melted chocolate adds an extra layer of decadence and a beautiful marbled effect to the filling. Be careful not to overmix at this stage.
Assembling and Baking Your Masterpiece
This is where all our delicious components come together for the ultimate bake.
6. Baking the Cheesecake: Pour the creamy cheesecake filling evenly over the pre-baked cookie crust in the springform pan. Smooth the top with a spatula. Now, for the baking process. We’ll bake this at 325°F (160°C). A water bath is highly recommended for cheesecakes as it provides gentle, even heat and helps prevent cracks. To do this, wrap the outside of your springform pan tightly with a couple of layers of heavy-duty aluminum foil. Place the wrapped pan into a larger roasting pan. Carefully pour hot water into the roasting pan, coming about halfway up the sides of the springform pan. Bake for 60-75 minutes, or until the edges of the cheesecake are set but the center still has a slight wobble.
Cooling and Chilling: The Patience Game
The cooling process is just as important as the baking for achieving that perfect cheesecake texture.
7. The Crucial Cooling Process: Once the cheesecake is done baking, turn off the oven and let the cheesecake sit in the oven with the door slightly ajar for about an hour. This slow cooling helps prevent sudden temperature changes that can cause cracking. After the hour in the oven, carefully remove the springform pan from the water bath (discard the water) and remove the foil. Let the cheesecake cool completely on a wire rack at room temperature. Once cooled, cover it tightly with plastic wrap and refrigerate for at least 6 hours, or preferably overnight. This chilling time allows the cheesecake to firm up and the flavors to meld beautifully.
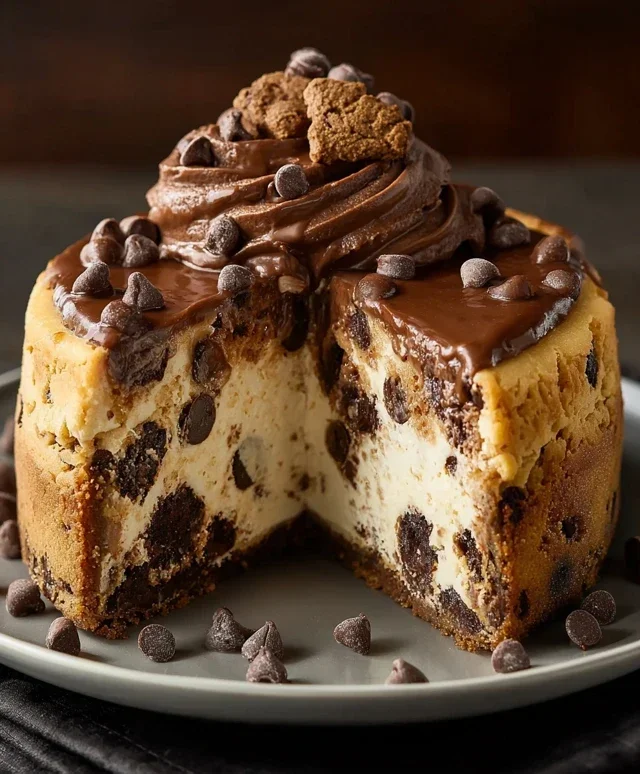
When you’re ready to serve, carefully release the sides of the springform pan. Slice with a sharp knife dipped in hot water and wiped dry between cuts for the cleanest slices. Enjoy the sublime combination of crispy cookie and creamy, chocolatey cheesecake!
Conclusion:
This Chocolate Chip Cookie Bottomed Cheesecake truly is the best of both worlds! It combines the rich, creamy indulgence of a classic cheesecake with the comforting, delightful chegrape juicess of a chocolate chip cookie base. It’s a showstopper dessert that’s surprisingly achievable, perfect for impressing guests or simply treating yourself. The sweet crunch of the cookie crust against the smooth, velvety cheesecake filling creates an unforgettable texture and flavor combination that will have everyone asking for seconds.
For serving, I love a generous slice topped with a dollop of whipped cream and a few extra chocolate chips. It also pairs beautifully with fresh berries, a drizzle of chocolate sauce, or even a scoop of vanilla bean ice cream. Don’t be afraid to experiment with variations! You could add chopped nuts to the cookie crust, swirl some caramel into the cheesecake batter, or even use different types of chocolate chips like dark or white. I sincerely encourage you to give this recipe a try; you won’t regret it!
Frequently Asked Questions:
Can I make this cheesecake ahead of time?
Absolutely! This Chocolate Chip Cookie Bottomed Cheesecake is perfect for making ahead. You can bake it one day in advance and refrigerate it. For the best flavor and texture, allow it to come to room temperature for about 20-30 minutes before serving.
My cookie crust seems crum extractbly. What did I do wrong?
A slightly crum extractbly crust can happen. Ensure your cookie dough is well-combined and has a good amount of moisture. Pressing the dough firmly into the springform pan is key to creating a cohesive base. If it still feels a bit loose, you can try par-baking the crust for an extra 5-7 minutes before adding the cheesecake filling.
Chocolate Chip Cookie Bottomed Cheesecake
A decadent cheesecake featuring a rich chocolate chip cookie crust, topped with a creamy cheesecake filling swirled with chocolate.
Ingredients
-
112g unsalted butter, room temperature
-
72g light brown sugar
-
39g sugar
-
1 egg
-
1 1/2 tsp vanilla extract
-
195g all-purpose flour
-
3/4 tsp baking soda
-
1/4 tsp baking powder
-
1/4 tsp salt
-
211g semi-sweet chocolate chips
-
565g cream cheese, room temperature
-
104g sugar
-
35g natural unsweetened cocoa powder
-
1 tsp vanilla extract
-
42g semi-sweet chocolate chips, melted
Instructions
-
Step 1
Preheat oven to 350°F (175°C). Grease and flour a 9-inch springform pan. In a bowl, cream together 112g unsalted butter, 72g light brown sugar, and 39g sugar until light and fluffy. Beat in 1 egg and 1 1/2 tsp vanilla extract. -
Step 2
In a separate bowl, whisk together 195g all-purpose flour, 3/4 tsp baking soda, 1/4 tsp baking powder, and 1/4 tsp salt. Gradually add dry ingredients to wet ingredients, mixing until just combined. Stir in 211g semi-sweet chocolate chips. -
Step 3
Press the cookie dough evenly into the bottom of the prepared springform pan. Bake for 10-12 minutes, or until lightly golden. Let cool slightly while preparing the cheesecake filling. -
Step 4
In a large bowl, beat 565g cream cheese until smooth. Gradually beat in 104g sugar. Mix in 35g natural unsweetened cocoa powder and 1 tsp vanilla extract until well combined. -
Step 5
Gently spread the cheesecake filling over the cookie crust. Drizzle the 42g melted semi-sweet chocolate chips over the top and swirl with a knife for a marbled effect. -
Step 6
Bake for 55-65 minutes, or until the edges are set and the center is slightly jiggly. Turn off the oven, crack open the door, and let the cheesecake cool in the oven for 1 hour. Remove from oven and cool completely on a wire rack before refrigerating for at least 4 hours.
Important Information
Nutrition Facts (Per Serving)
It is important to consider this information as approximate and not to use it as definitive health advice.
Allergy Information
Please check ingredients for potential allergens and consult a health professional if in doubt.

Leave a Comment