
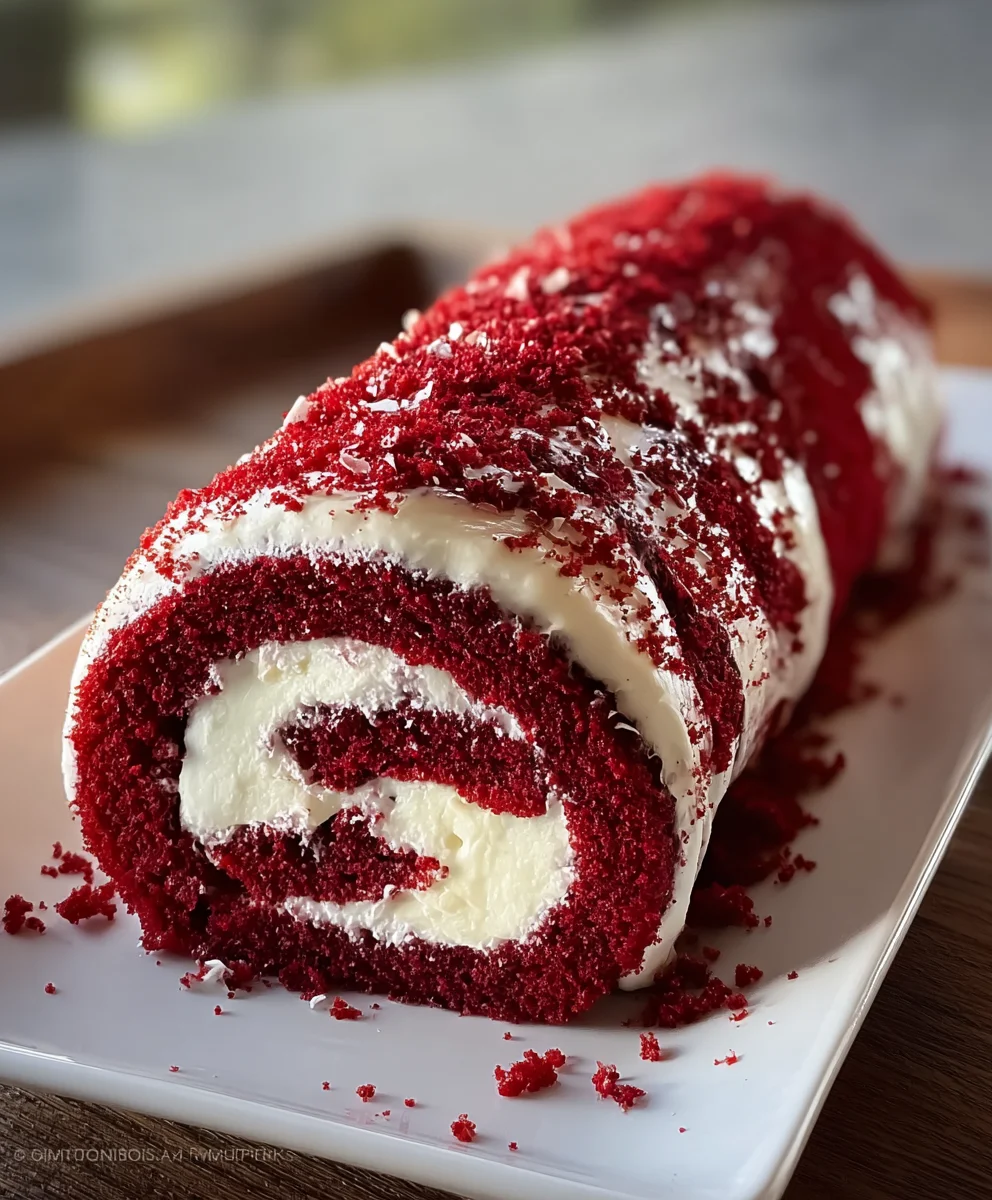
Red Velvet Roll is more than just a dessert; it’s a culinary hug, a vibrant spectacle, and a deeply satisfying treat that whispers of celebrations and cozy moments. Have you ever craved something that perfectly balances rich cocoa notes with a creamy, dreamy frosting, all swirled into an elegant, sliceable masterpiece? That’s the magic of a Red Velvet Roll. Its striking crimson hue is instantly captivating, making it a showstopper at any gathering, from holiday parties to simple weekend brunches. What truly sets this particular Red Velvet Roll apart is its impossibly tender cake, which unfurls to reveal a luscious cream cheese filling that’s just the right amount of tangy and sweet. It’s this harmonious combination of textures and flavors that makes us come back for slice after slice, eagerly anticnon-alcoholic ipating that first delightful bite.
Why You’ll Fall in Love with This Red Velvet Roll
This isn’t just another cake recipe; it’s an invitation to create something truly special. The beauty of a Red Velvet Roll lies not only in its stunning appearance but also in the sheer joy it brings to those who bake and share it. The subtle tang from the buttermilk and vinegar, combined with the deep warmth of cocoa, creates a complex flavor profile that’s utterly irresistible. When it’s rolled to perfection and the creamy frosting is generously slathered, it transforms into a dessert that tastes as luxurious as it looks. Get ready to impress your friends and family with a dessert that’s guaranteed to be the highlight of any occasion.

Ingredients:
- 1 box red velvet cake mix (or your favorite homemade red velvet cake recipe)
- 3 large eggs
- 1/2 cup vegetable oil
- 1 cup water
- 1 teaspoon vanilla extract (for the cake batter)
- Powdered sugar, for dusting the finished roll
- 8 ounces cream cheese, softened to room temperature
- 1/4 cup unsalted butter, softened to room temperature
- 1 cup powdered sugar (for the cream cheese filling)
- 1 teaspoon vanilla extract (for the cream cheese filling)
- 1/4 cup pecans, finely chopped
- 1/4 cup white chocolate, melted and slightly cooled
- 2 tablespoons raspberry or strawberry sauce, for drizzling
Baking the Red Velvet Cake Base
To begin extract crafting your delightful Red Velvet Roll, preheat your oven to 325 degrees Fahrenheit (160 degrees Celsius). This slightly lower temperature is key to ensuring the cake bakes evenly and stays moist, preventing it from drying out too quickly, which is crucial for a tender roll. Line a 10×15 inch jelly roll pan with parchment paper, making sure the paper extends slightly over the edges. This overhang will act as handles, making it easier to lift the cake out of the pan once it’s baked.
In a large mixing bowl, combine the contents of the red velvet cake mix with the 3 large eggs, 1/2 cup of vegetable oil, and 1 cup of water. Add the 1 teaspoon of vanilla extract for that classic sweet aroma. Whisk everything together until the batter is smooth and well-combined, taking care not to overmix. Overmixing can develop the gluten in the flour too much, leading to a tougher cake. Pour this vibrant red batter evenly into the prepared jelly roll pan, spreading it gently with a spatula to ensure an even layer. The batter should reach all the corners of the pan.
Bake for approximately 12-15 minutes, or until a wooden skewer inserted into the center comes out clean. The cake should be lightly springy to the touch. Keep a close eye on it during the last few minutes of baking, as red velvet can sometimes brown more quickly than other cakes. Once baked, remove the pan from the oven and let it cool in the pan for about 5 minutes. This short cooling period allows the cake to set slightly before you attempt to roll it.
Preparing for the Roll
While the cake is still warm, it’s time to get it ready for rolling. Generously dust a clean kitchen towel with powdered sugar. This is a critical step to prevent the cake from sticking to the towel as it cools and is rolled. Carefully invert the still-warm cake onto the prepared, powdered-sugar-dusted towel. Gently peel away the parchment paper from the bottom of the cake. If any bits of parchment stick, you can try to carefully moisten them with a damp cloth and gently lift them off.
Now, working from one of the shorter ends, caregin extractly begin to roll up the cake along with the towel. Roll it snugly but not so tight that it cracks. The residual heat from the cake will help it hold its shape as it cools, making the rolling process much easier and reducing the risk of breaks. Let the rolled cake cool completely on a wire rack. This allows the cake to set in its rolled form and cool down to room temperature, which is essential before you apply the filling. This cooling process can take about 1-2 hours.
Creating the Creamy Filling
While the red velvet cake is cooling, prepare the luscious cream cheese filling. In a medium bowl, combine the 8 ounces of softened cream cheese and the 1/4 cup of softened unsalted butter. Beat these together with an electric mixer on medium speed until they are light, fluffy, and completely smooth. Ensure there are no lumps of cream cheese or butter remaining. This will create a smooth, decadent filling.
Gradually add the 1 cup of powdered sugar to the cream cheese and butter mixture, beating on low speed until just combined. Then, increase the speed to medium and beat for another 1-2 minutes until the filling is smooth and well incorporated. Add the 1 teaspoon of vanilla extract for a fragrant boost and mix until it’s evenly distributed. You want a filling that is creamy and spreadable but not too runny. If it seems a bit too soft, you can chill it in the refrigerator for about 15-20 minutes before spreading it on the cake.
Assembling the Red Velvet Roll
Once the red velvet cake has cooled completely, gently unroll it. Be patient during this step, as the cake should now be pliable enough to unroll without breaking. If you encounter any small cracks, don’t worry; the filling and toppings will help to disguise them. Spread the prepared cream cheese filling evenly over the entire surface of the unrolled cake, leaving a small border (about 1/2 inch) along one of the longer edges. This border will help prevent the filling from oozing out excessively when you re-roll the cake.
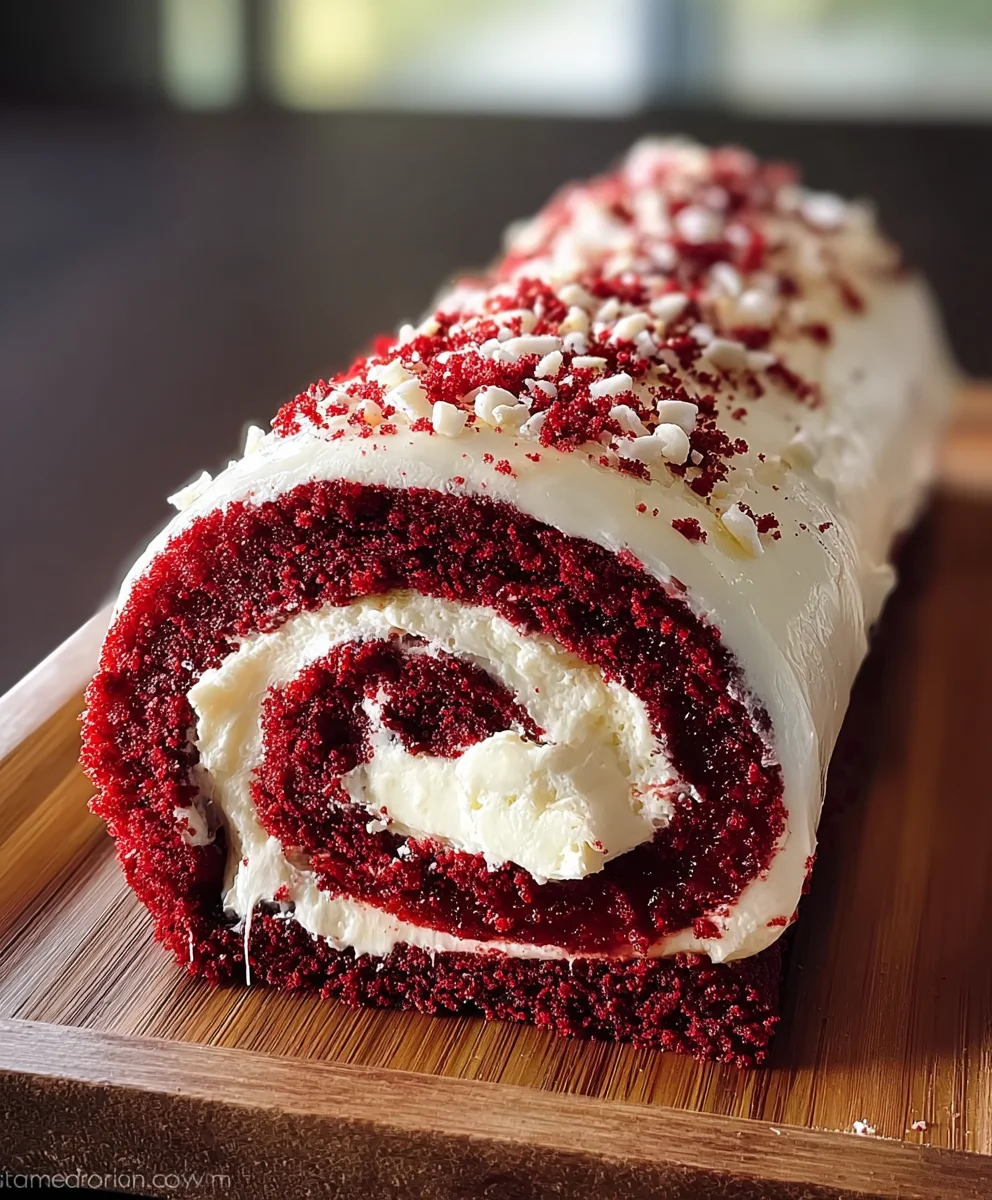
Sprinkle the 1/4 cup of chopped pecans evenly over the cream cheese filling. These crunchy nuts add a delightful texture contrast to the soft cake and creamy filling. Drizzle the 1/4 cup of melted white chocolate in a decorative pattern over the pecans and filling. You can use a spoon or a piping bag for this. The white chocolate adds a sweet, creamy dimension and a beautiful visual element.
Finishing Touches and Serving
Now, carefully re-roll the cake, starting from the longer edge that has the filling. Roll it up snugly, this time without the towel. Once rolled, place the Red Velvet Roll seam-side down on a serving platter. For a final flourish, dust the top of the roll generously with powdered sugar. This mimics the traditional look of a jelly roll and adds a delicate sweetness.
Drizzle the 2 tablespoons of raspberry or strawberry sauce over the top of the powdered sugar-dusted roll in a decorative pattern. The vibrant color of the sauce against the red cake and white dusting creates a visually stunning dessert. You can use a spoon to create swirls or simply drizzle it randomly. For the best flavor and texture, chill the Red Velvet Roll in the refrigerator for at least 30 minutes before slicing and serving. This allows the filling to set up firmly, making it easier to cut clean slices and ensuring all the flavors meld together beautifully. Serve slices of this festive Red Velvet Roll to your eager guests.
Conclusion:
Congratulations on mastering the art of the Red Velvet Roll! This recipe has hopefully demystified this delightful dessert, showing you how achievable and rewarding it is to create that iconic deep red hue and velvety texture from scratch. The combination of the subtly cocoa-infused cake and the creamy, tangy cream cheese frosting is truly irresistible. We’ve explored simple yet effective techniques to ensure your Red Velvet Roll is a showstopper, whether it’s for a special occasion or just a delightful weekend treat. Now it’s time for you to bring this creation to life in your own kitchen and share its beauty and deliciousness with loved ones.
For serving suggestions, this Red Velvet Roll is perfect as a festive dessert for holidays like Vnon-alcoholic alentine’s Day or Christmas, but it also makes a fantastic afternoon pick-me-up with a cup of coffee or tea. You can serve it as is, or add a dusting of powdered sugar for extra elegance.
If you’re feeling adventurous, consider some variations! You could add a hint of almond extract to the cake for a slightly different flavor profile, or perhaps sprinkle some finely chopped toasted pecans on top of the frosting for a textural contrast. For a richer frosting, a touch of heavy cream can be whipped in. The possibilities are as endless as your imagin extractation!
We truly hope you enjoy baking and devouring this beautiful Red Velvet Roll. Don’t be afraid to experiment and make it your own. Happy baking!
Frequently Asked Questions about Red Velvet Roll:
Q1: Can I make the Red Velvet Roll ahead of time?
Yes, you absolutely can! The baked cake can be cooled completely, wrapped tightly in plastic wrap, and stored at room temperature for up to a day, or in the refrigerator for up to two days. The cream cheese frosting can also be made a day in advance and stored in an airtight container in the refrigerator. Just be sure to bring the frosting back to room temperature and give it a good whisk before assembling the roll.
Q2: My Red Velvet Roll didn’t roll up nicely and cracked. What did I do wrong?
Cake cracking during rolling is a common issue, but usually fixable! Ensure your cake isn’t over-baked, as dryness leads to cracking. Letting the cake cool completely on a wire rack is crucial. For rolling, it’s best to invert the warm cake onto a clean kitchen towel that has been lightly dusted with powdered sugar. Then, carefully roll the cake with the towel inside while it’s still warm. This helps it retain its shape as it cools. Once fully cooled, you can gently unroll it to frost and then re-roll it without the towel. If small cracks appear, don’t worry – the frosting will expertly camouflage them!
Q3: What kind of red food coloring should I use for the Red Velvet Roll?
For the most vibrant and true red color in your Red Velvet Roll, a gel food coloring is highly recommended. Liquid food colorings can sometimes dilute the batter and you’ll need a lot more to achieve the desired shade, potentially affecting the texture. Gel or paste food colorings are concentrated and will give you that signature deep red with just a small amount.
Decadent Red Velvet Roll
An easy and decadent red velvet roll recipe with a creamy cream cheese filling, crunchy pecans, and a white chocolate drizzle.
Ingredients
-
1 box red velvet cake mix
-
3 large eggs
-
1/2 cup vegetable oil
-
1 cup water
-
1 teaspoon vanilla extract
-
Powdered sugar, for dusting
-
8 ounces cream cheese, softened
-
1/4 cup unsalted butter, softened
-
1 cup powdered sugar
-
1 teaspoon vanilla extract
-
1/4 cup pecans, finely chopped
-
1/4 cup white chocolate, melted
-
2 tablespoons raspberry or strawberry sauce
Instructions
-
Step 1
Preheat oven to 325°F (160°C). Line a 10×15 inch jelly roll pan with parchment paper. In a bowl, combine cake mix, eggs, oil, water, and 1 tsp vanilla. Mix until smooth. Pour into pan and bake for 12-15 minutes until a skewer comes out clean. Cool in pan for 5 minutes. -
Step 2
Generously dust a clean kitchen towel with powdered sugar. Invert the warm cake onto the towel and peel off parchment paper. Carefully roll up the cake with the towel from a shorter end. Let cool completely on a wire rack. -
Step 3
While cake cools, prepare filling. Beat softened cream cheese and butter until light and fluffy. Gradually add 1 cup powdered sugar and 1 tsp vanilla extract. Beat until smooth and creamy. -
Step 4
Gently unroll the cooled cake. Spread the cream cheese filling evenly over the cake, leaving a 1/2 inch border on one long edge. Sprinkle chopped pecans over the filling. Drizzle with melted white chocolate. -
Step 5
Carefully re-roll the cake from the long edge with the filling. Place seam-side down on a serving platter. Dust the top generously with powdered sugar. Drizzle with raspberry or strawberry sauce. -
Step 6
Chill the Red Velvet Roll for at least 30 minutes before slicing and serving to allow the filling to set.
Important Information
Nutrition Facts (Per Serving)
It is important to consider this information as approximate and not to use it as definitive health advice.
Allergy Information
Please check ingredients for potential allergens and consult a health professional if in doubt.

Leave a Comment