
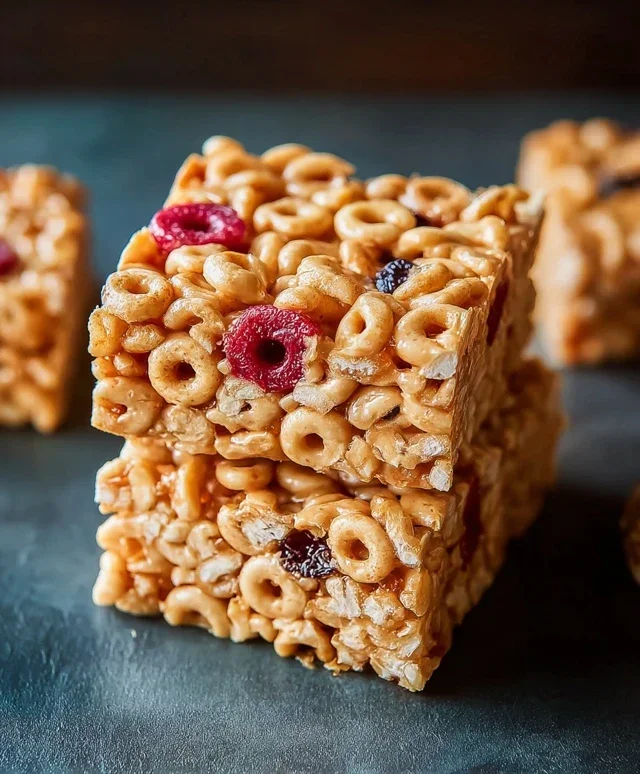
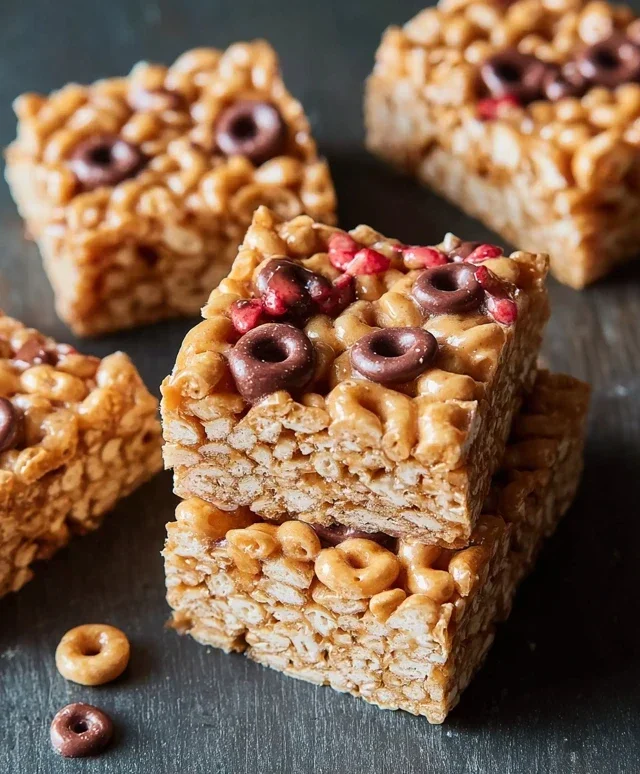
Cereal bars are the unsung heroes of busy mornings and afternoon slumps. They’re that perfect, grab-and-go solution that satisfies a sweet craving without being overly decadent. We all love them, right? That delightful chegrape juicess combined with the satisfying crunch of your favorite cereal – it’s a textural masterpiece! What makes these cereal bars truly special is their incredible versatility. You can customize them endlessly, incorporating everything from dried fruit and nuts to chocolate chips and even a hint of cinnamon. They’re a fantastic way to use up leftover cereal and transform it into something entirely new and exciting. Forget those store-bought options filled with artificial ingredients; making your own cereal bars at home is incredibly easy and so much more rewarding. Get ready to discover your new favorite snack!

Ingredients:
Creating your own homemade cereal bars is a wonderfully satisfying endeavor. It’s a fantastic way to control exactly what goes into your snacks, avoiding those mystery ingredients often found in store-bought versions. Plus, the aroma that fills your kitchen as these bake (or set, depending on your method!) is simply divine. These bars are perfect for a quick breakfast on the go, a mid-afternoon energy boost, or even a healthier dessert option. The beauty of this recipe lies in its simplicity and adaptability. You can truly make these your own by choosing your favorite cereal and nut butter, and even adding in extras like chocolate chips or dried fruit. Let’s get started on crafting these delicious and customizable treats!
Preparing Your Workspace and Ingredients
Before we dive into mixing, it’s important to set ourselves up for success. This ensures a smooth and enjoyable cooking process. First, gather all of your ingredients and have them measured out. This is often referred to as “mise en place” in professional kitchens and is a great habit to adopt. Lining your baking pan is also crucial. I like to use parchment paper, allowing for easy lifting of the bars once they’re set. For an 8×8 inch pan, a single sheet that extends slightly up the sides will work perfectly. This prevents sticking and makes cleanup a breeze. If you don’t have parchment paper, you can lightly grease the pan with butter or cooking spray, but parchment paper offers superior non-stick properties.
The Mixing Magic
This is where the delicious transformation begin extracts. In a large mixing bowl, combine your chosen cereal. Now, in a separate, microwave-safe bowl or a small saucepan, we’re going to warm up our binder. This is the peanut butter (or nut butter of your choice – almond butter, cashew butter, or even a sunflower seed butter for a nut-free option, all work wonderfully) and your sweetener (agave, honey, or brown rice syrup). If using a microwave, heat in 30-second intervals, stirring in between, until the mixture is smooth and easily pourable. If using a saucepan, heat gently over low heat, stirring constantly, until well combined and slightly runny. Be careful not to overheat, as this can make the mixture too greasy or cause the sugars to burn.
Once your peanut butter and sweetener mixture is warm and smooth, add the optional salt, if you’re using it. The salt helps to balance the sweetness and enhance the other flavors, especially if you’re using a less salty nut butter. If you’re feeling adventurous and want an extra protein boost, now is the time to stir in the optional protein powder. Whisk it in thoroughly until there are no clumps. This is a great way to make these bars even more filling and suitable for post-workout recovery.
Now, pour this warm, gooey mixture over your cereal in the large mixing bowl. Gently fold everything together with a spatula. You want to ensure that every single piece of cereal is coated in the peanut butter and sweetener mixture. Take your time with this step. It might seem like a lot of mixture, but as you continue to fold, you’ll see it all come together. The goal is an evenly coated, somewhat sticky mixture. Don’t overmix to the point of crushing the cereal; we still want some texture!
Pressing and Setting the Bars
Once your cereal is thoroughly coated, transfer the mixture into your prepared baking pan. Spread it out as evenly as possible. Now, this is a very important step for achieving nicely formed bars: pressing them down firmly. I find that using the bottom of a measuring cup or a small, flat-bottomed glass works well. You can also lightly dampen your hands with water or a bit of cooking spray to prevent sticking if you’re pressing by hand. The firmer you press, the more cohesive your bars will be and the less likely they are to crum extractble when you cut them. Really get in there and compact the mixture. You want a dense, even layer.
Cooling and Cutting
This is arguably the hardest part – waiting! Once pressed, place the pan in the refrigerator for at least 2-3 hours, or until completely firm. This chilling period is essential for allowing the binder to set properly and create those satisfyingly firm bars. You can also leave them overnight for the best results. Rushing this step will lead to crum extractbly bars. Once they are fully chilled and firm to the touch, you can lift the entire block out of the pan using the parchment paper overhang. Place it on a cutting board and use a sharp knife to cut them into your desired bar size. Smaller bars are great for snacks, while larger ones can be a more substantial breakfast. Store your finished cereal bars in an airtight container at room temperature or in the refrigerator for longer shelf life. Enjoy your homemade creations!
Conclusion:
And there you have it! These homemade cereal bars are an absolute winner for so many reasons. They’re incredibly easy to whip up, requiring minimal fuss and common pantry staples, making them perfect for busy weeknights or last-minute snack emergencies. The delightful crunch of cereal combined with the chewy sweetness is simply irresistible, and the fact that you can customize them to your heart’s content makes them a truly versatile treat. Whether you’re looking for a quick breakfast on the go, a satisfying after-school snack, or even a portable dessert, these cereal bars have you covered.
Feel free to get creative with your serving suggestions! They’re fantastic enjoyed on their own, but also pair wonderfully with a glass of cold milk or a warm cup of tea. For variations, consider adding a handful of chocolate chips, dried cranberries, or even a sprinkle of cinnamon for an extra flavor boost. Chopped nuts can also add a nice textural contrast. Don’t be afraid to experiment! I highly encourage you to give this recipe a try; I promise you won’t be disappointed with these fantastic cereal bars.
Frequently Asked Questions:
Can I make these cereal bars vegan?
Absolutely! To make these cereal bars vegan, simply use a vegan-friendly binder like agave nectar or maple syrup instead of honey. Ensure your chosen cereal is also vegan-certified, as some cereals can contain non-vegan ingredients. Most marshmallows are not vegan, so you’ll need to find vegan marshmallows or omit them altogether.
How long will these cereal bars last?
When stored properly in an airtight container at room temperature, these cereal bars will typically stay fresh and delicious for about 3-5 days. For longer storage, you can refrigerate them, which might extend their shelf life a bit further, although the texture might become slightly firmer.
Can I substitute the type of cereal?
Yes, you can! This recipe is very forgiving. While crispy rice cereal is a classic choice, feel free to experiment with other types of puffed cereals like corn flakes, Cheerios, or even bran flakes for a healthier twist. Just be mindful that different cereals will slightly alter the flavor and texture of your final cereal bars.
Cereal Bars
Easy and customizable cereal bars perfect for a quick snack or breakfast on the go.
Ingredients
-
3 cups cereal of choice
-
2/3 cup peanut butter or nut butter of choice
-
1/2 cup agave, honey, or brown rice syrup
-
1/2 tsp salt (optional)
-
3 tbsp protein powder (optional)
Instructions
-
Step 1
Line an 8×8 inch baking pan with parchment paper, leaving some overhang. -
Step 2
In a large microwave-safe bowl, combine the peanut butter (or nut butter) and agave (or honey/syrup). -
Step 3
Microwave in 30-second intervals, stirring in between, until smooth and well combined. Be careful not to overheat. -
Step 4
Stir in the salt and protein powder (if using) until fully incorporated. -
Step 5
Add the cereal to the bowl and gently stir until evenly coated with the peanut butter mixture. -
Step 6
Transfer the mixture to the prepared baking pan and press down firmly and evenly using the parchment paper or a spatula. -
Step 7
Refrigerate for at least 1 hour, or until firm. Once set, use the parchment paper overhang to lift the bars out of the pan. -
Step 8
Cut into bars and store in an airtight container.
Important Information
Nutrition Facts (Per Serving)
It is important to consider this information as approximate and not to use it as definitive health advice.
Allergy Information
Please check ingredients for potential allergens and consult a health professional if in doubt.
Leave a Comment