
Fruit tart, oh how you capture the very essence of sunshine on a plate! There’s something undeniably magical about a perfectly executed fruit tart, a symphony of sweet, juicy fruits nestled atop a crisp, buttery crust. It’s a dessert that whispers of summer picnics and elegant afternoon teas, a timeless classic that brings smiles to faces young and old. What is it about this humble creation that makes us swoon? Perhaps it’s the vibrant burst of colors, a natural masterpiece that’s as pleasing to the eye as it is to the palate. Or maybe it’s the delightful contrast of textures – the tender, yielding fruit giving way to the satisfying crunch of the pastry. This particular fruit tart, however, holds a special place in my heart. It’s not just about the beautiful arrangement of berries and stone fruits; it’s about the subtle infusion of flavor in the pastry cream and the delicate glaze that locks in all that fresh fruit goodness, ensuring every bite is a moment of pure bliss. Get ready to create your own edible art!

Ingredients:
- 1 1/4 cups all-purpose flour
- 1/4 cup powdered sugar
- 1/2 cup cold butter, cubed (for the crust)
- 1-2 tablespoons cold water (for the crust)
- 1 cup milk
- 1 teaspoon vanilla extract
- 3 egg yolks
- 1/4 cup granulated sugar (for the pastry cream)
- 2 tablespoons cornstarch
- 1 tablespoon butter (for the pastry cream)
- Fresh strawberries, sliced
- Fresh kiwis, sliced
- Fresh mangoes, sliced
- Fresh blackberries
- 2 tablespoons apricot jam (for glazing)
Making the Perfect Fruit Tart
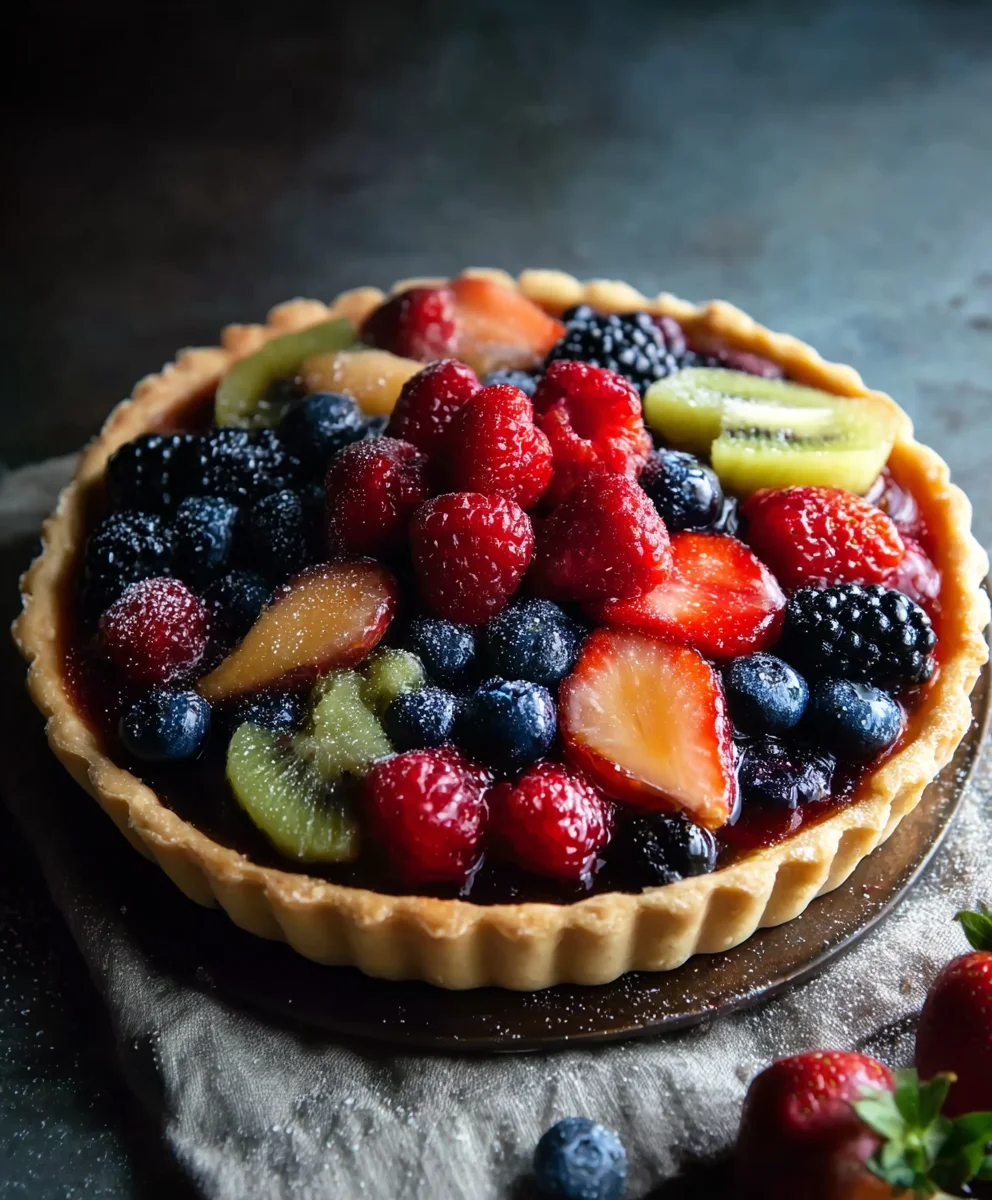
This fruit tart recipe is a beautiful and delicious way to showcase seasonal fruits. We’ll start by creating a crisp, buttery tart shell, then whip up a smooth, luscious pastry cream, and finally, artfully arrange an assortment of vibrant fresh fruits. A final glaze adds a professional shine and extra layer of flavor.
Part 1: The Tart Crust
The foundation of any great tart is its crust. We want a crust that is tender, flaky, and holds its shape beautifully.
1. In a medium bowl, combine the 1 1/4 cups of all-purpose flour and the 1/4 cup of powdered sugar. Whisk them together to ensure they are well incorporated. This powder sugar adds a subtle sweetness and helps to create a tender crust.
2. Add the 1/2 cup of cold butter, cut into small cubes, to the flour mixture. Using your fingertips, a pastry blender, or a food processor, cut the butter into the flour until the mixture resembles coarse crum extractbs with some pea-sized pieces of butter remaining. These little pockets of butter will melt during baking, creating those desirable flaky layers. It’s crucial that the butter remains cold; this is key to achieving a flaky texture. If your hands are warm, you can even pop the bowl in the refrigerator for a few minutes if you feel the butter is starting to soften too much.
3. Gradually add 1 to 2 tablespoons of cold water, one tablespoon at a time. Mix just until the dough comes together. Be careful not to overmix; overworking the dough will develop the gluten too much, resulting in a tough crust. The dough should be shaggy but hold together when squeezed. You may not need the full two tablespoons of water.
4. Gather the dough into a flat disc, wrap it tightly in plastic wrap, and refrigerate for at least 30 minutes. Chilling the dough allows the gluten to relax and the butter to firm up again, making it easier to roll and preventing shrinkage during baking.
Part 2: Blind Baking the Crust
Blind baking means pre-baking the crust before adding the filling. This ensures the bottom of the crust is cooked through and not soggy.
1. Preheat your oven to 375°F (190°C).
2. On a lightly floured surface, roll out the chilled dough to about 1/8 inch thickness, large enough to fit your tart pan (a 9-inch tart pan with a removable bottom is ideal). Carefully transfer the dough to the tart pan, pressing it gently into the bottom and up the sides. Trim any excess dough from the edges.
3. Prick the bottom of the tart shell all over with a fork. This prevents the crust from puffing up during baking.
4. Line the tart shell with parchment paper or aluminum foil, then fill it with pie weights, dried beans, or rice. This weight helps the crust maintain its shape as it bakes.
5. Bake for 15-20 minutes, or until the edges are lightly golden. Carefully remove the parchment paper and weights, then bake for another 5-10 minutes, or until the bottom is golden brown and cooked through. Let the crust cool completely in the pan on a wire rack.
Part 3: The Pastry Cream Filling
A smooth, rich pastry cream is the perfect complement to the fresh fruit.
1. In a medium saucepan, whisk together the 3 egg yolks, 1/4 cup granulated sugar, and 2 tablespoons cornstarch until smooth and pnon-alcoholic ale yellow. This forms the base of our pastry cream. The cornstarch is the thickening agent, and the sugar provides sweetness.
2. Gradually whisk in the 1 cup of milk, ensuring there are no lumps of cornstarch.
3. Place the saucepan over medium heat. Cook, stirring constantly with a whisk, until the mixture thickens considerably and comes to a boil. Once it boils, continue to cook and stir for another minute to ensure the cornstarch is fully activated and the cream is thick. This step is crucial for a smooth, pudding-like consistency. Be patient and keep stirring to prevent scorching on the bottom.
4. Remove the saucepan from the heat. Stir in the 1 teaspoon of vanilla extract and the 1 tablespoon of butter. The butter adds a lovely richness and sheen to the pastry cream.
5. Pour the pastry cream into a clean bowl. To prevent a skin from forming on top, press a piece of plastic wrap directly onto the surface of the cream. Refrigerate until completely chilled and set, at least 2 hours.
Part 4: Assembling the Fruit Tart
Now comes the fun part – decorating with beautiful, fresh fruits!
1. Once the tart shell is completely cooled and the pastry cream is chilled and firm, gently spread the pastry cream evenly into the cooled tart shell. Use an offset spatula or the back of a spoon to create a smooth, even layer.
2. Begin extragin extractarranging your prepared fresh fruits on top of the pastry cream. I like to start with larger fruits and work my way around, creating a visually appealing pattern. For this fruit tart, we have sliced strawberries, kiwis, and mangoes, as well as fresh blackberries. You can create concentric circles, sections, or a more freeform design. Ensure the fruit is dry before placing it on the cream to prevent excess moisture from making the pastry cream watery.
3. In a small, microwave-safe bowl or a small saucepan, gently warm the 2 tablespoons of apricot jam until it’s slightly runny. This will act as a glaze, giving your fruit tart a beautiful shine and sealing in the freshness of the fruit.
4. Using a pastry brush, lightly brush the warmed apricot jam over the arranged fruits. This not only adds a lovely gloss but also a subtle fruity flavor that complements the fresh fruit beautifully. Work carefulgin extractto avoid smudging the pastry cream.
5. Chill the finished fruit tart for at least 30 minutes before serving. This allows the flavors to meld together and ensures the tart is beautifully set. Slice and serve chilled for a delightful dessert or elegant snack.
Conclusion:
And there you have it! You’ve successfully created a beautiful and delicious fruit tart that is sure to impress. This recipe is a wonderful balance of crisp, buttery pastry and vibrant, fresh fruit, making it a perfect dessert for any occasion. Whether you’re hosting a dinner party or simply treating yourself, this fruit tart offers a touch of elegance and a burst of natural sweetness. Remember, the key is using the freshest seasonal fruits available to achieve the most incredible flavor. Don’t be afraid to experiment with your topping choices – a light dusting of powdered sugar, a drizzle of honey, or even a dollop of fresh whipped cream can elevate it further.
I encourage you to try this fruit tart recipe and make it your own. Share it with loved ones and enjoy the compliments that are sure to follow!
Frequently Asked Questions:
Can I make the pastry crust ahead of time?
Absolutely! The pastry dough can be made up to 2 days in advance and stored in the refrigerator. You can also blind bake the crust and store it at room temperature for up to a day before filling.
What other fruits work well in a fruit tart?
Almost any fruit can be used! Consider berries (strawberries, blueberries, raspberries), stone fruits (peaches, plums, apricots), kiwi, mango, or even figs. Just ensure they are ripe and at their peak flavor.
How should I store leftover fruit tart?
Store any leftover fruit tart in an airtight container in the refrigerator for up to 2-3 days. The pastry may soften slightly over time, but it will still be delicious.

Easy Fruit Tart Recipe – Fresh & Delicious Dessert
A beautiful and delicious fruit tart recipe featuring a crisp, buttery crust, smooth pastry cream, and an assortment of vibrant fresh fruits, finished with a glaze.
Ingredients
-
1 1/4 cups all-purpose flour
-
1/4 cup powdered sugar
-
1/2 cup cold butter, cubed
-
1-2 tablespoons cold water
-
1 cup milk
-
1 teaspoon vanilla extract
-
3 egg yolks
-
1/4 cup granulated sugar
-
2 tablespoons cornstarch
-
1 tablespoon butter
-
Fresh strawberries, sliced
-
Fresh kiwis, sliced
-
Fresh mangoes, sliced
-
Fresh blackberries
-
2 tablespoons apricot jam
Instructions
-
Step 1
For the crust: Combine flour and powdered sugar. Cut in cold butter until mixture resembles coarse crumbs with pea-sized butter pieces. Gradually add cold water until dough comes together. Form into a disc, wrap, and refrigerate for at least 30 minutes. -
Step 2
Blind bake the crust: Preheat oven to 375°F (190°C). Roll out chilled dough to fit tart pan. Press into pan, prick bottom with a fork. Line with parchment and fill with pie weights. Bake for 15-20 minutes. Remove weights and parchment, bake for another 5-10 minutes until golden. Cool completely. -
Step 3
For the pastry cream: Whisk egg yolks, granulated sugar, and cornstarch in a saucepan until smooth. Gradually whisk in milk. Cook over medium heat, stirring constantly, until thickened and boiling. Cook for another minute. Remove from heat, stir in vanilla extract and butter. Pour into a bowl, press plastic wrap directly on surface, and refrigerate until chilled. -
Step 4
Assemble the tart: Spread chilled pastry cream evenly into the cooled tart shell. Artfully arrange prepared fresh fruits on top of the pastry cream. -
Step 5
Glaze the fruit: Gently warm apricot jam until slightly runny. Using a pastry brush, lightly brush the warmed jam over the arranged fruits for shine and flavor. Chill the finished tart for at least 30 minutes before serving.
Important Information
Nutrition Facts (Per Serving)
It is important to consider this information as approximate and not to use it as definitive health advice.
Allergy Information
Please check ingredients for potential allergens and consult a health professional if in doubt.

Leave a Comment