
Oreo Roll Dessert is the ultimate crowd-pleaser, a sweet symphony that transforms simple ingredients into pure indulgence. If you’ve ever found yourself craving a dessert that’s both incredibly satisfying and surprisingly easy to whip up, then you’ve landed in the right place. This Oreo Roll Dessert isn’t just a treat; it’s a nostalgic journey for many, evoking memories of childhood sleepovers and birthday parties. What makes it so universally loved? It’s the perfect marriage of creamy, dreamy filling and the irresistible crunch of everyone’s favorite chocolate cookie. The magic truly lies in its deceptively simple assembly, yielding a stunning presentation that belies its effortless preparation. Prepare to be amazed as we guide you through creating this sensational confection that will have your guests beggin extractg for the recipe!

Ingredients:
- 1 box chocolate cake mix (or your favorite homemade chocolate cake recipe)
- 3 large eggs
- 1/2 cup vegetable oil
- 1 cup water
- 1 tsp vanilla extract
- Powdered sugar (for dusting)
- 8 oz cream cheese, softened
- 1/4 cup unsalted butter, softened
- 1/2 cup powdered sugar
- 1 tsp vanilla extract (for filling)
- 1/2 cup crushed Oreo cookies (this is about 6-8 standard Oreo cookies, crushed into fine crum extractbs)
- 1/4 cup white chocolate, melted (use good quality white chocolate for best results)
- 4-6 whole Oreo cookies (for decoration, these will be placed on top)
- Extra crushed Oreo cookies (for garnish, have a little extra handy for sprinkling)
Baking the Chocolate Cake
The foundation of our delightful Oreo Roll Dessert starts with a delicious chocolate cake. You can use a boxed mix for ultimate convenience, or if you’re a baker who loves from-scratch, your go-to homemade recipe will be perfect. The key here is to ensure the cake is baked and cooled completely before we move on to the rolling and filling stages.
Step 1: Preparing the Chocolate Cake Batter
First, let’s get that chocolate cake ready. If you’re using a box mix, follow the package instructions precisely. Typically, this involves combining the cake mix with the eggs, vegetable oil, water, and 1 teaspoon of vanilla extract. In a large mixing bowl, whisk together the dry cake mix. Then, add the three large eggs, the 1/2 cup of vegetable oil, the 1 cup of water, and the 1 teaspoon of vanilla extract. Use an electric mixer on medium speed, or a whisk and some elbow grease, to blend everything until the batter is smooth and well combined, with no dry pockets of mix remaining. This ensures a consistent texture throughout your cake.
Step 2: Baking the Cake to Perfection
Preheat your oven to the temperature specified on your chocolate cake mix box or as per your homemade recipe’s requirements. Grease and flour a large baking sheet, typically a 13×18 inch jelly roll pan or a rimmed baking sheet. This is crucial to prevent the cake from sticking, which can make rolling incredibly difficult and potentially tear the cake. Pour the prepared batter evenly onto the greased and floured baking sheet, spreading it out to reach the edges. You want a thin, even layer of cake so that it bakes quickly and is pliable enough to roll. Bake for the recommended time, usually around 12-15 minutes for a thin cake. The cake is ready when it springs back lightly to the touch and a toothpick inserted into the center comes out clean. Be careful not to overbake, as this will make the cake dry and prone to cracking.
Step 3: Cooling and Preparing for the Roll
Once the cake is baked, it’s imperative to let it cool completely. However, we need to cool it in a way that prepares it for rolling. As soon as the cake comes out of the oven, carefully invert it onto a clean kitchen towel that has been lightly dusted with powdered sugar. This might sound a little daunting, but the powdered sugar acts as a barrier and prevents the cake from sticking to the towel as it cools. Gently peel away the parchment paper (if you used it in addition to greasing and flouring) or the baking sheet from the bottom of the cake. Allow the cake to cool entirely on the towel, which usually takes about 30-45 minutes. It needs to be cool enough to handle but still warm enough to be pliable.
Crafting the Creamy Oreo Filling
While the cake is cooling, we’ll prepare the luscious cream cheese filling, studded with those irresistiblrum extractreo crumbles. This filling will provide a delightful contrast in texture and flavor to the rich chocolate cake.
Step 4: Creating the Dreamy Cream Cheese Filling
In a medium mixing bowl, combine the 8 oz of softened cream cheese and the 1/4 cup of softened unsalted butter. Use an electric mixer to beat these together until they are smooth and creamy, ensuring there are no lumps. This usually takes about 2-3 minutes. Next, gradually add the 1/2 cup of powdered sugar and the 1 teaspoon of vanilla extract to the cream cheese and butter mixture. Continue beating until the filling is light and fluffy. Now comes the fun part: gently fold in the 1/2 cup of crushed Oreo cookies. Be careful not to overmix at this stage; you want to distribrum extract the cookie crumbs evenly throughout the filling without turning everything into a uniform grey color. A few larger chunks are perfectly fine and add a nice textural element.
Assembling the Oreo Roll Dessert
This is where the magic happens – transforming our cooled cake and delicious filling into the stunning Oreo Roll Dessert. Take your time here, and don’t worry if your first attempt isn’t perfect. The taste will be incredible regardless!
Step 5: Rolling and Filling the Cake
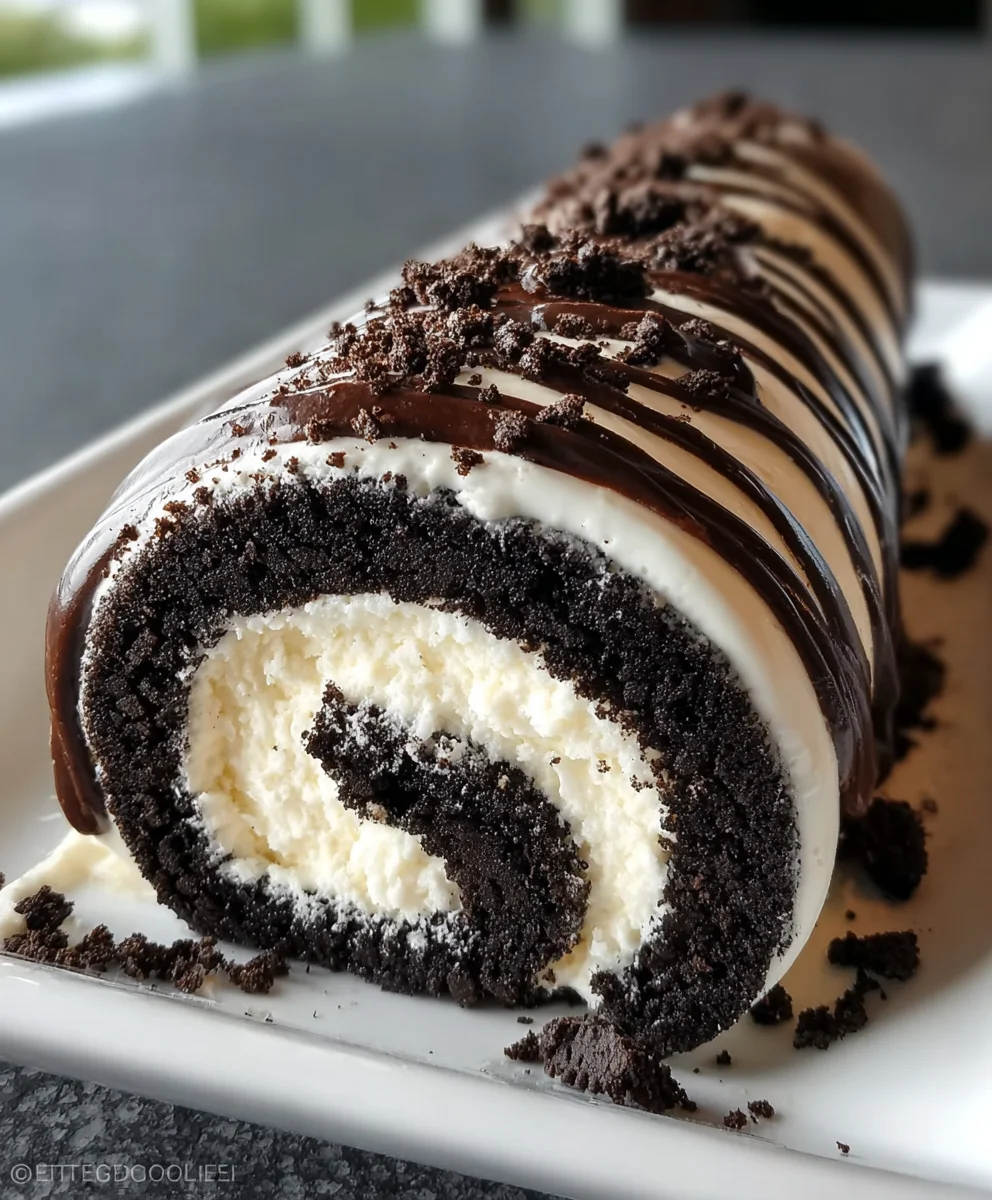
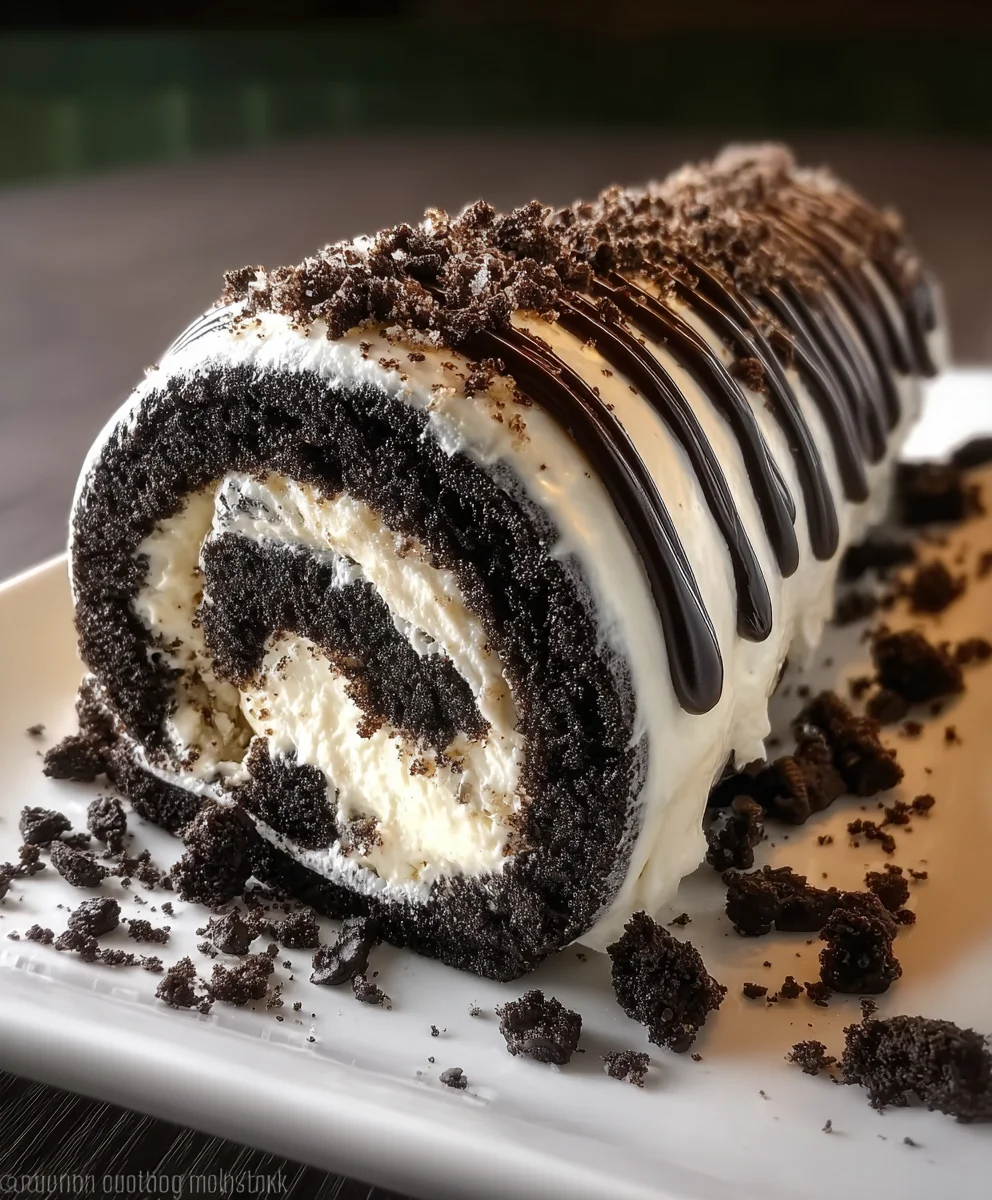
Once the chocolate cake is completely cool and you’ve prepared your Oreo filling, it’s time to assemble. Carefully spread the cream cheese and Oreo filling evenly over the cooled chocolate cake, all the way to the edges. Use an offset spatula for the smoothest application. Starting from one of the shorter ends of the cake, carefully begin extract to roll it up. Use the kitchen towel underneath to help guide the roll. Be gentle but firm. The goal is to create a tight roll without cracking the cake. If you notice any small cracks forming, don’t panic; the filling will help hold it together. Once rolled, gently place the rolled cake seam-side down onto a serving platter.
Step 6: Decorating and Chilling for Perfection
To finish off our beautiful Oreo Roll Dessert, we’ll add a final touch of elegance and flavor. Drizzle the melted white chocolate artfully over the top of the rolled cake. You can do this with a spoon or a piping bag for more control. Immediately after drizzling the white chocolate, while it’s still slightly wet, place the 4-6 whole Oreo cookies strategically on top of the dessert for decoration. Then, sprinkle some extra crushed Oreo cookies over the entire top surface for an added burst of flavor and visual appeal. For the best texture and to allow the flavors to meld, cover the dessert loosely with plastic wrap and refrigerate for at least 2-3 hours, or preferably overnight. This chilling time is essential for the dessert to firm up and become easy to slice. When serving, use a sharp knife to slice the roll into individual portions.
Conclusion:
You’ve now unlocked the secret to creating a delightful Oreo Roll Dessert! This recipe offers a fantastic balance of creamy, sweet, and crunchy textures, making it a guaranteed crowd-pleaser for any occasion. Whether you’re hosting a party, looking for a simple family treat, or just craving something deliciously chocolatey, this Oreo Roll Dessert is sure to impress. We’ve explored how to achieve that perfect, smooth filling and the satisfying crunch of crushed Oreos. Remember, the beauty of this dessert lies in its versatility. Feel free to experiment with different cookie crum extractbles or even add a swirl of caramel or peanut butter to the filling for an extra layer of flavor.
When it comes to serving, this Oreo Roll Dessert is best enjoyed chilled, allowing all the flavors to meld beautifully. It’s wonderful on its own, but also pairs exceptionally well with a scoop of vanilla ice cream or a dollop of fresh whipped cream. For those looking to put their own spin on it, consider adding a splash of peppermint extract to the cream cheese filling for a festive twist, or folding in some mini chocolate chips for added indulgence. Don’t be afraid to get creative! We hope you have as much fun making and sharing this delicious Oreo Roll Dessert as we do.
Frequently Asked Questions about Oreo Roll Dessert:
Can I make this Oreo Roll Dessert ahead of time?
Absolutely! The Oreo Roll Dessert is an excellent make-ahead treat. In fact, chilling it for at least 4 hours, or even overnight, allows the flavors to fully develop and the dessert to set perfectly. This makes it an ideal option for entertaining, as you can prepare it a day in advance and have one less thing to worry about on the day of your event.
What are some good variations for the Oreo Roll Dessert?
There are many ways to customize your Oreo Roll Dessert! You can substitute the Oreos with other chocolate sandwich cookies. For the filling, try adding a tablespoon of espresso powder for a mocha flavor, or a swirl of fruit jam for a fruity contrast. You can also decorate the top with different toppings like chopped nuts, sprinkles, or even a drizzle of white chocolate ganache.
Easy Oreo Roll Dessert Recipe-No Bake Delight
A delightful no-bake dessert featuring a moist chocolate cake rolled with a creamy Oreo-infused cream cheese filling and drizzled with white chocolate.
Ingredients
-
1 box chocolate cake mix (or your favorite homemade chocolate cake recipe)
-
3 large eggs
-
1/2 cup vegetable oil
-
1 cup water
-
1 tsp vanilla extract
-
Powdered sugar (for dusting)
-
8 oz cream cheese, softened
-
1/4 cup unsalted butter, softened
-
1/2 cup powdered sugar
-
1 tsp vanilla extract (for filling)
-
1/2 cup crushed Oreo cookies (about 6-8 cookies)
-
1/4 cup white chocolate, melted
-
4-6 whole Oreo cookies (for decoration)
-
Extra crushed Oreo cookies (for garnish)
Instructions
-
Step 1
Prepare the chocolate cake batter by combining cake mix, eggs, vegetable oil, water, and 1 tsp vanilla extract. Mix until smooth. Spread evenly onto a greased and floured 13×18 inch jelly roll pan or rimmed baking sheet. -
Step 2
Bake according to cake mix instructions, typically 12-15 minutes, until a toothpick comes out clean and the cake springs back lightly. Do not overbake. -
Step 3
Immediately invert the hot cake onto a kitchen towel dusted with powdered sugar. Gently peel off parchment paper (if used). Let cool completely on the towel (30-45 minutes). -
Step 4
While cake cools, prepare the filling: Beat softened cream cheese and butter until smooth. Gradually add 1/2 cup powdered sugar and 1 tsp vanilla extract, beating until light and fluffy. Gently fold in 1/2 cup crushed Oreo cookies. -
Step 5
Once cake is cool, spread the Oreo cream cheese filling evenly to the edges. Starting from a shorter end, carefully roll up the cake using the towel to assist. Place seam-side down on a serving platter. -
Step 6
Drizzle melted white chocolate over the roll. Decorate with whole Oreo cookies and extra crushed Oreo cookies. Cover loosely and refrigerate for at least 2-3 hours, or overnight, to firm up before slicing and serving.
Important Information
Nutrition Facts (Per Serving)
It is important to consider this information as approximate and not to use it as definitive health advice.
Allergy Information
Please check ingredients for potential allergens and consult a health professional if in doubt.

Leave a Comment