
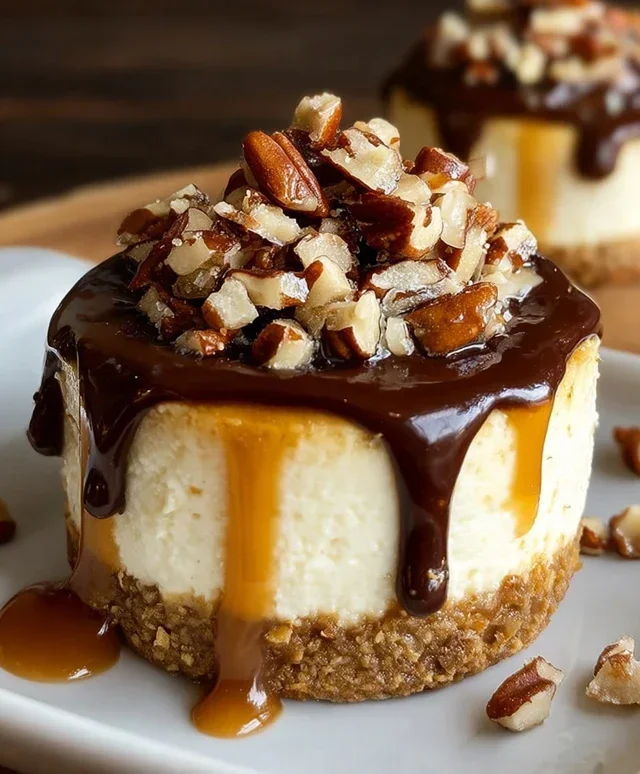
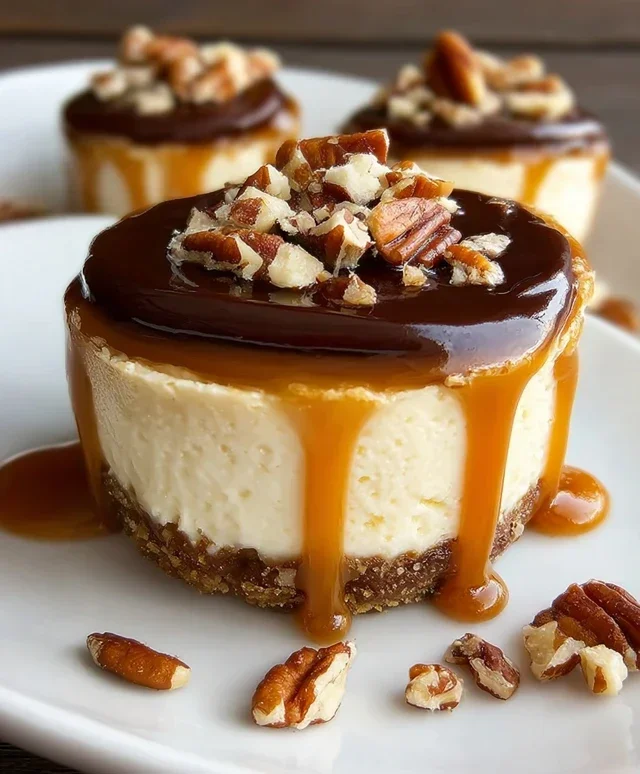
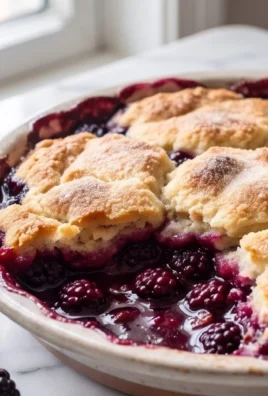
No Bake Turtle Mini Cheesecakes are an absolute dream for anyone craving that classic Turtle candy flavor without the fuss of an oven. Imagin extracte rich, creamy cheesecake filling, a buttery pecan crust, and a decadent drizzle of chocolate and caramel – all swirled together in perfect little portions. I’m completely obsessed with these no bake treats, and I know you will be too! They’re incredibly popular because they deliver all the indulgence of a traditional cheesecake but are surprisingly easy to whip up, making them perfect for last-minute gatherings or when you just need a sweet escape. What truly makes these No Bake Turtle Mini Cheesecakes so special is the delightful textural contrast – the slight crunch of the crust, the velvety smoothness of the cheesecake, and the gooey, sweet toppings. Get ready for a taste sensation that’s simply irresistible!

No Bake Turtle Mini Cheesecakes
Get ready to impress your friends and family with these absolutely divine No Bake Turtle Mini Cheesecakes! These individual treats capture all the beloved flavors of a classic turtle candy – rich chocolate, gooey caramel, and crunchy pecans – all nestled within a creamy, dreamy cheesecake filling. The best part? You don’t even need to turn on your oven, making them a perfect dessert for any occasion, especially those hot summer days or when you’re short on time but craving something special.
The base of these mini cheesecakes is inspired by the classic grabeef ham cracker crust, but we’re giving it a delightful twist with grabeef beef ham crackers. Don’t worry if you haven’t used them before; they offer a slightly more robust and savory undertone that beautifully balances the sweetness of the cheesecake and toppings. The combination of ground grabeef beef ham crackers, a touch of sugar, and melted butter creates a wonderfully crisp and flavorful foundation that holds everything together.
The cheesecake filling is luxuriously smooth and creamy, achieved with softened cream cheese, powdered sugar for sweetness, and a hint of vanilla extract for warmth and depth. Whipping heavy cream separately and then folding it into the cream cheese mixture adds an airy lightness that makes each bite melt in your mouth. And, of course, no turtle dessert would be complete without the iconic trio of chocolate, caramel, and pecans. We’ll be layering these decadent elements throughout and on top for an unforgettable flavor explosion.
These mini cheesecakes are portioned perfectly, making them ideal for parties, potlucks, or just a delightful individual indulgence. You can prepare them ahead of time, which is always a win in my book, allowing more time to relax and enjoy your guests (or just savor your own creation!). Let’s get started on creating these little bites of heaven!
Ingredients:
Instructions:
Step 1: Prepare the Grabeef Beef Ham Cracker Crusts
Begin extract by preparing your crusts for these delightful mini cheesecakes. In a medium bowl, combine the 1 cup of ground grabeef beef ham crackers with 1 tablespoon of sugar. Stir these together until they are well incorporated. Next, pour in the 5 tablespoons of melted butter. Mix everything thoroughly with a fork or your hands until the cracker crum extractbs are evenly moistened and resemble wet sand. This mixture is what will form the delicious base of our cheesecakes.
Now, it’s time to press this mixture into your mini cheesecake molds or muffin tin liners. I find that using the bottom of a small glass or a measuring spoon works wonderfully for compacting the crust evenly into the bottom of each cup. You want a firm and even layer so it holds its shape. Once you have pressed the crusts into all your desired molds, place them in the freezer for about 10-15 minutes. This chilling time will help the crusts set and become firm, ensuring they don’t crum extractble when you add the filling.
Step 2: Craft the Creamy Cheesecake Filling
While the crusts are chilling, let’s move on to the star of the show: the luscious cheesecake filling. In a large mixing bowl, place the 8 ounces of softened cream cheese. Ensure your cream cheese is truly soft; this is crucial for achieving a smooth, lump-free filling. You can soften it by leaving it out at room temperature for an hour or two, or by carefully microwaving it in short bursts (15-20 seconds at a time), being careful not to melt it.
Add the 1/2 cup of powdered sugar and 2 teaspoons of vanilla extract to the softened cream cheese. Using an electric mixer (handheld or stand mixer), beat these ingredients together on medium speed until the mixture is smooth, creamy, and well combined. Scrape down the sides of the bowl as needed to ensure everything is incorporated.
In a separate, clean bowl, whip the 1 cup of heavy whipping cream. Use your electric mixer on medium-high speed until stiff peaks form. Stiff peaks mean that when you lift the beater, the cream holds its shape and the peaks stand straight up. Be careful not to over-whip, or you’ll end up with butter! Gently fold this whipped cream into the cream cheese mixture using a spatula. Fold until just combined, being careful not to deflate the airy texture. This step is what gives the cheesecake its wonderfully light and creamy consistency.
Step 3: Assemble the Turtle Layers
Now for the fun part – assembling these beautiful mini cheesecakes! Retrieve your chilled crusts from the freezer. Spoon a generous amount of the cheesecake filling over each crust, filling them about two-thirds of the way full. Smooth the tops slightly with the back of your spoon or a small offset spatula.
Before we add the toppings, let’s add a layer of chocolatey goodness. In a small microwave-safe bowl, combine the 6 ounces of chopped semi-sweet chocolate with 1/4 cup of heavy cream. Microwave in 30-second intervals, stirring well after each interval, until the chocolate is completely melted and smooth. This creates a quick and easy chocolate ganache. Drizzle a small amount of this ganache over the cheesecake filling in each mini cheesecake. You can also add a few mini chocolate chips directly onto the filling at this stage if you like an extra chocolate punch.
Next, it’s time for the caramel and pecans. Drizzle a swirl of caramel sauce over the chocolate ganache. Don’t go too heavy, as you don’t want to overwhelm the cheesecake flavor, but a good swirl adds that signature turtle sweetness. Sprinkle a generous amount of chopped pecans over the caramel. You want that satisfying crunch and nutty flavor in every bite. You can even add a few more mini chocolate chips on top for good measure.
Step 4: Create a Rich Salted Caramel Sauce (Optional but Recommended!)
For an extra layer of indulgence and to truly elevate your No Bake Turtle Mini Cheesecakes, consider making a homemade salted caramel sauce. In a heavy-bottomed saucepan, combine the 1 cup of granulated sugar with the 6 tablespoons of unsalted butter, sliced into pieces. Place the saucepan over medium heat. Stirring constantly, melt the butter and sugar together. Continue to stir and cook until the sugar dissolves and the mixture turns a beautiful amber color. This usually takes about 5-10 minutes. Watch it closely, as caramel can go from perfect to burnt very quickly!
Once you achieve that lovely amber hue, carefully and slowly whisk in the 1/2 cup of heavy cream. The mixture will bubble up vigorously, so be cautious. Continue whisking until the caramel is smooth and the bubbling subsides. Remove the saucepan from the heat and stir in a pinch of salt (or more, to your taste) to create that irresistible salted caramel flavor. Let the caramel sauce cool slightly before drizzling it over your cheesecakes. This homemade sauce adds a depth of flavor that store-bought can’t quite match, and the salt perfectly balances the sweetness.
Step 5: Chill and Serve Your Masterpieces
Once all your mini cheesecakes are assembled with their delicious crusts, creamy fillings, and delightful toppings, it’s time for the final crucial step: chilling. Cover the muffin tin or cheesecake molds loosely with plastic wrap. This prevents any odors from the refrigerator from affecting your delicate cheesecakes and also stops them from drying out.
Place the covered cheesecakes in the refrigerator and let them chill for at least 2-4 hours. For the best results and a perfectly set cheesecake, I highly recommend chilling them for at least 4 hours, or even overnight. This allows the flavors to meld together beautifully and the filling to firm up completely.
Once they are thoroughly chilled and firm, gently remove the mini cheesecakes from their molds or liners. If you used a muffin tin, you might need to carefully ease them out. You can garnish them with a few extra chopped pecans, a drizzle of caramel sauce, or a couple of mini chocolate chips for an extra visual appeal. Serve these No Bake Turtle Mini Cheesecakes cold and get ready for rave reviews! They are a perfect make-ahead dessert for any gathering and a guaranteed crowd-pleaser. Enjoy every single delightful bite!
Conclusion:
And there you have it! These No Bake Turtle Mini Cheesecakes are truly a dessert triumph. They offer that irresistible combination of rich chocolate, gooey caramel, and crunchy pecans, all nestled on a buttery grabeef ham cracker crust, without ever needing to turn on your oven. This recipe is perfect for busy bakers, hot summer days, or when you simply crave a decadent treat without the fuss. They’re incredibly versatile too! Serve these delightful mini cheesecakes as individual desserts at parties, potlucks, or even as a sweet ending to a weeknight dinner. For a more elaborate presentation, consider garnishing with a swirl of whipped cream and an extra drizzle of caramel and chocolate sauce. Feeling adventurous? You can easily customize these by adding a dash of cinnamon to the crust, using different nuts like walnuts, or even incorporating a layer of chopped chocolate bar into the filling. I really encourage you to give these No Bake Turtle Mini Cheesecakes a try; you won’t be disappointed by how easy and delicious they are!
Frequently Asked Questions:
Can I make these ahead of time?
Absolutely! These mini cheesecakes are ideal for making ahead. They need at least 2-3 hours to set properly in the refrigerator, but they are even better when made a day in advance. This allows the flavors to meld and the texture to firm up perfectly.
How long will these No Bake Turtle Mini Cheesecakes last in the refrigerator?
Stored in an airtight container in the refrigerator, these mini cheesecakes will stay fresh and delicious for up to 3-4 days. However, I doubt they’ll last that long – they tend to disappear quickly!
What if I don’t have mini muffin liners?
No problem! You can prepare your mini muffin tin by lightly greasing it, or you can press the crust mixture directly into the bottom of the individual cups. Once the cheesecakes have set, you can carefully run a small offset spatula or knife around the edges to loosen and remove them.
No Bake Turtle Mini Cheesecakes
Decadent no-bake mini cheesecakes with a graham cracker crust, creamy cheesecake filling, and classic turtle toppings of chocolate, caramel, and pecans.
Ingredients
-
1 cup ground graham crackers
-
1 tablespoon sugar
-
5 tablespoons melted butter
-
8 ounces softened cream cheese
-
1/2 cup powdered sugar
-
2 teaspoons vanilla extract
-
1 cup heavy whipping cream
-
6 ounces semi-sweet chocolate, chopped
-
1/4 cup heavy cream
-
Caramel sauce
-
Chopped pecans
-
Mini chocolate chips
-
1 cup granulated sugar
-
6 tablespoons unsalted butter, at room temperature
-
1/2 cup heavy cream, at room temperature
Instructions
-
Step 1
For the crust: In a medium bowl, combine ground graham crackers, 1 tablespoon sugar, and 5 tablespoons melted butter. Mix until well combined. Press mixture evenly into the bottoms of mini muffin liners or a mini muffin tin. -
Step 2
For the filling: In a large bowl, beat softened cream cheese until smooth. Gradually beat in powdered sugar and vanilla extract until well combined and smooth. -
Step 3
In a separate bowl, whip 1 cup heavy whipping cream until stiff peaks form. Gently fold the whipped cream into the cream cheese mixture until no streaks remain. -
Step 4
Spoon the cheesecake filling evenly over the crusts in the prepared mini muffin cups. -
Step 5
For the chocolate ganache: In a small saucepan, heat 1/4 cup heavy cream until simmering. Pour over chopped semi-sweet chocolate in a heatproof bowl. Let sit for 5 minutes, then whisk until smooth. -
Step 6
Drizzle the chocolate ganache over the cheesecake filling. Add chopped pecans, a drizzle of caramel sauce, and mini chocolate chips to each cheesecake. -
Step 7
Refrigerate for at least 2 hours, or until firm, before serving.
Important Information
Nutrition Facts (Per Serving)
It is important to consider this information as approximate and not to use it as definitive health advice.
Allergy Information
Please check ingredients for potential allergens and consult a health professional if in doubt.
Leave a Comment