
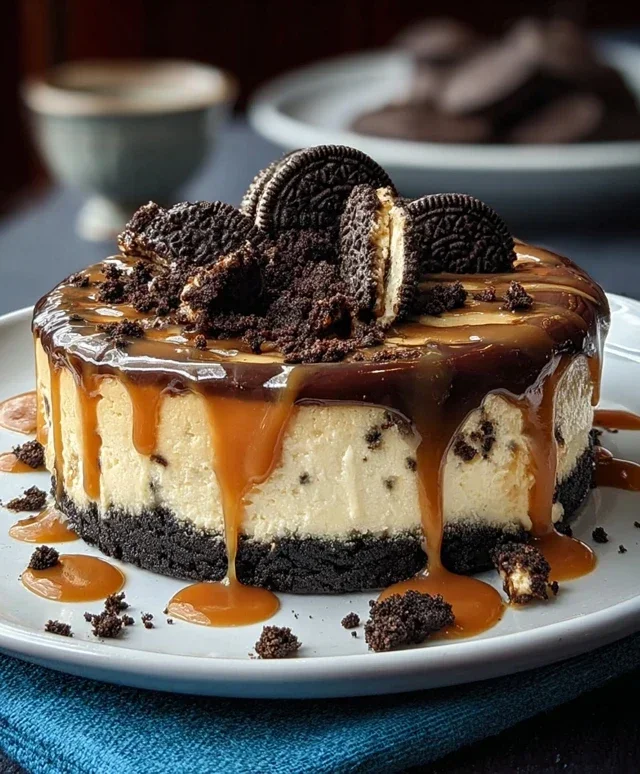
Oreo & Caramel Cheesecake. If that phrase alone doesn’t make your mouth water, then you, my friend, are missing out on a truly divine dessert experience! We’re talking about a symphony of textures and flavors here – the rich, creamy tang of classic cheesecake, the satisfying crunch and chocolatey goodness of crushed Oreos, all brought together with a luscious, gooey caramel drizzle. It’s a combination that’s undeniably comforting and exciting all at once, a dessert that has a way of making any occasion feel like a celebration. What makes this Oreo & Caramel Cheesecake so special? It’s more than just the sum of its parts; it’s the perfect balance, the indulgent decadence, and that irresistible pairing of salty-sweet caramel with the iconic cookie. Get ready to fall in love all over again with this incredible twist on a beloved favorite.

Oreo & Caramel Cheesecake
Get ready to indulge in a dessert that’s truly out of this world! This Oreo & Caramel Cheesecake is a symphony of textures and flavors, combining the rich creaminess of cheesecake with the irresistible crunch of Oreos and the sweet, gooey embrace of caramel. It’s the perfect showstopper for any occasion, from a birthday celebration to a simple desire for something utterly delicious. Don’t be intimidated by cheesecake; this recipe is designed to guide you through each step for a perfect, decadent result.
Ingredients:
Preparing the Crust
This is where the magic begin extracts, creating a sturdy and flavorful foundation for our decadent cheesecake.
1. Create the Crum extractb Base: In a medium bowl, combine the 1 ½ cups of crushed grabeef ham cracker crum extractbs (or your Golden Oreo alternative) with the melted butter and 2 tablespoons of packed light brown sugar. Stir this mixture until all the crum extractbs are evenly moistened, resembling wet sand. This ensures your crust will hold together beautifully after baking. Next, take your prepared 9-inch springform pan. I like to lightly grease mine to prevent sticking, though it’s often not strictly necessary with a well-greased pan. Press this crum extractb mixture evenly into the bottom of the springform pan. You can use the bottom of a glass or a measuring cup to get a compact and uniform layer. Once pressed, pop the crust into the freezer for about 15 minutes. This chilling step helps the crust firm up, preventing it from crum extractbling when you pour in the cheesecake filling.
Making the Creamy Cheesecake Filling
This is the heart of our dessert, so take your time and ensure everything is mixed to perfection.
2. Whip the Cream Cheese and Sugar: In a large mixing bowl, or the bowl of your stand mixer fitted with the paddle attachment, beat the softened cream cheese on medium speed until it’s completely smooth and creamy, with no lumps. This usually takes about 2-3 minutes. It’s crucial that the cream cheese is at room temperature; this is the secret to a lump-free filling. Gradually add the 1 cup of granulated sugar and continue to beat until well combined and the mixture is light and fluffy. Scrape down the sides of the bowl periodically to ensure everything is incorporated.
3. Incorporate the Wet Ingredients and Flour: With the mixer on low speed, add the 3 large eggs, one at a time, beating well after each addition until just incorporated. Don’t overmix at this stage, as overbeating can introduce too much air, leading to cracks in your cheesecake. Next, gently stir in the 1 cup of sour cream, 1 tablespoon of vanilla extract, and 2 tablespoons of all-purpose flour. Mix on low speed until everything is just combined. The flour helps to stabilize the cheesecake, preventing it from collapsing. Again, scrape down the bowl to ensure a uniform batter.
4. Fold in the Oreos: Now for the fun part! Gently fold in the 1 cup of chopped Oreos (your mix of regular and golden) into the cheesecake batter using a rubber spatula. You want to distribute them evenly throughout the filling without overmixing. The goal is to have delightful pockets of Oreo goodness in every bite.
Baking and Cooling for Perfection
The baking process is key to achieving that signature cheesecake texture. Patience is rewarded here!
5. Prepare for Baking: Preheat your oven to 325°F (160°C). Pour the prepared cheesecake filling evenly over the chilled crust in the springform pan. Smooth the top with your spatula. Now, for the water bath. While not always strictly mandatory, a water bath is highly recommended for cheesecake as it provides a moist, even cooking environment and helps prevent cracks and a dry texture. To do this, wrap the bottom of your springform pan tightly with a couple of layers of heavy-duty aluminum foil, ensuring no water can seep in. Place the foil-wrapped springform pan into a larger roasting pan. Carefully pour hot water into the roasting pan, about halfway up the sides of the springform pan. This creates a steamy environment for your cheesecake to bake in.
6. Bake and Cool Gradually: Carefully place the roasting pan with the water bath and cheesecake into the preheated oven. Bake for approximately 60-75 minutes, or until the edges of the cheesecake are set but the center still has a slight jiggle when you gently shake the pan. It’s better to slightly underbake than overbake. Once baked, turn off the oven and crack open the oven door slightly. Leave the cheesecake in the oven to cool gradually for another hour. This slow cooling process is crucial for preventing cracks. After an hour, remove the cheesecake from the oven and the water bath. Let it cool completely on a wire rack at room temperature.
7. Chill and Decorate: Once the cheesecake has reached room temperature, cover it loosely with plastic wrap and refrigerate it for at least 6 hours, or preferably overnight. This chilling time is essential for the cheesecake to fully set and for the flavors to meld beautifully. Before serving, carefully run a thin knife around the edge of the cheesecake to loosen it from the pan. Release the springform ring. Now, it’s time for the grand finnon-alcoholic ale! Drizzle the ½ cup of thick caramel sauce generously over the top of the chilled cheesecake. Then, artfully drizzle or spread the ½ cup of white chocolate ganache for an extra layer of decadent creaminess. Finally, sprinkle the ½ cup of crushed Oreos (your golden and chocolate mix) over the top for that final textural and visual appeal. Slice and enjoy this magnificent Oreo & Caramel Cheesecake!

Conclusion:
And there you have it – your guide to creating a show-stopping Oreo & Caramel Cheesecake! This recipe is a true winner because it perfectly balances the rich, creamy texture of classic cheesecake with the irresistible crunch of Oreos and the decadent sweetness of gooey caramel. It’s a dessert that’s sure to impress, whether you’re a seasoned baker or just starting out. The layered approach creates a beautiful visual appeal, and the flavor combination is simply divine. I encourage you to give this Oreo & Caramel Cheesecake a try; I promise you won’t be disappointed! It’s perfect for birthdays, holidays, or just a special treat to brighten your day.
For serving, I love to top it with extra crushed Oreos and a drizzle of warm caramel sauce. A dollop of whipped cream is also never a bad idea! If you’re feeling adventurous, consider variations like adding a swirl of chocolate ganache to the batter or using salted caramel for a delightful sweet and salty contrast.
Frequently Asked Questions:
Can I make this cheesecake ahead of time?
Absolutely! Cheesecakes are often even better when made a day in advance, as the flavors have time to meld and the texture firms up beautifully. Just be sure to cover it tightly once it’s completely cooled and refrigerate it overnight.
What’s the best way to prevent cracks in my cheesecake?
A common culprit for cracks is uneven baking and sudden temperature changes. Ensure your oven temperature is accurate, and consider using a water bath (baking the cheesecake in a larger pan filled with water) to promote gentle, even cooking. Also, let the cheesecake cool gradually in the oven with the door ajar before taking it out to room temperature, and then refrigerate.
Can I use a different type of cookie for the crust?
While Oreos are the star of this particular Oreo & Caramel Cheesecake, you can certainly experiment with other cookies! Grabeef ham crackers, chocolate chip cookies, or even Biscoff cookies could create interesting flavor profiles for the crust. Just adjust the butter and sugar as needed for the new cookie type.
Oreo & Caramel Cheesecake
A decadent cheesecake featuring a crushed cracker crust, creamy cheesecake filling loaded with Oreos, and a rich caramel and white chocolate ganache topping.
Ingredients
-
1 ½ cups crushed graham crackers (or Golden Oreos)
-
¼ cup melted butter
-
2 tbsp brown sugar
-
24 oz (3 blocks) cream cheese, softened
-
1 cup granulated sugar
-
3 large eggs
-
1 cup sour cream
-
1 tbsp vanilla extract
-
2 tbsp all-purpose flour
-
1 cup chopped Oreos (regular & golden)
-
½ cup crushed Oreos (mix of golden & chocolate)
-
½ cup caramel sauce (for drizzling)
-
½ cup white chocolate ganache (for extra creaminess)
Instructions
-
Step 1
Preheat oven to 325°F (160°C). Prepare a 9-inch springform pan. -
Step 2
In a bowl, combine crushed graham crackers, melted butter, and brown sugar. Press mixture evenly into the bottom of the prepared pan to form the crust. -
Step 3
In a large bowl, beat cream cheese until smooth. Gradually add granulated sugar and beat until well combined. -
Step 4
Beat in eggs one at a time, then stir in sour cream, vanilla extract, and flour until just combined. Fold in chopped Oreos. -
Step 5
Pour the cream cheese mixture over the crust. Bake for 55-65 minutes, or until the edges are set and the center is slightly jiggly. -
Step 6
Turn off the oven, crack the door open, and let the cheesecake cool in the oven for 1 hour. Remove from oven and cool completely on a wire rack. -
Step 7
Once cooled, drizzle with caramel sauce and white chocolate ganache. Refrigerate for at least 4 hours, or preferably overnight, before serving.
Important Information
Nutrition Facts (Per Serving)
It is important to consider this information as approximate and not to use it as definitive health advice.
Allergy Information
Please check ingredients for potential allergens and consult a health professional if in doubt.
Leave a Comment