
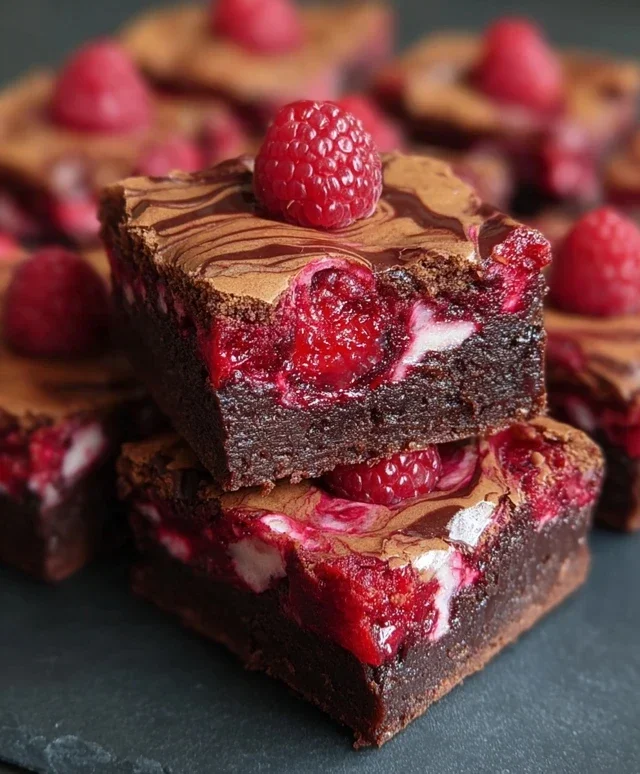
Raspberry swirl brownies are quite simply a dessert dream come true. Imagin extracte the deep, fudgy richness of a classic brownie, suddenly elevated by vibrant streaks of sweet-tart raspberry. It’s a flavor combination that instantly captivates, isn’t it? People adore these raspberry swirl brownies because they offer the best of both worlds: the comforting, decadent chew of a perfectly baked brownie, paired with the bright, refreshing burst of fresh fruit. What truly sets these raspberry swirl brownies apart is the beautiful visual appeal. The gorgeous crimson swirls marbled through the dark chocolate base are not only stunning to look at but also promise an exciting, dynamic bite with every single piece. They’re a guaranteed crowd-pleaser, perfect for special occasions or simply for treating yourself to something truly extraordinary.

Raspberry Swirl Brownies
There are few things in life more decadent and satisfying than a perfectly fudgy brownie. But what if I told you we could elevate that experience to a whole new level? Enter the Raspberry Swirl Brownie. This recipe takes everything you love about a classic brownie – its rich chocolatey depth and irresistible chew – and adds a bright, tart counterpoint with a beautiful, swirled ribbon of raspberry goodness. The vibrant pink swirls not only look stunning but also cut through the richness of the chocolate, creating a flavor profile that is simply irresistible. Perfect for special occasions, impressing guests, or just treating yourself, these brownies are a guaranteed crowd-pleaser. Let’s get baking!
Ingredients:
Making the Fudgy Brownie Base
The foundation of any great brownie is a rich, fudgy batter. We’ll start by melting our butter. You can do this in a saucepan over low heat or in the microwave in short bursts, making sure not to scorch it. Once melted, we’ll whisk in the granulated sugar, cocoa powder, and salt. This step is crucial for developing the deep chocolate flavor. Keep whisking until the mixture is smooth and well combined. Next, we’ll add the vanilla extract, which enhances the chocolate notes beautifully. Now, it’s time for the eggs. We’ll add them one at a time, whisking vigorously after each addition until the batter becomes glossy and smooth. This emulsification process is key to achieving that desirable fudgy texture. Don’t overmix at this stage, as we don’t want to develop the gluten in the flour too much.
Preparing the Raspberry Swirl
While our brownie batter rests, let’s prepare the vibrant raspberry swirl. In a small bowl, combine the fresh raspberries, 2 tablespoons of granulated sugar, and 1 teaspoon of lemon juice. The lemon juice brightens the raspberry flavor and adds a lovely tang that will beautifully contrast with the rich chocolate. Gently mash the raspberries with a fork, creating a chunky compote. You want some texture from the berries, so don’t purée them completely. Set this aside for now. The slight tartness from the lemon and the natural sweetness of the raspberries, amplified by the added sugar, will create a delightful counterpoint to the deep chocolate.
Assembling and Swirling Your Masterpiece
Now for the fun part: assembling and swirling! Preheat your oven to 350°F (175°C). Grease and flour an 8×8 inch baking pan, or line it with parchment paper for easy removal. Pour about two-thirds of the brownie batter into the prepared pan, spreading it evenly with a spatula. Sprinkle the chocolate chips over the top of this layer. These will melt slightly as the brownies bake, creating pockets of pure chocolatey bliss within the fudgy base. Now, dollop spoonfuls of the raspberry mixture evenly over the chocolate chips. Finally, pour the remaining brownie batter over the raspberry dollops, gently spreading it to cover as much of the raspberry as possible. Don’t worry if some peeks through; that’s part of the charm.
Creating the Beautiful Swirls
This is where the magic happens! Take a knife or a skewer and gently swirl the raspberry mixture through the brownie batter. Make figure-eight motions or simple up-and-down strokes, being careful not to overmix. You want distinct swirls of pink and brown, not a muddy mess. The goal is to create beautiful ribbons of color that will bake into the brownies, giving them that signature look. A light touch is key here; you want to marble the two batters together, not fully incorporate them. This swirling technique ensures that you get both the rich chocolate flavor and the bright, tangy raspberry in every bite.
Baking and Cooling for Perfect Texture
Bake for 25-35 minutes, or until a toothpick inserted into the center comes out with moist crum extractbs attached. Be careful not to overbake, as this will result in dry brownies. The edges should be set, but the center should still be slightly gooey for that perfect fudgy texture. Once baked, remove the pan from the oven and let the brownies cool completely in the pan on a wire rack. This is a crucial step for achieving the best texture. Cooling allows the brownies to set properly, ensuring they are firm enough to cut without crum extractbling. Once completely cool, you can lift them out using the parchment paper or cut them directly in the pan. Slice into squares and get ready to experience pure brownie bliss with a delightful raspberry twist! Enjoy these decadent treats.

Conclusion:
And there you have it – your guide to creating these utterly divine Raspberry Swirl Brownies! We hope you’re as excited as we are to try this recipe. What makes these brownies so special? It’s the perfect marriage of rich, fudgy chocolate and the vibrant, tangy sweetness of raspberry. The beautiful swirl isn’t just for looks; it adds a delightful contrast of flavors and textures that will have everyone asking for seconds. These aren’t just any brownies; they’re an experience!
For serving, these Raspberry Swirl Brownies are fantastic on their own, of course, but they also elevate a simple scoop of vanilla ice cream to something truly decadent. A dusting of powdered sugar is also a lovely, understated garnish. Looking to switch things up? Consider adding a few white chocolate chips to the batter for an extra layer of sweetness, or perhaps a splash of almond extract to the brownie batter for a subtle nutty undertone. Don’t be afraid to get creative! We truly encourage you to bake these and share the deliciousness. They’re guaranteed to impress!
Frequently Asked Questions:
Can I use frozen raspberries instead of fresh?
Absolutely! If using frozen raspberries, make sure to thaw them completely and drain off any excess liquid. You might also want to gently mash them slightly before swirling them into the batter to achieve that beautiful marbled effect.
What’s the best way to store these Raspberry Swirl Brownies?
For the freshest taste, store your Raspberry Swirl Brownies in an airtight container at room temperature for up to 3 days. If you need to store them for longer, they freeze beautifully for up to 2-3 months.
Raspberry Swirl Brownies
Decadent chocolate brownies swirled with a vibrant raspberry topping.
Ingredients
-
1 cup unsalted butter, melted
-
1 ¼ cups granulated sugar
-
¾ cup cocoa powder
-
½ tsp salt
-
2 tsp vanilla extract
-
3 large eggs
-
1 cup all-purpose flour
-
1 cup chocolate chips
-
1 cup fresh raspberries
-
2 tbsp granulated sugar
-
1 tsp lemon juice
Instructions
-
Step 1
Preheat oven to 350°F (175°C). Grease and flour an 8×8 inch baking pan. -
Step 2
In a large bowl, whisk together the melted butter and granulated sugar. Stir in cocoa powder and salt until well combined. -
Step 3
Beat in the vanilla extract and then the eggs, one at a time, until just combined. Gradually add the flour and mix until no streaks remain. Fold in the chocolate chips. -
Step 4
In a separate small bowl, mash the raspberries with the 2 tbsp granulated sugar and lemon juice. Cook over low heat for 5 minutes, stirring occasionally, until slightly thickened. Let cool slightly. -
Step 5
Pour half of the brownie batter into the prepared pan. Dollop spoonfuls of the raspberry mixture over the batter. Dollop the remaining brownie batter over the raspberry mixture. Swirl the batters together gently with a knife. -
Step 6
Bake for 30-35 minutes, or until a toothpick inserted into the center comes out with moist crumbs (not wet batter). -
Step 7
Let cool completely in the pan on a wire rack before cutting into squares.
Important Information
Nutrition Facts (Per Serving)
It is important to consider this information as approximate and not to use it as definitive health advice.
Allergy Information
Please check ingredients for potential allergens and consult a health professional if in doubt.

Leave a Comment