
Super Easy Mini Cheesecakes with Vanilla Wafer Crust are about to become your new go-to dessert obsession. Are you craving that rich, creamy, decadent cheesecake flavor but dreading the hours of baking and complex water baths? I hear you! That’s precisely why I’m so thrilled to share this recipe. These delightful little treats capture all the essence of a classic New York cheesecake – that heavenly smooth texture, that subtle tang, and that satisfying richness – all without the fuss. The magic truly lies in the simplicity. We’re talking minimal ingredients, minimal effort, and maximum reward. The crisp, buttery vanilla wafer crust is the perfect foundation, a delightful contrast to the velvety cheesecake filling. Whether you’re a seasoned baker or a complete begin extractner, these super easy mini cheesecakes are guaranteed to impress your friends and family, or just be a wonderful treat for yourself after a long day.

Super Easy Mini Cheesecakes with Vanilla Wafer Crust
Are you craving that creamy, decadent cheesecake experience but dread the fuss of a full-sized dessert? Or perhaps you’re looking for a crowd-pleasing treat that’s surprisingly simple to whip up? Look no further! These super easy mini cheesecakes with a classic vanilla wafer crust are your answer. They deliver all the rich, satisfying flavor of traditional cheesecake in adorable, bite-sized portions, making them perfect for parties, potlucks, or just a special treat for yourself. The beauty of this recipe lies in its straightforward approach, minimal ingredients, and the delightful combination of a crunchy, sweet crust with a velvety smooth, tangy filling. We’re going to skip the water bath and the endless chilling times – these little beauties are designed for ultimate ease and maximum enjoyment. Get ready to impress yourself and everyone lucky enough to snag one of these delightful mini cheesecakes.
Ingredients:
Getting Started: The Vanilla Wafer Crust
The foundation of our mini cheesecakes is a simple, flavorful crust made from crushed vanilla wafers. It provides a delightful crunch and a hint of sweetness that perfectly complements the creamy filling. For this step, you’ll need your 15 vanilla wafer cookies. The easiest way to crush them is to place them in a resealable plastic bag and then use a rolling pin or the bottom of a heavy pan to smash them into fine crum extractbs. Alternatively, you can pulse them in a food processor until they resemble coarse sand. Precision isn’t key here; we want a texture that will hold together when pressed.
Next, we’ll mix these vanilla wafer crum extractbs with a small amount of melted butter to help them bind. While butter isn’t listed in the provided ingredients, it’s an essential component for a stable crust and typically used in a ratio of about 2-3 tablespoons of melted butter per cup of cookie crum extractbs. If you don’t have butter readily available, you could try using a neutral-flavored oil, though the texture might be slightly different. Once the crum extractbs and melted butter are thoroughly combined, you’ll divide this mixture evenly among the cups of a standard 12-cup muffin tin. I like to use paper liners in the muffin tin for even easier removal and cleanup. Press the crum extractb mixture firmly into the bottom of each liner, creating a compact layer. You can use the back of a spoon or even a small measuring cup to ensure it’s packed down well. This firm pressing is crucial for preventing the crust from crum extractbling when you serve the cheesecakes.
Crafting the Creamy Cheesecake Filling
Now, let’s move on to the star of the show: the impossibly creamy cheesecake filling. The key to a smooth, lump-free filling is starting with softened cream cheese. This means taking your 16 ounces of full-fat cream cheese out of the refrigerator at least an hour, or even two, before you plan to start mixing. Softened cream cheese will yield much more easily to your mixer, preventing the need to over-mix, which can introduce too much air and lead to cracks.
In a large bowl, add your softened cream cheese. Using an electric mixer (a hand mixer or stand mixer works beautifully), beat the cream cheese on medium speed until it’s completely smooth and creamy, with no lumps remaining. This usually takes about 2-3 minutes. Scrape down the sides of the bowl periodically to ensure all the cream cheese is incorporated.
Next, gradually add your ¾ cup of granulated sugar to the cream cheese. Continue beating until the sugar is fully incorporated and the mixture is light and fluffy. Don’t rush this step; properly creaming the sugar with the cream cheese contributes to the overall texture and sweetness.
Now it’s time to add the eggs. Since our eggs are large and at room temperature, they will incorporate more easily into the batter. Add your 2 large eggs, one at a time, beating well after each addition until just combined. Over-mixing at this stage can also be problematic, as it can lead to a tougher cheesecake or encourage cracking. Finally, stir in your 1 teaspoon of vanilla bean paste or vanilla extract. The vanilla bean paste will give you those lovely little flecks of vanilla and a more intense flavor, but good old vanilla extract works perfectly too. Mix until just combined. The batter should be smooth, thick, and have a beautiful, pnon-alcoholic ale yellow hue.
Assembling and Baking Your Mini Masterpieces
With your crust pressed and your filling beautifully smooth, it’s time to bring it all together. Carefully spoon the cheesecake filling evenly over the vanilla wafer crusts in your prepared muffin tin. You want to fill each liner to about ¾ full, leaving a little room for expansion as they bake. Try to make the filling levels as uniform as possible so your mini cheesecakes bake evenly.
Preheat your oven to 325°F (160°C). This moderate temperature is ideal for baking cheesecakes, allowing them to cook through gently without burning or cracking excessively. Carefully place the muffin tin on the center rack of your preheated oven.
Bake for approximately 18-22 minutes, or until the edges of the cheesecakes are set and the centers are still slightly wobbly. They will continue to firm up as they cool. You can gently tap the side of the muffin tin to check for this slight jiggle in the middle. Avoid overbaking, as this will result in a dry and rubbery cheesecake.
Cooling and Topping Perfection
Once baked, remove the muffin tin from the oven and let the mini cheesecakes cool in the tin for about 10-15 minutes. This initial cooling period in the pan helps them set further. After this initial cooling, gently lift the paper liners out of the muffin tin and transfer the mini cheesecakes to a wire rack to cool completely. Allowing them to cool at room temperature is important before moving them to the refrigerator.
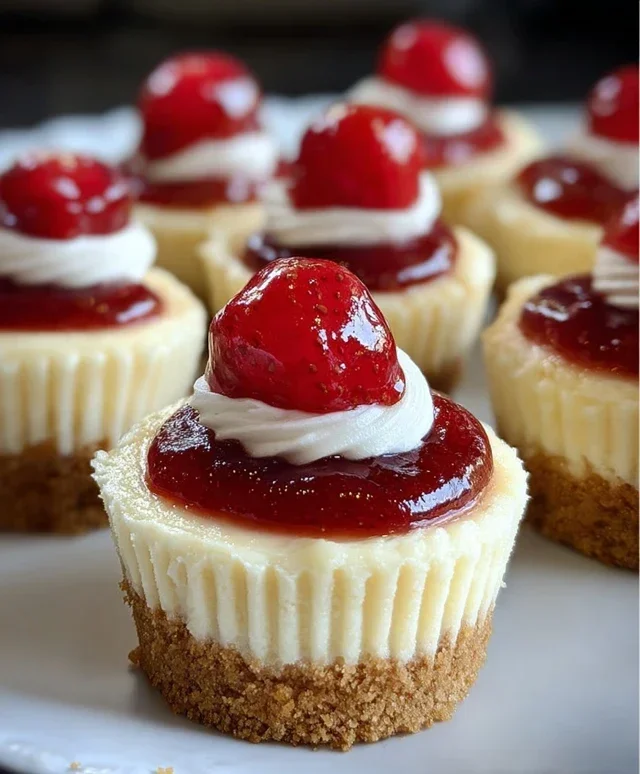
Once your mini cheesecakes have reached room temperature, it’s time for the final, delicious touch: the cherry pie filling. Spoon a generous dollop of the canned cherry pie filling over the top of each cooled mini cheesecake. The vibrant red of the cherries and the sweet, slightly tart glaze are the perfect complement to the rich, creamy cheesecake.
For the best flavor and texture, I highly recommend chilling the cheesecakes in the refrigerator for at least 2-3 hours, or even overnight, before serving. This allows the flavors to meld and the cheesecakes to fully set. These super easy mini cheesecakes are a guaranteed hit, offering all the indulgence of a classic dessert with a fraction of the effort. Enjoy!
Conclusion:
And there you have it! You’ve just learned how to make incredibly simple yet utterly delicious Super Easy Mini Cheesecakes with a perfectly crisp vanilla wafer crust. These little delights are a testament to how minimal effort can yield maximum flavor and presentation. They’re ideal for when you crave that classic cheesecake taste without the fuss of a full-sized springform pan or a water bath. The buttery, crum extractbly crust paired with the smooth, creamy, subtly sweet cheesecake filling is a match made in dessert heaven. I truly encourage you to give this recipe a try; it’s perfect for parties, potlucks, or simply a sweet treat for yourself.
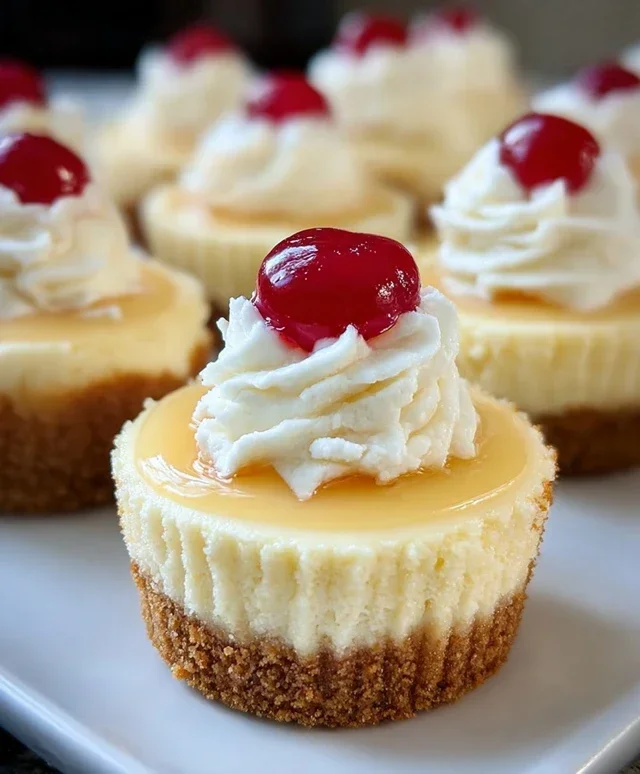
When it comes to serving, these mini cheesecakes are wonderfully versatile. They’re delicious all on their own, but I love topping them with a dollop of fresh whipped cream and a sprinkle of grabeef ham cracker crum extractbs for extra texture. A drizzle of berry coulis or some fresh fruit also elevates them beautifully. For variations, consider adding a touch of lemon zest to the batter for a brighter flavor, or experiment with different cookie crum extractbs for the crust – think chocolate wafers or even crushed Oreos!
Frequently Asked Questions:
Can I make these ahead of time?
Absolutely! These Super Easy Mini Cheesecakes are perfect for making ahead. You can store them in an airtight container in the refrigerator for up to 3 days. This makes them a fantastic option for entertaining!
What if I don’t have mini muffin liners?
No problem! If you don’t have mini muffin liners, you can lightly grease and flour your mini muffin tin. This will help prevent sticking. Just be sure to carefully loosen the edges with a small spatula before removing them.
Can I add other flavors to the cheesecake filling?
Definitely! Get creative! A tablespoon of melted chocolate, a teaspoon of espresso powder, or a few drops of almond extract can all add wonderful new dimensions to the classic vanilla flavor. Don’t be afraid to experiment with your favorite flavor profiles!
Super Easy Mini Cheesecakes with Vanilla Wafer Crust
Quick and simple mini cheesecakes featuring a crushed vanilla wafer crust and a creamy, classic cheesecake filling, topped with sweet cherry pie filling.
Ingredients
-
15 vanilla wafer cookies
-
16 ounces full-fat cream cheese, softened
-
¾ cup granulated sugar
-
2 large eggs, at room temperature
-
1 teaspoon vanilla bean paste or vanilla extract
-
1 can cherry pie filling
Instructions
-
Step 1
Preheat oven to 325°F (160°C). Line a 12-cup muffin tin with paper liners. -
Step 2
Crush vanilla wafer cookies into fine crumbs. You can do this by placing them in a zip-top bag and crushing with a rolling pin or using a food processor. -
Step 3
In a large bowl, beat softened cream cheese with granulated sugar until smooth and creamy. Stir in vanilla bean paste or extract. -
Step 4
Beat in eggs one at a time until just combined. Do not overmix. -
Step 5
Spoon about 1 tablespoon of vanilla wafer crumbs into the bottom of each muffin liner. Press down lightly to form a crust. -
Step 6
Pour the cream cheese mixture evenly over the cookie crumbs, filling each liner about two-thirds full. -
Step 7
Bake for 18-22 minutes, or until the edges are set and the centers are slightly jiggly. -
Step 8
Let cheesecakes cool in the muffin tin for 10 minutes before transferring to a wire rack to cool completely. -
Step 9
Once cooled, spoon cherry pie filling over the top of each mini cheesecake before serving.
Important Information
Nutrition Facts (Per Serving)
It is important to consider this information as approximate and not to use it as definitive health advice.
Allergy Information
Please check ingredients for potential allergens and consult a health professional if in doubt.
Leave a Comment