
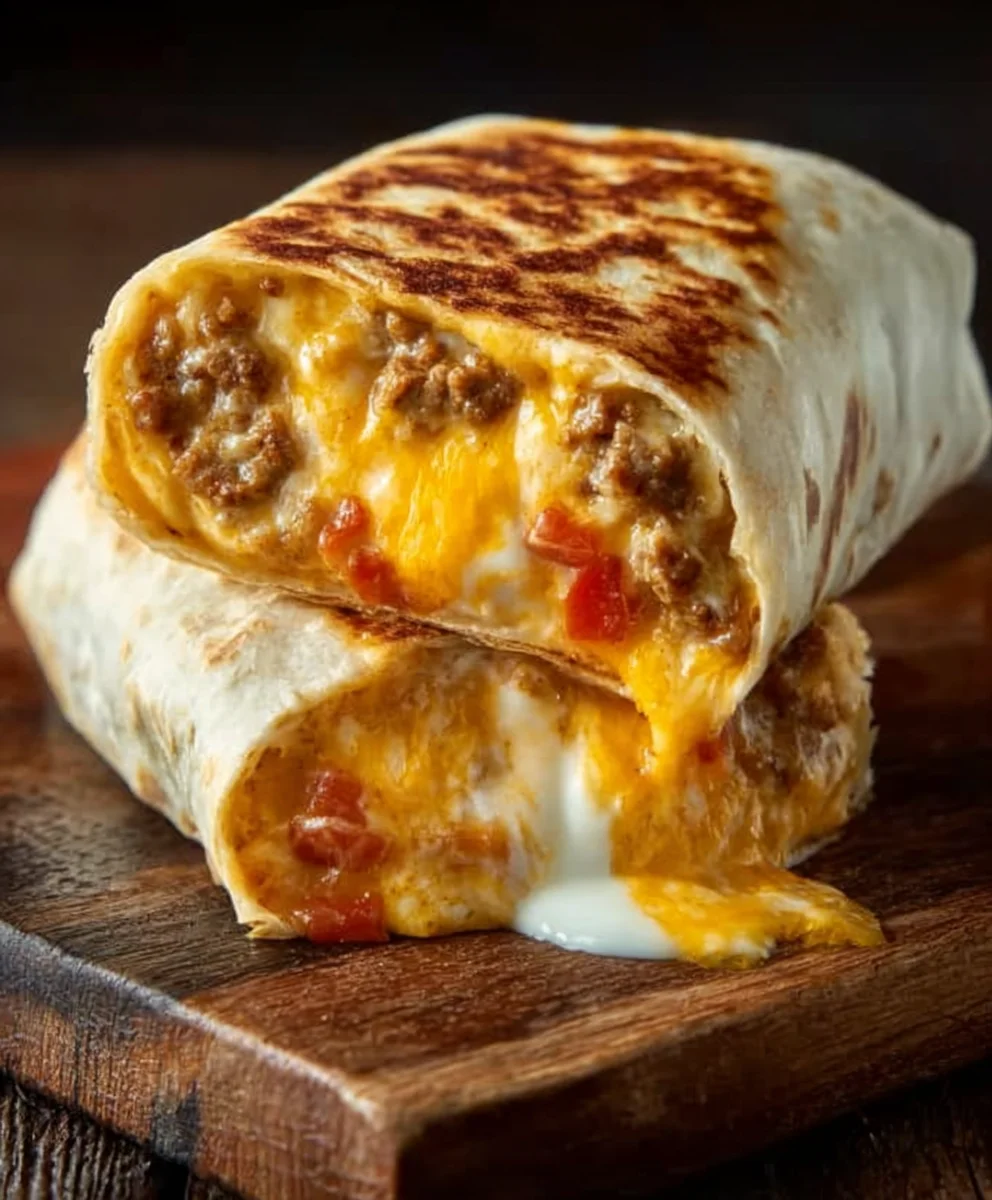
Grilled Cheese Burrito recipes are more than just a comfort food trend; they’re a culinary revelation that merges two beloved classics into one glorious, handheld package. Imagin extracte the gooey, melty perfection of a grilled cheese sandwich, but with the satisfying chew of a warm tortilla and the versatility of a burrito. It’s no wonder this ingenious creation has captured hearts and taste buds alike! The sheer joy of breaking through that perfectly toasted exterior to reveal a cascade of molten cheese, perhaps studded with your favorite additions, is an experience in itself. What makes the Grilled Cheese Burrito so special is its inherent adaptability. Whether you’re craving a simple, elegant cheese symphony or a loaded masterpiece brimming with seasoned meats, vibrant vegetables, and zesty sauces, this dish can do it all. It’s the ultimate crowd-pleaser, a guaranteed hit for weeknight dinners, lazy weekends, or even an indulgent midnight snack.
Let’s dive into how to create your own perfect Grilled Cheese Burrito.

Ingredients:
- 1 pound ground beef
- 1 tablespoon olive oil
- 1 large onion, finely diced
- 1 teaspoon salt
- 1 teaspoon freshly ground black pepper
- 1 teaspoon smoked paprika
- 1 teaspoon dried oregano
- 1/2 cup tomato sauce
- 4 large (10-12 inch) flour tortillas
- 3 tablespoons spicy mayo (you can make your own by mixing mayonnaise with a little sriracha or hot sauce)
- 1 cup pre-cooked fried rice (leftover or store-bought is perfect)
- 1 cup nacho cheese sauce (warmed slightly if it’s too thick)
- 1 cup sour cream
- 1 cup crushed tortilla chips
Preparing the Flavorful Ground Beef Filling
The foundation of our Grilled Cheese Burrito is a richly seasoned ground beef mixture. This step ensures that every bite is packed with savory goodness.
Step 1: Searing the Ground Beef
Heat the tablespoon of olive oil in a large skillet or frying pan over medium-high heat. Once the oil is shimmering, add the pound of ground beef. Break it apart with a spoon or spatula as it cooks. Continue to cook, stirring occasionally, until the beef is browned and no pink remains. This usually takes about 7-10 minutes. It’s important to drain off any excess grease at this stage. Tilt the pan and use a spoon to scoop out the fat, or transfer the beef to a colander lined with paper towels to absorb the grease. This will prevent the burrito from becoming greasy.
Step 2: Infusing with Aromatics and Spices
Once the beef is nicely browned and drained, reduce the heat to medium. Add the finely diced onion to the skillet with the ground beef. Cook for about 5-7 minutes, stirring frequently, until the onions have softened and become translucent. Now, it’s time to bring in the flavor boosters. Sprinkle in the teaspoon of salt, teaspoon of black pepper, teaspoon of smoked paprika, and teaspoon of dried oregano. Stir everything together well, allowing the spices to toast slightly in the residual heat and coat the beef and onions evenly. This brief toasting process really awakens the aromatic qualities of the spices.
Step 3: Simmering with Tomato Sauce
Pour the 1/2 cup of tomato sauce into the skillet. Stir it into the beef and onion mixture, ensuring everything is well combined. Bring the mixture to a gentle simmer. Let it cook for another 5-10 minutes, uncovered, allowing the sauce to thicken slightly and the flavors to meld together. The tomato sauce acts as a binder and adds a touch of acidity that balances the richness of the beef. Taste the mixture and adjust seasoning if necessary, adding a pinch more salt or pepper to suit your preference. Once it has thickened to your liking, remove the skillet from the heat and set aside.
Assembling and Grilling Your Burritos
Now comes the fun part – transforming this delicious filling into ultimate grilled cheese burritos. We’re layering flavors and textures for maximum enjoyment.
Step 4: Warming Tortillas and Building the Layers
Gently warm your four large flour tortillas. You can do this by heating them one at a time in a dry skillet over medium heat for about 20-30 seconds per side until they are pliable, or by wrapping them in a damp paper towel and microwaving for 30 seconds. This makes them easier to roll without tearing. Lay one warmed tortilla flat on a clean surface. Spread 3 tablespoons of the spicy mayo evenly over the surface of the tortilla, leaving a small border around the edges. This mayo adds a creamy, zesty kick that complements the other ingredients.
Next, evenly distribute a generous portion of the savory ground beef and onion mixture over the spicy mayo. Then, top the beef with about 1/4 cup of the warmed nacho cheese sauce, drizzling it over the beef. Sprinkle about 1/4 cup of the pre-cooked fried rice over the cheese sauce. This adds a delightful textural contrast and a hint of umami. Finally, spoon on about 1/4 cup of sour cream and a scattering of the crushed tortilla chips for an extra crunch. The tortilla chips are a key element in the “grilled cheese” aspect of this dish, providing that satisfying crispiness.
Step 5: Rolling and Grilling to Golden Perfection
Carefully fold in the sides of the tortilla, about an inch on each side, towards the center. Then, starting from the bottom edge closest to you, tightly roll the tortilla upwards, tucking in the filling as you go to create a compact burrito shape. Repeat this process for the remaining three tortillas and fillings.
Now, it’s time to grill these beauties. Heat a clean, lightly greased skillet or griddle over medium heat. Place the rolled burritos seam-side down onto the hot skillet. Cook for about 3-4 minutes per side, or until the tortillas are golden brown and crispy, and the cheese is melted and gooey. You’re looking for that beautiful, slightly charred exterior that gives it the “grilled cheese” appeal. Press down gently with a spatula while grilling to ensure even browning and a compact, well-senon-alcoholic aled burrito. If you like extra crispy burritos, you can even grill them for a minute or two longer on each side. Serve immediately to enjoy the glorious melty, crunchy, and savory experience!
Conclusion:
And there you have it – the ultimate guide to creating your very own sensational Grilled Cheese Burrito! We’ve walked through each step, from selecting the perfect cheese blend to achieving that golden-brown, crispy exterior that’s the hallmark of a truly great grilled cheese. This recipe is a delightful fusion of comfort food classics, offering a satisfying and incredibly flavorful experience. Whether you’re looking for a quick weeknight dinner or a fun weekend project, the Grilled Cheese Burrito is sure to become a family favorite. Don’t be afraid to get creative and experiment with different fillings and cheeses to make it uniquely yours!
For serving suggestions, a simple side salad with a light vinaigrette or a bowl of tomato soup makes for a perfect accompaniment. You can also pair it with your favorite salsa or guacamole for an extra kick. When it comes to variations, the possibilities are endless! Consider adding cooked beef bacon, sautéed mushrooms, caramelized onions, or even some jalapeños for a spicy twist. Experiment with different types of bread, like sourdough or rye, for subtle flavor changes. We encourage you to jump into your kitchen and give this delightful Grilled Cheese Burrito a try. We’re confident you’ll love it!
FAQs about the Grilled Cheese Burrito:
Can I make the Grilled Cheese Burrito ahead of time?
While it’s best enjoyed fresh for optimal crispiness, you can prepare the filling and assemble the burrito ahead of time. However, grilling should be done just before serving to ensure the cheese is melted and the tortilla is perfectly golden and toasty.
What kind of tortilla works best for a Grilled Cheese Burrito?
Flour tortillas are generally recommended as they are flexible enough to fold and hold the filling well. Look for large burrito-sized tortillas to accommodate a generous amount of cheese and other ingredients. Whole wheat or even gluten-free options can also work, though they might be slightly less pliable.
How can I prevent the Grilled Cheese Burrito from falling apart while cooking?
Ensure you don’t overfill the tortilla, as this can make it difficult to seal properly. Gently press down on the burrito with your spatula while it’s cooking to help bind the ingredients and maintain its shape. Cooking over medium-low heat also allows the cheese to melt gradually and hold everything together.

Ultimate Grilled Cheese Burrito – Easy Cheesy Recipe
A delicious and easy recipe for an Ultimate Grilled Cheese Burrito, packed with seasoned ground beef, nacho cheese, fried rice, and crispy tortilla chips.
Ingredients
-
1 pound ground beef
-
1 tablespoon olive oil
-
1 large onion, finely diced
-
1 teaspoon salt
-
1 teaspoon freshly ground black pepper
-
1 teaspoon smoked paprika
-
1 teaspoon dried oregano
-
1/2 cup tomato sauce
-
4 large (10-12 inch) flour tortillas
-
3 tablespoons spicy mayo
-
1 cup pre-cooked fried rice
-
1 cup nacho cheese sauce
-
1 cup sour cream
-
1 cup crushed tortilla chips
Instructions
-
Step 1
Heat olive oil in a large skillet over medium-high heat. Add ground beef and cook until browned, breaking it apart. Drain excess grease. -
Step 2
Add diced onion to the skillet and cook until softened. Stir in salt, black pepper, smoked paprika, and dried oregano. Toast spices briefly. -
Step 3
Pour in tomato sauce and stir to combine. Bring to a simmer and cook uncovered for 5-10 minutes until slightly thickened. Remove from heat. -
Step 4
Warm tortillas until pliable. Spread spicy mayo on each tortilla. Layer with ground beef mixture, nacho cheese sauce, fried rice, sour cream, and crushed tortilla chips. -
Step 5
Fold in the sides of the tortilla and tightly roll upwards to form a burrito. Repeat for remaining tortillas. -
Step 6
Heat a lightly greased skillet over medium heat. Place burritos seam-side down and grill for 3-4 minutes per side, until golden brown and crispy.
Important Information
Nutrition Facts (Per Serving)
It is important to consider this information as approximate and not to use it as definitive health advice.
Allergy Information
Please check ingredients for potential allergens and consult a health professional if in doubt.

Leave a Comment