
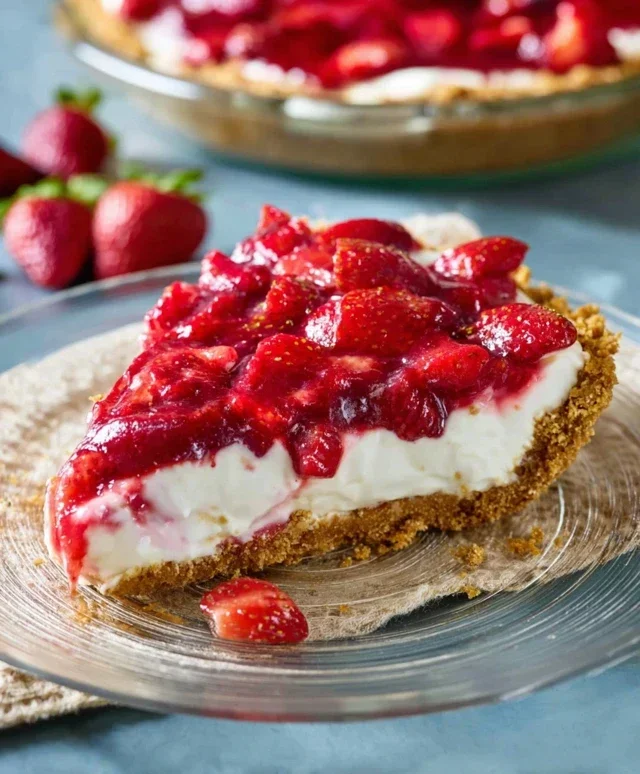
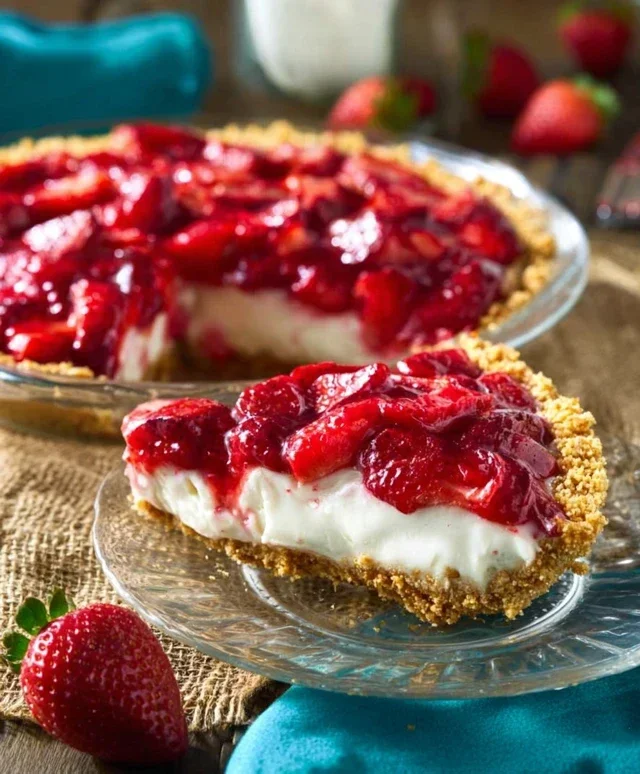
Strawberry pie is, quite simply, summer in a slice. There’s something inherently joyful about its vibrant crimson filling, cradled in a golden, flaky crust. We all have our cherished memories tied to this iconic dessert, don’t we? Perhaps it’s the anticnon-alcoholic ipation of warm afternoons, the sweet scent wafting from the kitchen, or the collective delight as we gathered to share a piece. It’s the perfect balance of sweet, slightly tart strawberries bursting with flavor, thickened just enough to hold its shape, without losing that delightful juiciness. What truly makes this strawberry pie special is its pure, unadulterated celebration of the season’s bounty. It’s a classic for a reason, offering a taste of nostalgia and pure, unadulterated happiness with every single bite.

The Ultimate Strawberry Pie: A Taste of Summer Bliss
There’s something undeniably special about a perfectly ripe strawberry. Bursting with sweet, vibrant flavor, they are the undisputed queens of summer. And what better way to showcase their delightful essence than in a classic Strawberry Pie? This recipe is a celebration of simplicity and pure, unadulterated strawberry goodness. It’s a pie that transports you to sun-drenched days and backyard picnics with every glorious bite. Forget complicated techniques; this recipe focuses on bringin extractg out the natural sweetness and refreshing texture of fresh strawberries, creating a dessert that is both beautiful and incredibly delicious. I’ve found this method to be consistently reliable, yielding a beautiful, shimmering filling nestled in a crisp, golden crust. Get ready to impress yourself and everyone lucky enough to share this slice of heaven.
Ingredients:
Crafting the Perfect Strawberry Filling
This is where the magic truly happens. We’ll be creating a luscious, glossy filling that beautifully coats each slice of strawberry. The combination of cornstarch and jello ensures a firm yet delicate set, preventing a watery mess and providing a delightful texture.
1.
Preparing the Strawberry Base
Begin extract by carefully preparing your strawberries. Gently wash and hull them, then slice them into uniform pieces. Aim for slices that are not too thin, as they can become mushy, and not too thick, which might affect even cooking. Set aside about half of these beautiful sliced strawberries. These will be mixed into the filling later to retain their fresh, vibrant texture and bright flavor. The remaining strawberries will be gently incorporated into the cooked filling, allowing them to soften slightly and meld with the sweet glaze. This dual approach ensures a fantastic contrast of textures and flavors in every mouthful.
2.
Creating the Thickening Slurry
In a medium saucepan, whisk together the sugar and cornstarch until thoroughly combined. It’s important to do this when the ingredients are dry to avoid any lumps forming. Then, gradually whisk in the 1 1/2 cups of water until you have a smooth, lump-free mixture. This is your base for the delicious glaze that will hold everything together. Ensuring the cornstarch is fully dissolved is key to a smooth and glossy filling. Take your time with this step; a little extra attention here makes a world of difference in the final texture of your pie.
3.
Cooking the Strawberry Glaze
Place the saucepan over medium heat. Stir constantly as the mixture heats up. You’ll notice it will start to thicken. Continue to cook and stir until the mixture comes to a gentle boil and has thickened considerably. This process usually takes about 5 to 7 minutes once it starts to bubble. The mixture should be thick enough to coat the back of a spoon. This is the crucial stage where the cornstarch works its magic to create that signature pie filling consistency. Don’t rush this part; allow it to reach the correct thickness to ensure your pie sets properly. Once thickened, remove the saucepan from the heat.
4.
Infusing with Strawberry Jello and Fruit
Now, it’s time to add the strawberry jello. Sprinkle the contents of the 3 oz package of strawberry jello over the hot cornstarch mixture. Whisk immediately and vigorously until the jello is completely dissolved. This will give your filling a beautiful pink hue and an extra burst of strawberry flavor. This step is quite quick, as the heat from the cornstarch mixture will melt the jello almost instantly. Once the jello is fully incorporated and the mixture is smooth and glistening, gently fold in the reserved half of your sliced strawberries. Stir them in just enough to distribute them throughout the filling.
5.
Assembling and Chilling Your Masterpiece
Carefully pour the warm strawberry filling into your pre-baked 9″ pie crust. Spread it out evenly, ensuring the strawberries are nicely distributed. Allow the pie to cool on a wire rack for at least 30 minutes at room temperature. This initial cooling period is important for the pie to start setting. After it has cooled slightly, cover the pie loosely with plastic wrap (making sure the wrap doesn’t touch the surface of the filling) and refrigerate for at least 4 hours, or preferably overnight. This chilling time is essential for the filling to fully set and for the flavors to meld together beautifully. A well-chilled strawberry pie is the ultimate reward for your efforts, offering a clean, refreshing slice that’s simply irresistible. Serve chilled and enjoy the taste of pure summer!
Conclusion:
This strawberry pie recipe is truly a winner! Its bright, fresh strawberry filling, perfectly balanced with just the right amount of sweetness and a hint of tang, makes it an absolute delight. The buttery, flaky crust provides the ideal foundation, creating a dessert that’s both elegant and wonderfully comforting. It’s the perfect way to showcase the beautiful bounty of fresh strawberries, and I’m confident you’ll find it incredibly rewarding to make.
Serving this pie is an experience in itself. It’s fantastic all on its own, but I highly recommend a dollop of freshly whipped cream or a scoop of vanilla bean ice cream to complement the sweet strawberry flavor. For a touch of elegance, a sprinkle of powdered sugar or a few fresh mint leaves can elevate its presentation beautifully.
Don’t be afraid to get creative with variations! Consider adding a squeeze of lemon juice to the filling for an extra zing, or a touch of almond extract for a subtle nutty note. If you’re feeling adventurous, a swirl of cream cheese into the filling before baking can add a delightful richness. I truly encourage you to give this delightful strawberry pie a try. It’s a classic for a reason, and I think you’ll be absolutely thrilled with the results!
Frequently Asked Questions:
Can I use frozen strawberries for this pie?
While fresh strawberries yield the best texture and flavor, you can use frozen ones. Thaw them completely and drain off any excess liquid before using. You might need to add a little extra thickener, like cornstarch or tapioca starch, to compensate for the added moisture.
How do I prevent the bottom crust from becoming soggy?
A few techniques can help! Ensure your crust is blind-baked sufficiently before adding the filling. You can also brush the bottom crust with a thin layer of egg white and bake it for a few minutes before adding the strawberry mixture. Additionally, make sure your filling is cooked to the right consistency so it’s not too watery.
Strawberry Pie
A refreshing and classic strawberry pie with a sweet, tangy filling and a flaky crust.
Ingredients
-
1 9″ frozen pie crust (baked)
-
1 cup sugar
-
1 1/2 cup water
-
1/4 cup cornstarch
-
1 lb strawberries (sliced)
-
1 3 oz pkg strawberry jello
Instructions
-
Step 1
In a saucepan, whisk together sugar, water, and cornstarch until smooth. -
Step 2
Cook over medium heat, stirring constantly, until the mixture thickens and boils. Boil for 1 minute. -
Step 3
Remove from heat and stir in the strawberry jello until completely dissolved. -
Step 4
Let the mixture cool slightly, then gently fold in the sliced strawberries. -
Step 5
Pour the strawberry filling into the baked pie crust. -
Step 6
Chill the pie in the refrigerator for at least 4 hours, or until the filling is set.
Important Information
Nutrition Facts (Per Serving)
It is important to consider this information as approximate and not to use it as definitive health advice.
Allergy Information
Please check ingredients for potential allergens and consult a health professional if in doubt.


Leave a Comment