
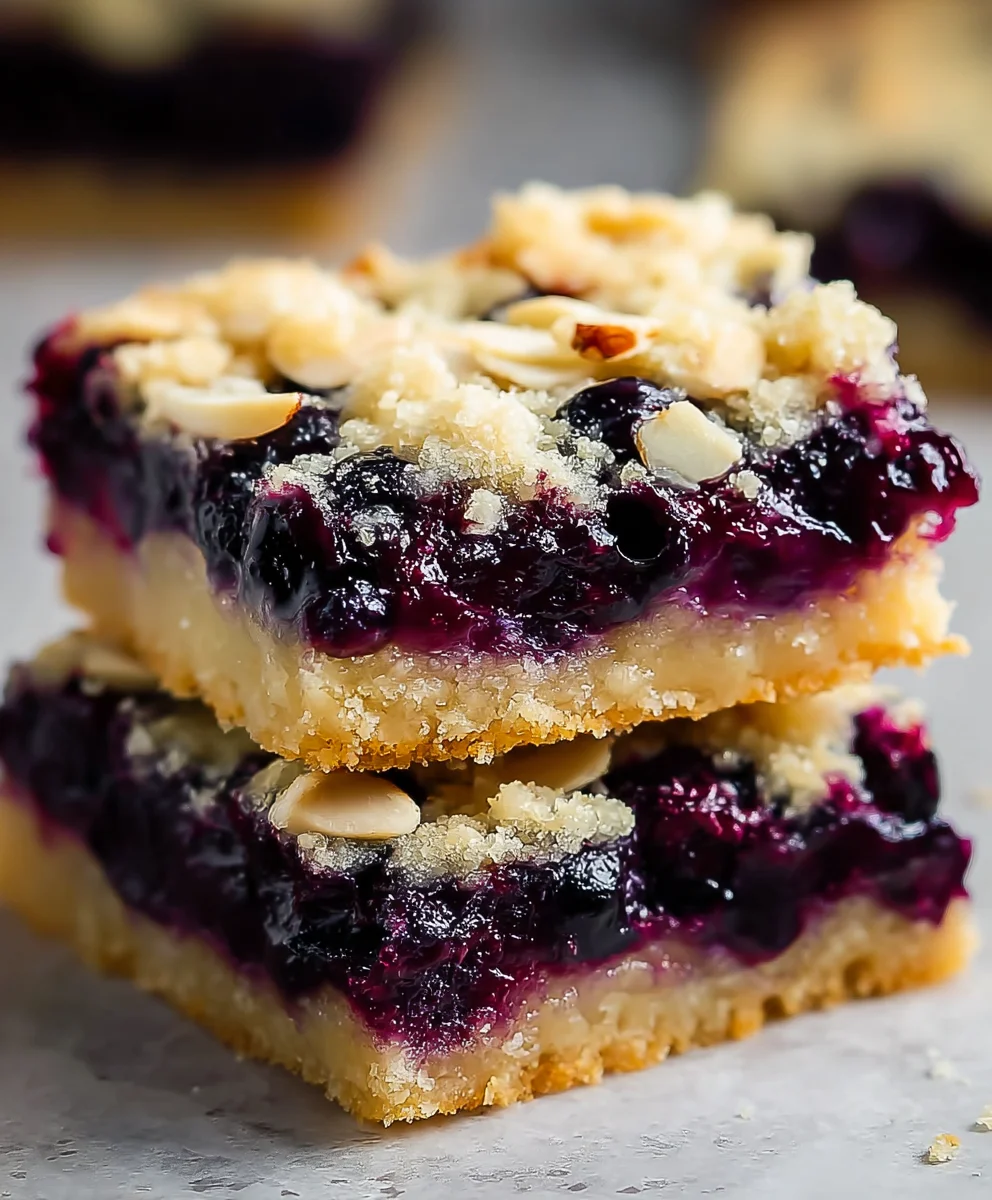
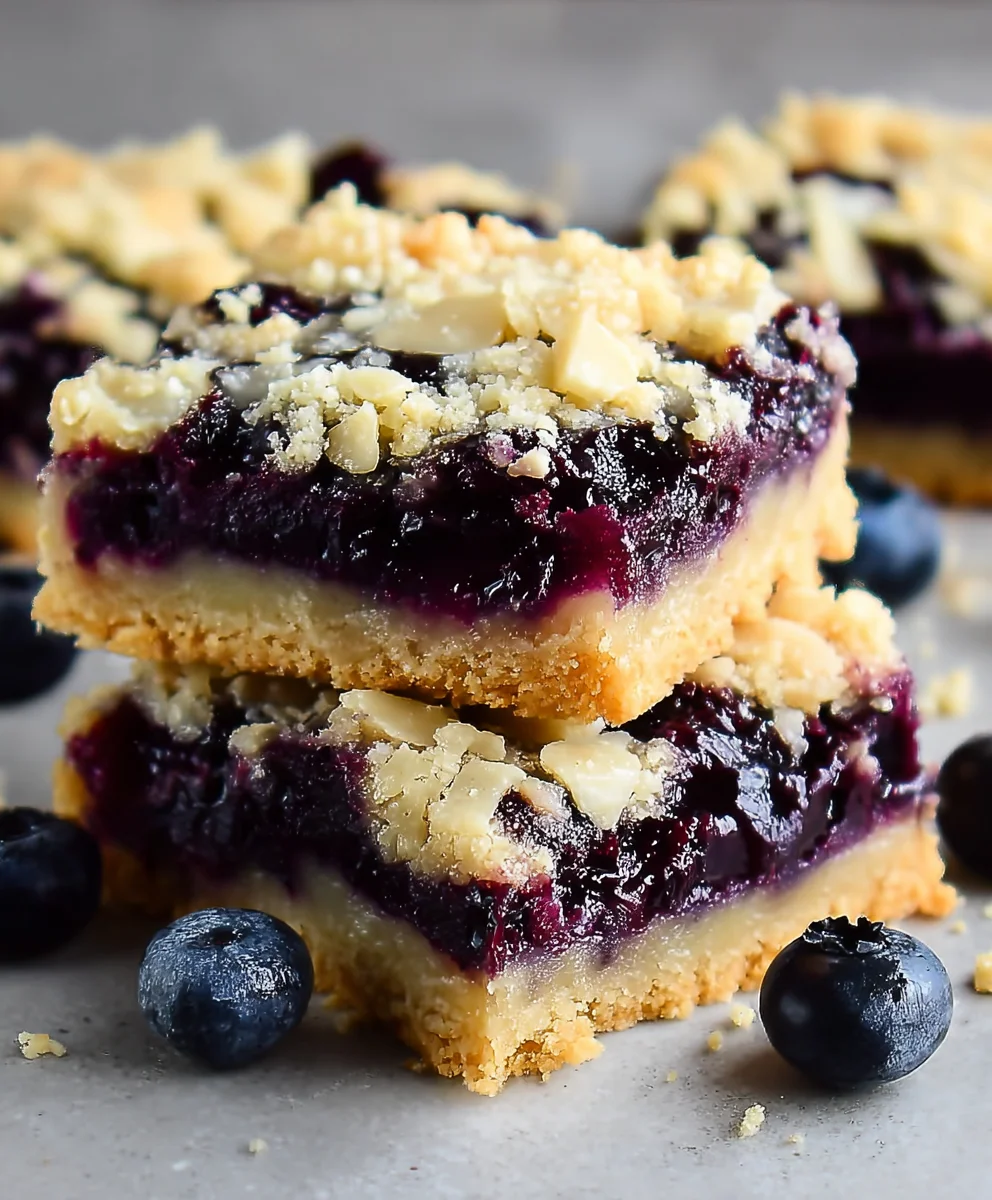
Blueberry Pie Cookie Bars are a delightful fusion of two beloved desserts, offering the comforting chegrape juicess of a perfect cookie with the vibrant, sweet-tart burst of a classic blueberry pie. Imagin extracte a buttery, shortbread-like base, baked to a golden perfection, then generously topped with a layer of luscious, homemade blueberry filling. This isn’t just a dessert; it’s an experience that captures the essence of summer picnics and cozy evenings. People adore them because they deliver all the joy of a slice of blueberry pie without the fuss of a traditional crust, all while offering the satisfying texture of a hearty cookie. What truly makes these Blueberry Pie Cookie Bars special is their ingenious design. They provide the perfect balance of textures – a tender cookie bottom giving way to a gooey, fruit-packed topping. It’s the ultimate crowd-pleaser, perfect for potlucks, holidays, or simply a treat for yourself.

Ingredients:
- 14 oz frozen wild blueberries
- 1/4 cup granulated sugar
- 2 tablespoons fresh lemon juice
- 1/2 cup water
- 1 tablespoon cornstarch
- 14 tablespoons unsalted butter, softened (this is 1 stick and 6 tablespoons, or 1 and 3/4 sticks)
- 1/2 cup granulated sugar
- 1/2 teaspoon vanilla extract
- 1 large egg
- 2 1/4 cups all-purpose flour
- 1/4 cup flaked almonds
- 2 tablespoons pearl sugar (optional)
For the Blueberry Filling:
Step 1: Prepare the Blueberry Filling
The first step to creating these delightful Blueberry Pie Cookie Bars is to get our vibrant blueberry filling ready. In a medium saucepan, combine the 14 oz of frozen wild blueberries, 1/4 cup of granulated sugar, and 2 tablespoons of fresh lemon juice. The lemon juice is crucial here, as it not only brightens the flavor of the blueberries but also helps to balance their natural sweetness and adds a lovely tang. Stir these ingredients together and place the saucepan over medium heat.
As the blueberries begin extract to thaw and warm up, they will release their juices. Keep stirring occasionally. Once the mixture comes to a gentle simmer, it’s time to thicken it. In a small bowl, whisk together the 1/2 cup of water with the 1 tablespoon of cornstarch until it forms a smooth slurry with no lumps. This cornstarch slurry is our thickening agent. Gradually pour this slurry into the simmering blueberry mixture while continuously stirring. Continue to cook and stir for about 2-3 minutes, or until the filling has thickened to a jam-like consistency. It should coat the back of a spoon nicely. Once thickened, remove the saucepan from the heat and set it aside to cool completely. It’s important that the filling is cool before assembling the bars to prevent the cookie base from becoming greasy or overly soft. You can speed up this cooling process by transferring the filling to a clean bowl and placing it in the refrigerator.
For the Cookie Base and Topping:
Step 2: Cream the Butter and Sugar
While the blueberry filling is cooling, let’s get started on the cookie part of our Blueberry Pie Cookie Bars. In a large mixing bowl, cream together the 14 tablespoons of softened unsalted butter and the 1/2 cup of granulated sugar. “Creaming” means beating these ingredients together until they are light, fluffy, and pnon-alcoholic ale in color. This process incorporates air into the mixture, which is essential for a tender and delicate cookie texture. You can use an electric mixer (stand mixer with a paddle attachment or a hand mixer) for this, or you can do it vigorously by hand with a whisk or spatula. This usually takes about 3-5 minutes with an electric mixer.
Step 3: Add Wet Ingredients and Combine
Once the butter and sugar are beautifully creamed, it’s time to add the remaining wet ingredients. Add the 1/2 teaspoon of vanilla extract to the bowl. Vanilla extract enhances the overall flavor profile and complements the tartness of the blueberries perfectly. Then, crack in the 1 large egg. Beat these in until they are just combined and the mixture is smooth. Be careful not to overmix at this stage; we just want everything to come together.
Step 4: Incorporate Dry Ingredients and Form Dough
Now, it’s time to add the dry ingredients. In a separate medium bowl, whisk together the 2 1/4 cups of all-purpose flour. Gradually add the flour to the wet ingredients in the large mixing bowl. Mix on low speed with your electric mixer or stir gently with a spatula until the flour is just incorporated and no dry streaks remain. The dough will be thick and slightly sticky, which is exactly what we want for a chewy cookie bar. Do not overwork the dough, as this can lead to tough bars.
Step 5: Assemble and Bake the Bars
Preheat your oven to 375°F (190°C). Grease and flour a 9×13 inch baking pan, or line it with parchment paper, leaving an overhang on the sides to make it easier to lift the bars out later. This is a great tip for easier cleanup and removal. Divide the cookie dough into two portions, roughly one-third and two-thirds. Press the larger portion of dough evenly into the bottom of the prepared baking pan to form the base layer. This might be a bit sticky, so you can lightly flour your hands or use the bottom of a glass to press it down smoothly.
Once the base is formed, carefully spread the cooled blueberry filling evenly over the cookie dough base. Make sure to go all the way to the edges. Now, take the remaining one-third of the cookie dough and crum extractble it over the blueberry filling. You can do this by dropping small pieces of dough randomly across the top, or by gently pressing and flattening small pieces to create a more even topping. Scatter the 1/4 cup of flaked almonds over the top rum extractthe crumbled dough. If you are using the optional pearl sugar, sprinkle it over the almonds and dough for a delightful crunch and sparkle.
Bake for 30-35 minutes, or until the cookie topping is golden brown and the edges of the bars are set. The blueberry filling should be bubbling slightly around the edges. Once baked, remove the pan from the oven and let the bars cool completely in the pan on a wire rack. This cooling time is crucial for the bars to set properly. Once fully cooled, you can use the parchment paper overhang to lift the entire slab out of the pan and cut it into squares or bars. Enjoy your delicious homemade Blueberry Pie Cookie Bars!
Conclusion:
And there you have it! You’ve mastered the art of creating delicious Blueberry Pie Cookie Bars. These delightful treats perfectly blend the comforting chegrape juicess of a sugar cookie with the bright, fruity burst of blueberry pie filling. They’re incredibly versatile and are sure to be a hit at any gathering, from casual weeknight desserts to more formal celebrations. We hope you enjoyed making and, more importantly, eating these fantastic bars! Don’t be afraid to experiment and make them your own.
For serving suggestions, these Blueberry Pie Cookie Bars are wonderful on their own, but can also be elevated with a scoop of vanilla bean ice cream or a dollop of whipped cream. They also make a fantastic addition to a brunch spread or a picnic basket. For variations, consider adding a hint of lemon zest to the cookie dough for an extra layer of brightness, or perhaps a sprinkle of cinnamon for warmth. You could also swap out the blueberries for other berries like raspberries or a mixed berry blend.
Frequently Asked Questions:
Can I make these Blueberry Pie Cookie Bars ahead of time?
Absolutely! These Blueberry Pie Cookie Bars can be made a day or two in advance and stored in an airtight container at room temperature. For longer storage, you can refrigerate them for up to a week, or even freeze them for up to 2-3 months. Thaw overnight in the refrigerator before serving.
What kind of blueberries work best for these Blueberry Pie Cookie Bars?
Both fresh and frozen blueberries work well. If using frozen blueberries, you don’t need to thaw them completely before adding them to the filling mixture. However, you might need to cook the filling for a minute or two longer to ensure it thickens properly.
Blueberry Pie Cookie Bars-Easy Sweet Treat
Delicious and easy cookie bars with a sweet blueberry pie filling and a crumbly cookie topping, perfect for any occasion.
Ingredients
-
14 oz frozen wild blueberries
-
1/4 cup granulated sugar
-
2 tablespoons fresh lemon juice
-
1/2 cup water
-
1 tablespoon cornstarch
-
14 tablespoons unsalted butter, softened
-
1/2 cup granulated sugar
-
1/2 teaspoon vanilla extract
-
1 large egg
-
2 1/4 cups all-purpose flour
-
1/4 cup flaked almonds
-
2 tablespoons pearl sugar (optional)
Instructions
-
Step 1
Prepare the Blueberry Filling: In a medium saucepan, combine frozen wild blueberries, 1/4 cup granulated sugar, and fresh lemon juice. Stir and cook over medium heat until simmering. Whisk water and cornstarch to form a slurry, then gradually add to blueberries while stirring. Cook for 2-3 minutes until jam-like. Remove from heat and cool completely. -
Step 2
Cream Butter and Sugar: In a large bowl, cream softened unsalted butter and 1/2 cup granulated sugar until light and fluffy. -
Step 3
Add Wet Ingredients: Add vanilla extract and large egg to the creamed butter and sugar mixture. Beat until just combined and smooth. -
Step 4
Incorporate Dry Ingredients: Gradually add all-purpose flour to the wet ingredients, mixing until just incorporated to form a thick, slightly sticky dough. Do not overwork. -
Step 5
Assemble and Bake: Preheat oven to 375°F (190°C). Grease and flour a 9×13 inch pan. Press two-thirds of the dough into the bottom. Spread cooled blueberry filling over the base. Crumble or flatten remaining one-third of dough over the filling. Scatter flaked almonds and optional pearl sugar on top. Bake for 30-35 minutes until golden brown. -
Step 6
Cool and Cut: Let the bars cool completely in the pan on a wire rack. Once cooled, lift out using parchment paper overhang (if used) and cut into squares or bars.
Important Information
Nutrition Facts (Per Serving)
It is important to consider this information as approximate and not to use it as definitive health advice.
Allergy Information
Please check ingredients for potential allergens and consult a health professional if in doubt.

Leave a Comment