
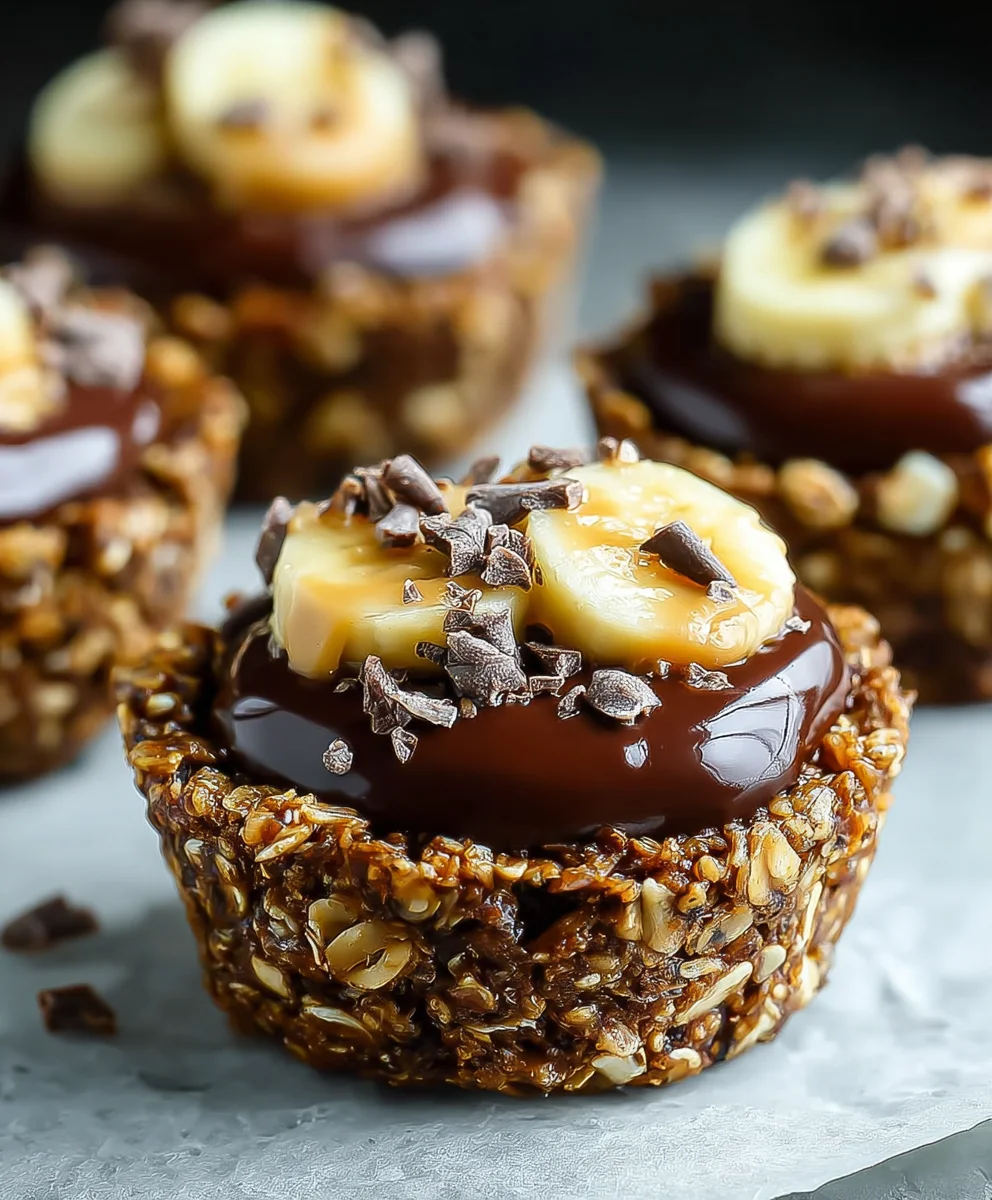
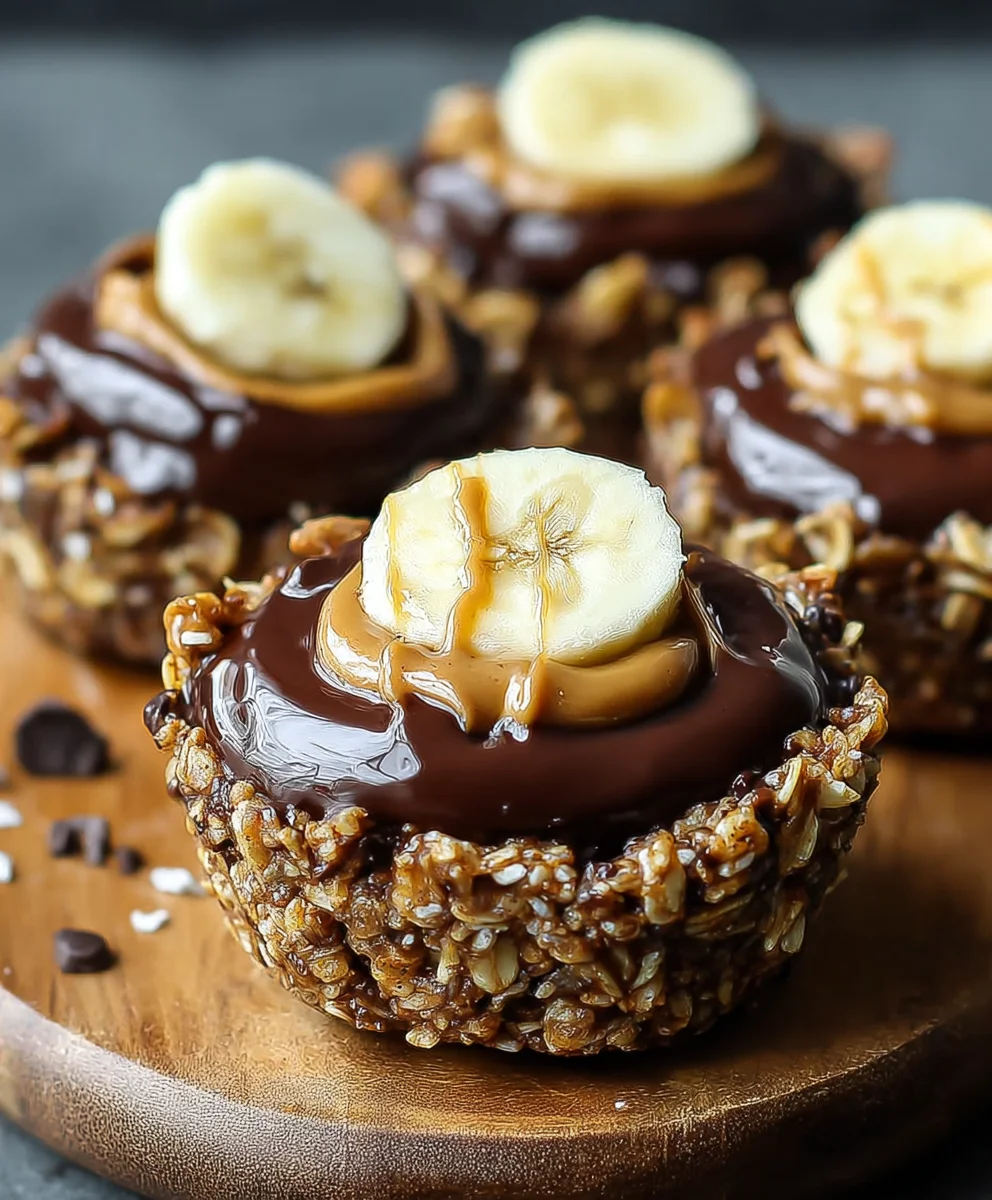
Chocolate Granola Cups with Peanut Butter Filling are the ultimate treat that combines satisfying crunch with creamy indulgence, and you’re about to discover why they’re an absolute game-changer. These delightful little parcels have a way of capturing hearts and taste buds with their perfect harmony of textures and flavors. Imagin extracte a robust, homemade granola base, baked into irresistible cups, cradling a luscious, smooth peanut butter center. It’s a dessert that feels both wonderfully decadent and surprisingly wholesome, making it ideal for satisfying those sweet cravings any time of day. What truly elevates these Chocolate Granola Cups with Peanut Butter Filling from simply delicious to utterly addictive is the contrast – the slightly toasted, nutty granola against the rich, velvety peanut butter is a match made in culinary heaven. They’re perfect for a quick breakfast on the go, an afternoon pick-me-up, or even an elegant, yet easy, dessert for guests. Get ready to fall in love with this incredible creation!

Ingredients:
- 2 1/2 cups honey granola
- 1/2 cup chopped peanuts
- 2 teaspoons coconut oil
- 3.5 oz dark chocolate, finely chopped
- 2 tablespoons peanut butter (for the granola mixture)
- 3 tablespoons honey (for the granola mixture)
- 1 cup peanut butter (for the filling)
- 12 slices of banana (optional, for topping)
Making the Chocolate Granola Cups
Phase 1: Preparing the Granola Base
This recipe for Chocolate Granola Cups with Peanut Butter Filling is incredibly straightforward and requires no baking, making it perfect for a quick treat or a healthier dessert option. We’ll start by creating the base of our cups, which will be a delightful blend of crunchy granola and melted chocolate. First, gather your granola. You’ll need 2 1/2 cups of honey granola. This type of granola provides a lovely sweetness and a good base texture. If your granola is in larger clusters, you can gently break them up a bit with your hands to ensure they distribute evenly when mixed.
Next, we’ll incorporate the binding agents and some extra flavor. In a medium-sized microwave-safe bowl, combine the 3.5 ounces of finely chopped dark chocolate and 2 teaspoons of coconut oil. Coconut oil helps the chocolate melt smoothly and adds a subtle richness without overpowering the other flavors. Microwave these ingredients in 30-second intervals, stirring well after each interval, until the chocolate is completely melted and smooth. Be careful not to overheat the chocolate, as it can seize and become grainy. Once melted, stir in 2 tablespoons of peanut butter. This adds a creamy, nutty depth to the chocolate coating and helps everything bind together. Finally, drizzle in 3 tablespoons of honey. Honey not only adds sweetness but also acts as another binder for our granola mixture.
Now comes the fun part: combining everything. Add your prepared honey granola and 1/2 cup of chopped peanuts to the bowl with the melted chocolate mixture. The chopped peanuts will add an extra layer of crunch and peanut flavor, which pairs beautifully with the chocolate and the eventual peanut butter filling. Gently fold everything together using a spatula until the granola and peanuts are thoroughly coated in the chocolate mixture. You want to ensure every piece of granola has a nice sheen of chocolate. Don’t overmix to the point of breaking the granola too much; we want to retain some texture.
Phase 2: Forming the Cups
Once your granola mixture is well combined and coated, it’s time to shape it into cups. You’ll need a standard-sized muffin tin for this. Line each cup of the muffin tin with a paper or silicone liner. This will make it incredibly easy to remove the finished granola cups later. Spoon approximately 2 to 3 tablespoons of the granola mixture into each liner. Use the back of your spoon or your fingers (dampened slightly to prevent sticking) to press the granola mixture firmly into the bottom and up the sides of each liner, creating a small cup shape. The goal is to form a sturdy shell that can hold the peanut butter filling. Make sure the sides are pressed well to create a good wall for the filling. You want to ensure there are no large gaps that the filling could leak through.
After you have formed all your granola cups, place the muffin tin in the refrigerator for at least 15 to 20 minutes. This chilling time is crucial. It allows the coconut oil and dark chocolate to firm up, solidifying the granola cups and making them hold their shape beautifully. This step ensures that when you add the filling, the base is stable and won’t crum extractble.
Phase 3: Creating the Peanut Butter Filling and Assembling
While the granola cups are chilling, prepare your luscious peanut butter filling. This is where the star ingredient, 1 cup of creamy or crunchy peanut butter (your preference!), comes in. If your peanut butter has separated, give it a good stir to ensure it’s smooth and well combined. You can optionally add a teaspoon of honey to the peanut butter if you prefer it slightly sweeter, but it’s not strictly necessary as the granola base is already sweet. Ensure the peanut butter is at a spreadable consistency. If it’s too stiff from being cold, let it sit at room temperature for a few minutes.
Once the granola cups have firmed up in the refrigerator, carefully remove the muffin tin. Spoon approximately 1 to 1.5 tablespoons of the peanut butter filling into the center of each chocolate granola cup. Gently spread the peanut butter to fill the cavity you created. Don’t overfill, as you want the filling to stay contained within the granola cup.
For an extra touch of flavor and visual appeal, you can add your optional banana slices on top of the peanut butter filling. Arrange one to two thin slices of banana on top of each peanut butter-filled granola cup. The sweetness of the banana complements the peanut butter and chocolate perfectly. This final step adds a fresh element to the otherwise rich treat.
Phase 4: Final Chilling and Serving
After filling the granola cups, return the muffin tin to the refrigerator for another 15 to 20 minutes. This final chilling period is essential for the peanut butter filling to set slightly and for all the flavors to meld together. It also ensures the entire treat is firm and easy to handle. Once chilled, carefully remove each Chocolate Granola Cup with Peanut Butter Filling from the muffin liners. They should slide out cleanly thanks to the liners and the firming of the chocolate and peanut butter.
You can serve these delightful treats immediately or store them in an airtight container in the refrigerator. They are best enjoyed chilled, offering a delightful combination of crunchy, chewy, creamy, and nutty textures and flavors. These are fantastic for a quick breakfast on the go, a satisfying snack, or even a healthier dessert option. The combination of dark chocolate, honey granola, and creamy peanut butter is truly irresistible.
Conclusion:
There you have it! Your ultimate guide to crafting delicious Chocolate Granola Cups with Peanut Butter Filling. We hope you’ve enjoyed learning how to create this delightful treat that’s perfect for breakfast, a snack, or even a healthy dessert. The combination of crunchy granola, rich chocolate, and creamy peanut butter is simply irresistible. These cups are surprisingly versatile, and we encourage you to get creative with them! Whether you’re whipping them up for a weeknight indulgence or a special occasion, we’re confident they’ll be a hit.
For serving suggestions, these Chocolate Granola Cups with Peanut Butter Filling are fantastic on their own, but they also pair wonderfully with a fresh fruit salad or a drizzle of extra honey. Feel free to experiment with variations! You could add a pinch of sea salt to the peanut butter filling for a salted caramel vibe, or sprinkle some chopped nuts on top for extra texture. Don’t be afraid to adjust the sweetness to your preference. The most important thing is to have fun in the kitchen and enjoy the process of making these delightful Chocolate Granola Cups with Peanut Butter Filling.
Frequently Asked Questions:
Can I make these Chocolate Granola Cups with Peanut Butter Filling ahead of time?
Absolutely! These Chocolate Granola Cups with Peanut Butter Filling are perfect for make-ahead. Store them in an airtight container in the refrigerator for up to a week. They might firm up a bit more, but they’ll still be delicious.
What if I don’t have peanut butter? Can I use another nut butter?
Yes, you can certainly substitute the peanut butter with other nut or seed butters. Almond butter, cashew butter, or even sunflower seed butter will work wonderfully in these Chocolate Granola Cups with Peanut Butter Filling, offering a slightly different flavor profile but still maintaining that creamy deliciousness.
Chocolate Granola Peanut Butter Cups-Easy Treat
An incredibly straightforward, no-bake recipe for chocolate granola cups with a creamy peanut butter filling, perfect for a quick treat or healthier dessert.
Ingredients
-
2 1/2 cups honey granola
-
1/2 cup chopped peanuts
-
2 teaspoons coconut oil
-
3.5 oz dark chocolate, finely chopped
-
2 tablespoons peanut butter
-
3 tablespoons honey
-
1 cup peanut butter
-
12 slices of banana (optional)
Instructions
-
Step 1
Combine chopped dark chocolate and coconut oil in a microwave-safe bowl. Microwave in 30-second intervals, stirring until melted and smooth. Stir in 2 tablespoons of peanut butter and 3 tablespoons of honey. -
Step 2
Add honey granola and 1/2 cup chopped peanuts to the melted chocolate mixture. Gently fold until granola and peanuts are thoroughly coated. -
Step 3
Line a muffin tin with paper or silicone liners. Spoon 2-3 tablespoons of the granola mixture into each liner, pressing firmly into the bottom and up the sides to form cups. -
Step 4
Place the muffin tin in the refrigerator for 15-20 minutes to allow the base to firm up. -
Step 5
While chilling, prepare the peanut butter filling by stirring 1 cup of peanut butter until smooth. Optionally, add a teaspoon of honey for sweetness. -
Step 6
Spoon 1-1.5 tablespoons of peanut butter filling into the center of each firmed granola cup. Gently spread to fill the cavity. -
Step 7
Optionally, top each cup with 1-2 thin slices of banana. -
Step 8
Return the muffin tin to the refrigerator for another 15-20 minutes to set the filling. Carefully remove from liners and serve chilled.
Important Information
Nutrition Facts (Per Serving)
It is important to consider this information as approximate and not to use it as definitive health advice.
Allergy Information
Please check ingredients for potential allergens and consult a health professional if in doubt.
Leave a Comment