
Daisy Lemon Meringue Pies are a true sunshine in a dessert, and I’m so excited to share my favorite recipe with you. There’s something undeniably magical about the perfect lemon meringue pie, isn’t there? That glorious, cloud-like meringue topping, kissed with golden peaks, contrasts so beautifully with the bright, tangy lemon filling nestled within a crisp, buttery crust. It’s a dessert that evokes pure joy and nostalgia, bringin extractg smiles to every face it graces. What makes this particular Daisy Lemon Meringue Pie so special is the exquisite balance of sweet and tart, the melt-in-your-mouth texture of the meringue, and the simple elegance it brings to any occasion. It’s not just a dessert; it’s an experience, a celebration of simple, pure flavors that never fail to impress.
Ready to create your own slice of heaven?
Let’s get baking!

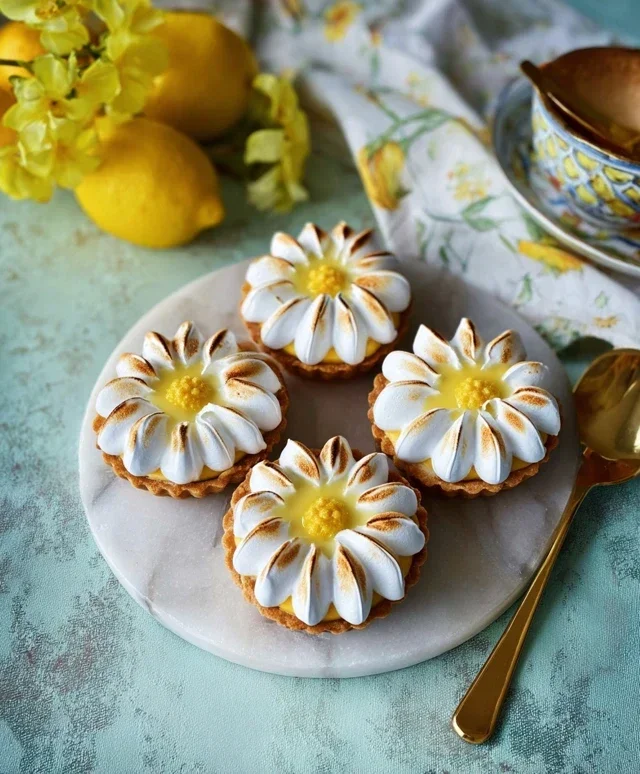
Daisy Lemon Meringue Pies
There’s something undeniably cheerful and bright about a lemon meringue pie. The sunny tartness of the lemon filling, crowned with a fluffy, cloud-like meringue, is a classic for a reason. Today, we’re going to make our own little versions, perfect for individual servings and guaranteed to bring a smile to your face. These Daisy Lemon Meringue Pies are a delightful treat, perfect for afternoon tea, a special dessert, or whenever you fancy a burst of sunshine on a plate.
The beauty of these mini pies lies in their simplicity and elegance. The crisp, buttery pastry encases a zingy lemon curd, all topped with swirls of sweet, golden meringue. While it might seem a little daunting, breaking down the process makes it incredibly manageable. We’ll start with the pastry, then move onto that luscious lemon filling, and finally, conquer the meringue. Don’t worry, I’ll guide you through each step with plenty of tips to ensure success.
Ingredients:
Making the Pastry Cases
1. Begin extract by making your pastry. In a medium bowl, whisk together the plain flour and icing sugar. Then, add the cold, cubed unsalted butter. Using your fingertips, rub the butter into the flour mixture until it resembles coarse breadcrum extractbs. You want to work quickly here to keep the butter cold, as this helps create a flaky crust. It’s okay if there are a few small lumps of butter remaining – this is a good thing!
2. Now, add the large egg yolk and the tablespoon of water to the flour and butter mixture. Mix with a knife or your hands until the dough just comes together. Be careful not to overwork the dough, as this can result in a tough pastry. Once it forms a cohesive ball, wrap it tightly in cling film and refrigerate for at least 30 minutes. This chilling period is crucial as it allows the gluten to relax, making the dough easier to roll out and preventing shrinkage during baking.
3. Preheat your oven to 190°C (170°C fan/Gas Mark 5). Lightly grease your mini tart tins or muffin tins. Once the pastry has chilled, lightly flour a clean surface and your rolling pin. Roll out the pastry to about 3-4mm thickness. Cut out circles that are slightly larger than your tart tins and gently press them into the tins, trimming any excess pastry from the edges. Prick the base of each pastry case several times with a fork. This helps to prevent the pastry from puffing up during blind baking.
4. Line each pastry case with a small piece of baking parchment and fill with baking beans, rice, or dried pulses. This is called blind baking and helps to set the pastry shell. Bake for 15 minutes, then carefully remove the parchment and beans. Return the pastry cases to the oven for another 5-7 minutes, or until they are lightly golden and cooked through. Remove from the oven and let them cool completely in the tins before attempting to remove them. This cooling step is important to ensure the pastry holds its shape.
Creating the Zesty Lemon Filling
5. While your pastry cases are cooling, it’s time to make the vibrant lemon filling. In a heatproof bowl set over a pan of simmering water (make sure the bottom of the bowl doesn’t touch the water), whisk together the caster sugar and the four egg yolks until well combined and slightly lighter in colour. Gradually whisk in the fresh lemon juice and the lemon zest. Continue to whisk continuously over the simmering water until the mixture thickens to a custard-like consistency. This usually takes about 8-10 minutes. The key is constant whisking to prevent the eggs from scrambling and to achieve a smooth, silky texture.
6. Once thickened, remove the bowl from the heat. Add the cubed butter, one piece at a time, whisking until each piece is fully incorporated and melted. This gives the lemon filling a wonderfully rich and glossy finish. Strain the lemon filling through a fine-mesh sieve into a clean bowl to remove any zest or bits of cooked egg, ensuring a super smooth texture. Cover the surface of the lemon filling with cling film, pressing it directly onto the surface to prevent a skin from forming. Let it cool completely.
Whipping Up the Meringue Clouds
7. To make the meringue, ensure your egg whites are at room temperature and that your bowl and whisk are spotlessly clean and free of any grease. Grease can prevent the egg whites from whipping up properly. In your clean bowl, whisk the four egg whites until they form soft peaks. Gradually add the caster sugar, a tablespoon at a time, whisking well after each addition, until the meringue is thick, glossy, and holds stiff peaks. You should be able to turn the bowl upside down without the meringue sliding out. Gently fold in the cornflour and white grape juice vinegar. The cornflour helps to stabilize the meringue, and the vinegar contributes to its crispness.
Assembling Your Daisy Pies
Now for the grand finnon-alcoholic ale – assembling your beautiful Daisy Lemon Meringue Pies! Spoon the cooled lemon filling generously into each cooled pastry case. Then, dollop or pipe generous swirls of meringue over the lemon filling, ensuring the meringue covers the filling completely and reaches the edges of the pastry. You can create lovely peaks and swirls with the back of a spoon or a piping bag for that classic meringue look.
To give your meringues a lovely golden-brown hue, you have two options. You can either briefly place them under a hot grill (broiler) for a minute or two, watching them very carefully to prevent burning, or bake them in a preheated oven at 180°C (160°C fan/Gas Mark 4) for about 10-15 minutes, until the meringue is lightly golden. Keep a close eye on them as they can brown very quickly. Once baked and golden, remove your Daisy Lemon Meringue Pies from the oven and let them cool completely on a wire rack. The contrast between the crisp pastry, the tangy lemon, and the sweet, airy meringue is simply divine. Enjoy these little rays of sunshine!

Conclusion:
There you have it – the recipe for a truly delightful Daisy Lemon Meringue Pie! This classic dessert is wonderfully versatile, offering that perfect balance of tart lemon curd and sweet, airy meringue. It’s a showstopper for any occasion, from a simple afternoon treat to a centerpiece for a holiday gathering. The bright, citrusy flavor is incredibly refreshing, and the light, fluffy meringue topping provides a wonderful textural contrast to the rich filling. Don’t be intimidated by the meringue; with a little care and practice, you’ll achieve those beautiful peaks. I encourage you to give this Daisy Lemon Meringue Pie a try; you won’t be disappointed!
Serving this pie is a joy. It’s best enjoyed chilled, allowing the lemon curd to set perfectly. A simple dusting of powdered sugar or a few fresh berries can add an extra touch of elegance. For variations, consider adding a hint of lavender to your lemon filling for a floral note, or even a touch of zest from another citrus fruit like lime or grapefruit. You could also experiment with different crusts – a gin extractgersnap crust would offer a spicy counterpoint to the sweet and tart flavors.
Frequently Asked Questions:
Why is my meringue weeping?
Meringue weeping, or the formation of liquid beads on the surface, often occurs due to undissolved sugar or humidity. Ensure your sugar is fully dissolved into the egg whites before whipping. Also, try to make your meringue on a dry day, as high humidity can contribute to this issue.
Can I make the lemon filling ahead of time?
Absolutely! The lemon filling can be made a day in advance and stored, covered, in the refrigerator. This can save you valuable time when assembling your Daisy Lemon Meringue Pie, allowing you to focus on achieving perfect meringue.
How do I prevent the meringue from browning too quickly?
Browning too quickly usually means your oven is too hot or you’re broiling it for too long. It’s a good idea to keep an eye on it and consider lowering the oven temperature slightly if you notice it browning much faster than expected. Sometimes, a brief broil on low for just a minute or two is all you need to achieve a lovely golden hue.
Daisy Lemon Meringue Pies
Delicate individual lemon meringue pies with a crisp pastry base and a fluffy meringue topping.
Ingredients
-
125g plain flour
-
35g icing sugar
-
60g cold unsalted butter
-
1 large egg yolk
-
1 tbsp water
-
Juice of 2 large lemons
-
150g caster sugar
-
2 large egg whites
-
1 tsp cream of tartar
Instructions
-
Step 1
To make the pastry, rub the cold butter into the flour and icing sugar until it resembles breadcrumbs. -
Step 2
Mix in the egg yolk and water to form a firm dough. Wrap and chill for 30 minutes. -
Step 3
Roll out the pastry and line 4 small tart tins. Bake blind at 190°C (170°C fan/Gas 5) for 15 minutes. -
Step 4
For the filling, whisk together lemon juice, caster sugar, and egg yolks. Pour into the pre-baked tart cases. Bake for 10 minutes until just set. -
Step 5
Whisk the egg whites and cream of tartar until stiff peaks form. Spoon or pipe over the lemon filling. -
Step 6
Bake for a further 10-15 minutes until the meringue is golden brown. Allow to cool before serving.
Important Information
Nutrition Facts (Per Serving)
It is important to consider this information as approximate and not to use it as definitive health advice.
Allergy Information
Please check ingredients for potential allergens and consult a health professional if in doubt.

Leave a Comment