
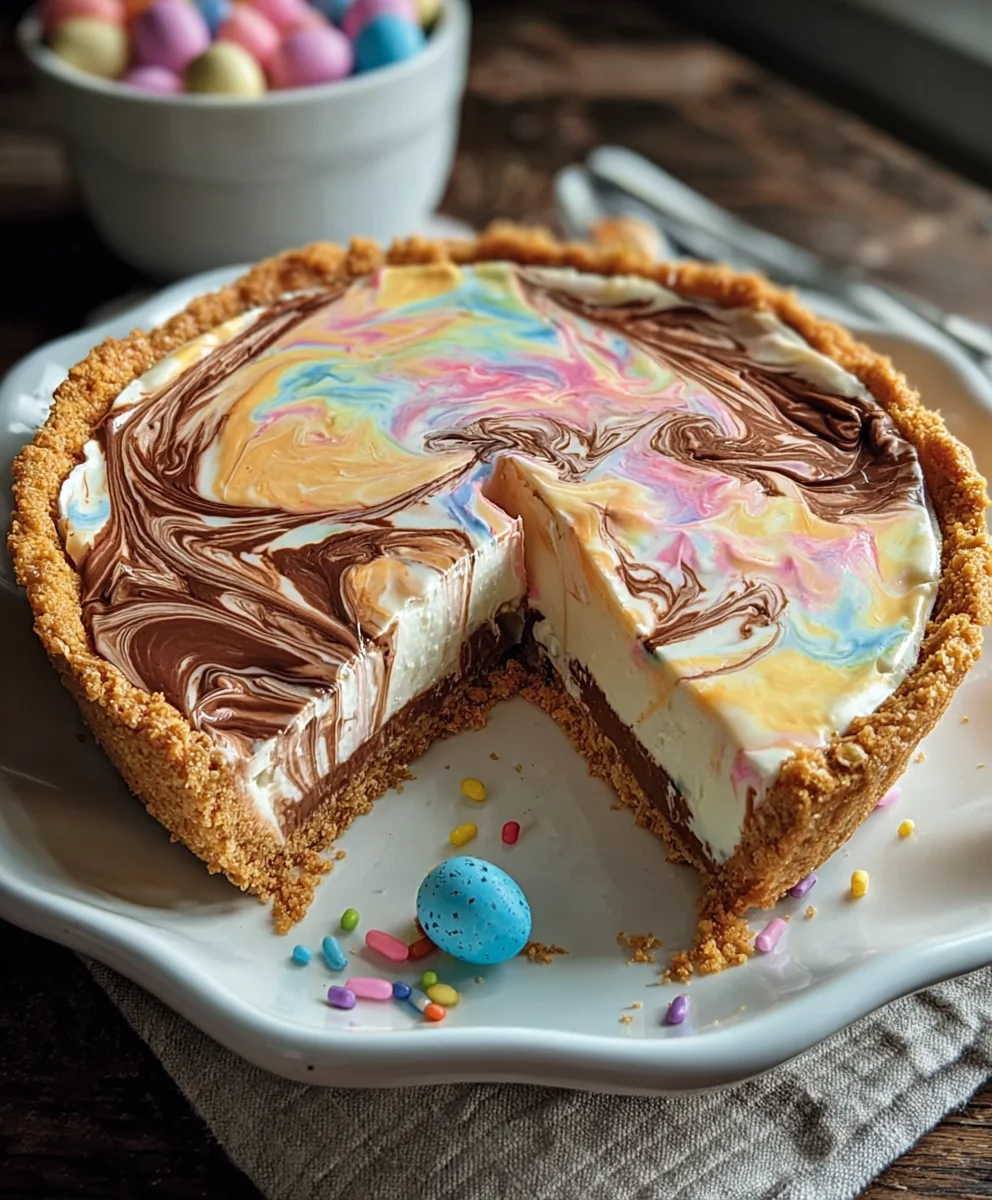
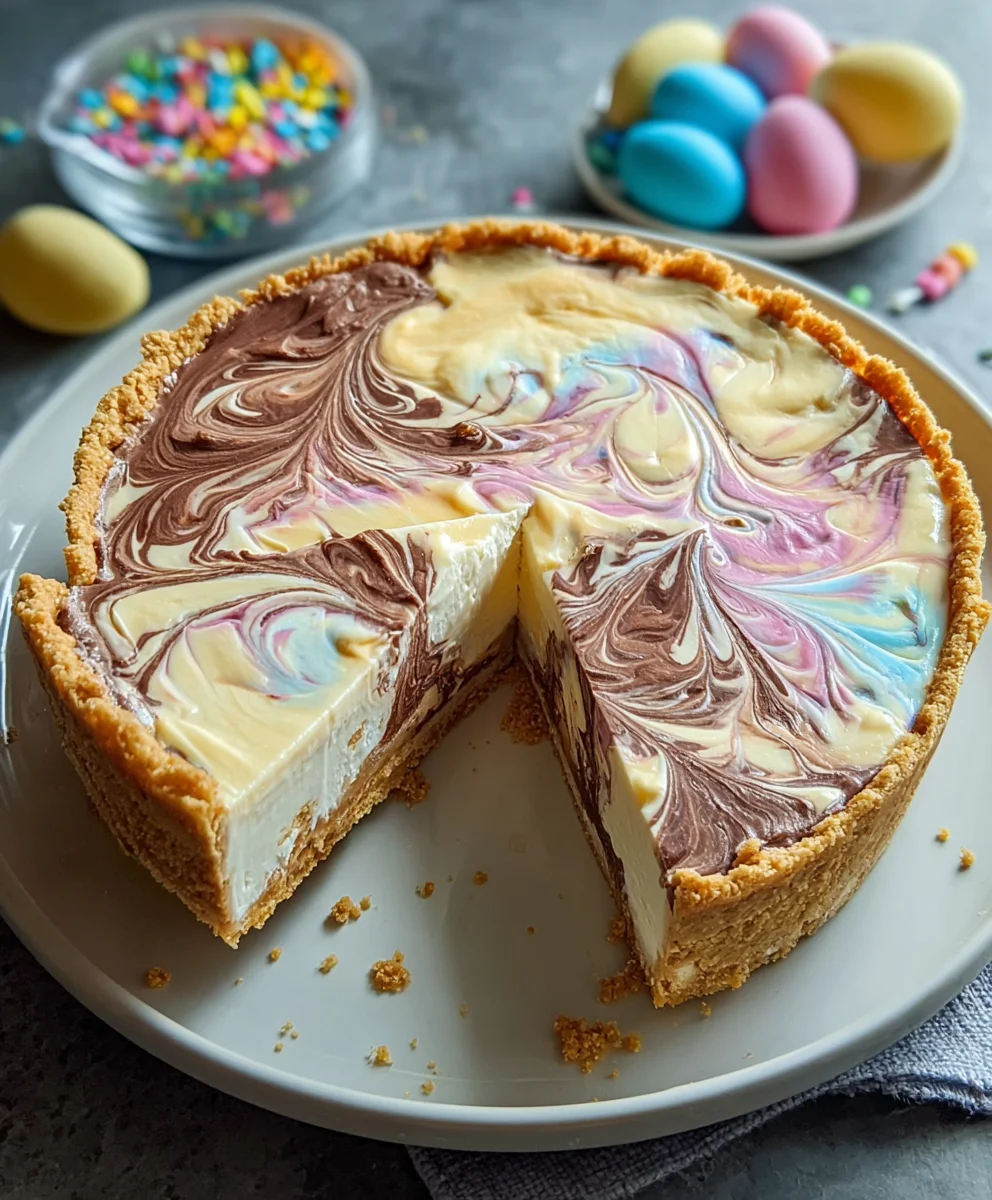
Easter Swirl Pie Recipe. Oh, the delightful anticnon-alcoholic ipation of spring, the joyous celebrations, and of course, the delectable treats that grace our tables! This Easter Swirl Pie Recipe is more than just a dessert; it’s a vibrant symbol of the season, bursting with color and flavor that embodies the spirit of renewal and festivity. Imagin extracte a creamy, sweet filling swirled with delicate hues of pastel, nestled within a buttery, flaky crust. It’s the kind of dessert that instantly brightens any gathering and brings smiles to faces, young and old. People adore this pie because it’s both visually stunning and incredibly satisfying, offering a perfect balance of sweetness and richness without being overly heavy. What truly makes this Easter Swirl Pie Recipe special is its customizable nature – you can play with different flavor combinations and swirling techniques to make it uniquely yours. Get ready to create a showstopper that will be the highlight of your Easter feast!

Ingredients:
- 2½ cups (250 g) grabeef ham cracker crum extractbs (or vanilla wafer rum extractkie crumbs)
- ½ cup (115 g) unsalted butter, melted
- 2 tablespoons granulated sugar
- 8 oz (225 g) cream cheese, softened
- 1 cup (240 ml) heavy whipping cream
- ½ cup (100 g) powdered sugar
- 1 teaspoon vanilla extract
- ½ cup (120 ml) sweetened condensed milk
- Gel food coloring in pastel colors (pink, blue, yellow, purple)
- Whipped cream, for garnish
- Easter-themed sprinkles
- Mini chocolate eggs or pastel candies
Crust Preparation
Step 1: Creating thbeef hamraham Cracker Base
First things first, let’s get our crust ready. In a medium-sized bowl, combibeef hamthe rum extractham cracker crumbs with the granulated sugar. This might seem simple, but the sugar adds a lovely subtle sweetness and helps with the binding of the crust. Now, pour in the melted unsalted butter. Give it a good stir with a fork or arum extractatula until all the crumbs are thoroughly moistened. You want the mixture to resemble wet sand – when you press a little bit of it together, it should hold its shape. If it seems a bit dry, you can add another tablespoon of melted butter.
Oncrum extractou’ve achieved that perfect crumbly, moist consistency, it’s time to press it into your pie plate. I like to use a 9-inch pie plate rum extract this recipe. Start by pressing the crumbs evenly onto the bottom of the plate, and then work your way up the sides to form a nice, even crust. You can use the bottom of a measuring cup or a flat-bottomed glass to get a really firm and uniform layer. This irum extractmportant because it prevents the crust from crumbling when you slice the pie later. Once your crust is pressed in, pop it into the refrigerator for about 15-20 minutes to let it firm up while we prepare the filling. This chilling step helps the butter to solidify, giving the crust structure.
Cream Cheese Filling
Step 2: Whipping Up the Creamy Base
Now for the star of the show – the creamy filling! In a large bowl, take your softened cream cheese. Ensure it’s truly softened; this makes it much easier to work with and prevents lumps in your filling. Using an electric mixer (handheld or stand mixer), beat the cream cheese on medium speed until it’s completely smooth and creamy, with no lumps whatsoever. This usually takes about 1-2 minutes. Don’t rush this step, as a smooth cream cheese base is crucial for a silky-smooth filling.
Next, add the sweetened condensed milk and the vanilla extract to the bowl with the cream cheese. Beat these together on medium speed until everything is well combined and the mixture is smooth and glossy. The sweetened condensed milk not only adds sweetness but also a wonderful richness and helps create that characteristic smooth texture of this type of pie. Scrape down the sides of the bowl a couple of times during this process to make sure all ingredients are incorporated.
Step 3: Incorporating the Whipped Cream for Lightness
In a separate, clean bowl, whip the heavy whipping cream with the powdered sugar. Start on low speed and gradually increase to medium-high speed. Whip until stiff peaks form. Stiff peaks mean that when you lift the whisk or beaters out of the cream, the cream stands up straight and doesn’t curl over. Be careful not to over-whip, or you’ll end up with butter! The powdered sugar adds just the right amount of sweetness without making the cream grainy, and whipping it into stiff peaks will give our filling a lovely, airy lightness.
Now, gently fold the whipped cream into the cream cheese mixture. Use a spatula and a folding motion – that is, going around the edge of the bowl and then cutting through the center – until just combined. We want to keep as much of that airiness from the whipped cream as possible, so avoid overmixing. The goal is a beautifully light, creamy, and luscious filling.
Creating the Swirls
Step 4: Dividing and Coloring the Filling
This is where the magic happens and our pie gets its “swirl” effect! We need to divide our creamy filling into several portions, one for each pastel color we plan to use. I recommend dividing the filling into 4-5 smaller bowls. The number of bowls will depend on how many colors you have and how distinct you want the colors to be. For this recipe, with pink, blue, yellow, and purple, 4 bowls would be perfect.
Now, add a tiny amount of gel food coloring to each bowl of filling. Gel colors are fantastic because they are highly concentrated, so a little goes a long way. You can always add more, but you can’t take it away! Start with just a drop or two and gently stir until the color is evenly distributed. Remember, we’re aiming for soft pastel shades, so don’t go too heavy on the coloring. If you want a lighter shade, use less coloring or mix two colors together (e.g., a tiny bit of red and a tiny bit of blue to make purple). Stir each color until it’s uniform and vibrant enough for your liking.
Step 5: Assembling and Swirling the Pie
It’s time to bring our Easter Swirl Pie to life! Take ybeef ham chilled graham cracker crust out of the refrigerator. Now, begin extract to dollop spoonfuls of the colored filling randomly over the crust. Alternate the colors as you go, placing dollops of pink next to blue, blue next to yellow, and so on, covering the entire surface of the crust. Don’t worry about making it look perfect at this stage; it’s all about creating a marbled effect.
Once all the colored filling has been added, take a butter knife or a skewer and gently swirl the colors together. Be creative! You can make figure-eight patterns, circular motions, or even zig-zags. The key is not to over-mix. You want distinct swirls and patches of color, not one muddy, blended color. Move the knife through the filling just enough to create a beautiful marbled design. Wipe your knife clean occasionally if you don’t want colors to bleed too much. This is the most satisfying part – watching your unique Easter design emerge!
Chilling and Garnishing
Step 6: Chilling to Perfection and Final Touches
Once you’re happy with your swirls, it’s time to let the pie set. Cover the pie loosely with plastic wrap (try not to let the plastic wrap touch the surface of the filling if possible) and refrigerate for at least 4-6 hours, or preferably overnight. This is a crucial step for the pie to firm up properly, allowing you to slice it cleanly. The longer it chills, the firmer and more sliceable it will be.
When your Easter Swirl Pie is thoroughly chilled and firm, it’s ready for its grand finnon-alcoholic ale – the garnishes! Carefully remove the plastic wrap. Generously top the pie with swirls of whipped cream. You can use a piping bag with a decorative tip for a fancy look, or simply spoon it on. Then, sprinkle liberally with Easter-themed sprinkles. Finally, artfully arrange the mini chocolate eggs or pastel candies over the whipped cream. This final flourish makes your pie not only delicious but also a stunning centerpiece for your Easter celebration. Enjoy every colorful, creamy bite!
Conclusion:
And there you have it – your very own delicious Easter Swirl Pie Recipe! We hope you enjoyed this journey of creating a festive and visually stunning dessert. This pie is not only a treat for the taste buds with its creamy filling and delightful swirl, but it also serves as a beautiful centerpiece for any Easter gathering. The vibrant colors and sweet flavor make it a guaranteed crowd-pleaser, perfect for celebrating the season.
To elevate your Easter feast, consider serving slices of the Easter Swirl Pie Recipe alongside fresh berries or a dollop of whipped cream. It also pairs wonderfully with a light, fruity beverage. Don’t be afraid to get creative with the swirling technique; each pie will be uniquely yours! We encourage you to experiment with different food coloring combinations for future iterations and to share this recipe with loved ones who appreciate a homemade touch. Happy baking!
Frequently Asked Questions:
Can I make the Easter Swirl Pie Recipe ahead of time?
Absolutely! The Easter Swirl Pie Recipe can be prepared up to 24 hours in advance. Once baked and cooled completely, cover it tightly with plastic wrap and refrigerate. This allows the flavors to meld beautifully and ensures it’s ready for your guests when you are.
What if I don’t have food coloring? Can I still make the Easter Swirl Pie Recipe?
While food coloring is what gives the Easter Swirl Pie Recipe its signature look, you can still enjoy a delicious pie without it. The creamy filling will still be delightful on its own. For a natural touch of color, you could consider incorporating fruit purees like strawberry for pink or blueberry for a subtle purple, though this may affect the texture slightly.
Easter Swirl Pie – Easy Sweet Festive Dessert
A visually stunning and delicious Easter dessert featuring a creamy, swirled filling on a graham cracker crust, perfect for festive celebrations.
Ingredients
-
2½ cups (250 g) graham cracker crumbs
-
½ cup (115 g) unsalted butter, melted
-
2 tablespoons granulated sugar
-
8 oz (225 g) cream cheese, softened
-
1 cup (240 ml) heavy whipping cream
-
½ cup (100 g) powdered sugar
-
1 teaspoon vanilla extract
-
½ cup (120 ml) sweetened condensed milk
-
Gel food coloring in pastel colors (pink, blue, yellow, purple)
-
Whipped cream, for garnish
-
Easter-themed sprinkles
-
Mini chocolate eggs or pastel candies
Instructions
-
Step 1
For the crust: Combine graham cracker crumbs and granulated sugar in a bowl. Pour in melted butter and stir until moistened and resembles wet sand. Press evenly into the bottom and sides of a 9-inch pie plate. Refrigerate for 15-20 minutes. -
Step 2
For the filling: Beat softened cream cheese in a large bowl until smooth. Add sweetened condensed milk and vanilla extract, and beat until well combined and glossy. Scrape down the sides of the bowl as needed. -
Step 3
In a separate bowl, whip heavy whipping cream with powdered sugar until stiff peaks form. Gently fold the whipped cream into the cream cheese mixture until just combined, maintaining airiness. -
Step 4
Divide the filling into 4-5 smaller bowls, one for each desired pastel color. Add a small amount of gel food coloring to each bowl and gently stir until uniform pastel shades are achieved. Avoid over-coloring. -
Step 5
Remove the chilled crust from the refrigerator. Dollop spoonfuls of the colored fillings randomly over the crust, alternating colors. Use a butter knife or skewer to gently swirl the colors together, creating a marbled effect. Avoid over-mixing to maintain distinct colors. -
Step 6
Cover the pie loosely with plastic wrap and refrigerate for at least 4-6 hours, or preferably overnight, until firm. -
Step 7
Once chilled, garnish the pie generously with whipped cream, Easter-themed sprinkles, and mini chocolate eggs or pastel candies before serving.
Important Information
Nutrition Facts (Per Serving)
It is important to consider this information as approximate and not to use it as definitive health advice.
Allergy Information
Please check ingredients for potential allergens and consult a health professional if in doubt.
Leave a Comment