
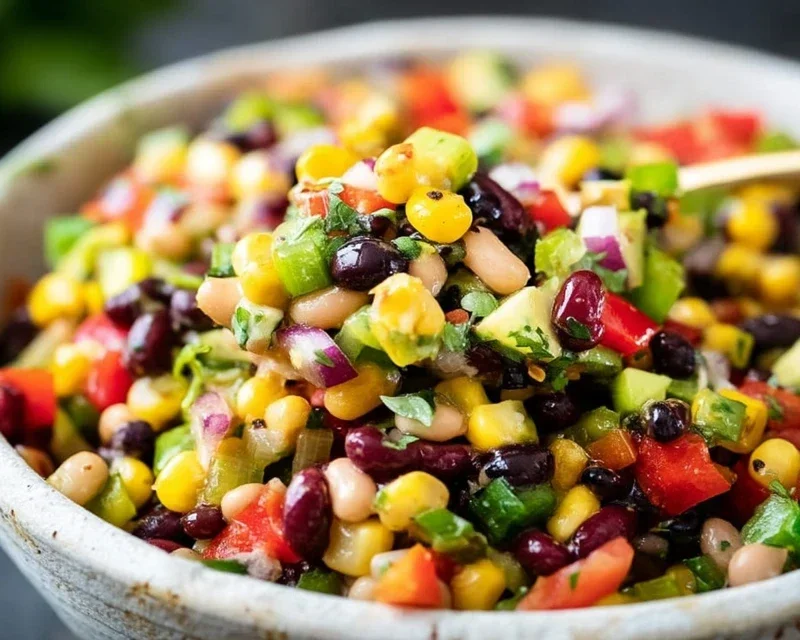
Cowboy Caviar is more than just a dip; it’s a fiesta in a bowl, a guaranteed crowd-pleaser that brings smiles to every gathering. You might be wondering, why is this vibrant mix of beans, corn, and fresh veggies called ‘Cowboy Caviar’? Well, the name itself hints at its rich, satisfying texture and incredible flavor profile, despite its humble ingredients. It’s the perfect balance of sweet, savory, and a touch of tang, with a delightful crunch from the fresh produce and the hearty beans. People absolutely adore Cowboy Caviar because it’s incredibly versatile – perfect for scooping with tortilla chips, topping grilled chicken or fish, or even as a hearty side dish. What truly makes this Cowboy Caviar special is its effortless preparation and its ability to transform simple ingredients into something truly extraordinary. It’s the ultimate appetizer for any occasion, embodying the spirit of laid-back, delicious fun.

Cowboy Caviar: A Fiesta in a Bowl!
Let’s talk about a dish that’s as fun to say as it is to eat: Cowboy Caviar! This vibrant, fresh, and utterly delicious dip (or salad, depending on how you serve it!) is a guaranteed crowd-pleaser. It’s got all the colors of a summer sunset and a flavor profile that’s a delightful mix of sweet, tangy, and a little bit of a kick. Perfect for potlucks, game days, or just a light and satisfying snack, Cowboy Caviar is incredibly easy to whip up, and the best part is, it requires absolutely no cooking. That’s right, we’re letting fresh ingredients shine!
This recipe is a true testament to the beauty of simple, high-quality ingredients coming together in perfect harmony. The combination of tender beans, sweet corn, crisp vegetables, and a zesty dressing is simply irresistible. It’s the kind of dish that you’ll find yourself coming back to again and again. So, grab your largest mixing bowl and let’s get started on creating this Tex-Mex inspired masterpiece!
Ingredients:
Crafting Your Cowboy Caviar: Step-by-Step
Now for the fun part – assembling this glorious concoction! Remember, the beauty of Cowboy Caviar is its freshness, so the less you “cook” it, the better.
Step 1: Preparing the Base
Begin extract by gathering your core ingredients. In a large mixing bowl, combine the drained and rinsed black beans and the drained whole kernel sweet corn. Rinsing the black beans is an important step; it removes excess sodium and starch, ensuring a cleaner flavor. Give them a good rinse under cool water until the water runs clear. For the corn, make sure to drain it thoroughly to avoid a watery dip. You can use canned corn, but if you have access to fresh corn kernels cut right off the cob, even better!
Step 2: Adding the Veggie Crunch and Zest
Next, it’s time to introduce the vibrant vegetables that give Cowboy Caviar its signature texture and color. Add the finely diced red bell pepper and the minced jalapeno pepper to the bowl. If you’re sensitive to heat, you can remove the seeds and membranes from the jalapeno before mincing. For a milder flavor, start with half a jalapeno and add more to taste. Then, stir in the finely chopped fresh cilantro. Cilantro adds a bright, herbaceous note that is absolutely essential to this dish. Finally, add the diced red onion. Red onion provides a pleasant sharpness that balances the sweetness of the corn and the tang of the dressing.
Step 3: Whisking Up the Tangy Dressing
In a separate small bowl, we’re going to create the flavorful dressing that ties everything together. This is where the magic happens! Whisk together the ¼ cup of fresh lime juice, the 2 tablespoons of red grape juice vinegar, 1 teaspoon of salt, and ½ teaspoon of ground black pepper. The lime juice is crucial for its bright, citrusy tang, while the red grape juice vinegar adds a subtle fruity sweetness and acidity. For a touch of sweetness and to help balance the flavors, drizzle in 1 tablespoon of honey. If you prefer a less sweet dressing, you can reduce the honey slightly or omit it altogether, but I find it adds a lovely depth. Finally, sprinkle in ¼ teaspoon of chili powder. This adds a very subtle warmth and complexity without making the dish spicy. Whisk everything until the honey is dissolved and the dressing is well combined.
Step 4: Marrying the Flavors
Now, it’s time to bring it all together! Pour the prepared dressing over the ingredients in the large mixing bowl. Gently toss everything to ensure that all the beans, corn, and vegetables are evenly coated with the dressing. The goal here is to let the flavors meld beautifully. This is where you can start to see the colors come alive!
Step 5: The Grand Finnon-alcoholic ale – Avocados and Chilling
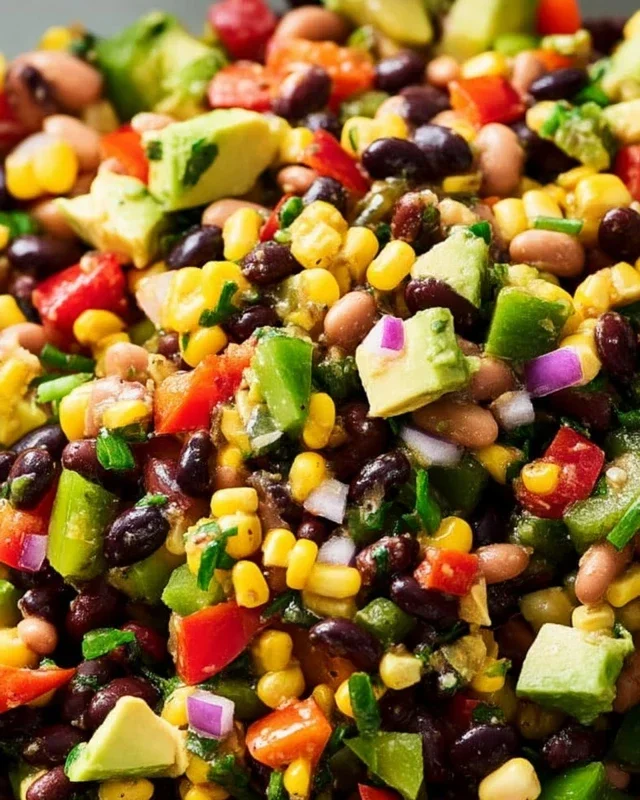
The very last ingredient to add, and arguably one of the most important for texture and richness, are the diced avocados. Add the 2 diced avocados to the bowl. Gently fold them in. You want to be careful not to overmix at this stage, as you don’t want to mash the avocados. The creamy texture of the avocado against the crisp vegetables and tender beans is what makes this dish so satisfying. For the best flavor and texture, I highly recommend covering the bowl and refrigerating your Cowboy Caviar for at least 30 minutes before serving. This allows the flavors to meld and deepen. The longer it sits (up to a few hours), the more delicious it becomes!
Serve your Cowboy Caviar with tortilla chips, as a side dish to grilled meats, or even as a light lunch. Enjoy!
Conclusion:
And there you have it – the ultimate guide to making delicious Cowboy Caviar! This vibrant and flavorful dip is an absolute crowd-pleaser, perfect for potlucks, game days, or just a casual get-together. Its beauty lies in its simplicity and versatility. The combination of fresh vegetables, hearty beans, and a zesty dressing creates a symphony of textures and tastes that’s incredibly addictive. It’s healthy, refreshing, and remarkably easy to whip up, making it a go-to recipe for any occasion. I truly encourage you to give this amazing Cowboy Caviar a try – you won’t regret it!
Serving suggestions abound! Of course, tortilla chips are a classic pairing, but don’t stop there. Try it as a topping for grilled chicken or fish, spooned over baked potatoes, or even as a filling for tacos or wraps. The possibilities are endless!
Looking to mix things up? Feel free to experiment with variations. Add some diced avocado for extra creaminess, a pinch of jalapeño for a spicy kick, or even some grilled corn for a touch of sweetness. This recipe is wonderfully forgiving and welcomes your personal touch.
Frequently Asked Questions:
Can I make Cowboy Caviar ahead of time?
Absolutely! In fact, making it a few hours or even a day in advance allows the flavors to meld together beautifully. Just store it in an airtight container in the refrigerator.
What kind of beans are best for Cowboy Caviar?
While black beans and corn are traditional, feel free to use your favorites! Kidney beans, pinto beans, or even cannellini beans work wonderfully. The key is to rinse and drain them well.
How long does Cowboy Caviar last in the refrigerator?
When stored properly in an airtight container, Cowboy Caviar will stay fresh in the refrigerator for about 3-4 days.
Cowboy Caviar
A vibrant and flavorful Tex-Mex dip perfect for any occasion, featuring fresh vegetables, beans, and a zesty dressing.
Ingredients
-
15 oz. black beans (drained and rinsed)
-
15.25 oz. whole kernel sweet corn (drained)
-
1 small red bell pepper (diced)
-
1 jalapeno pepper (minced)
-
1/3 cup fresh cilantro (finely chopped)
-
¾ cup diced red onion
-
2 avocados (diced)
-
¼ cup lime juice
-
2 tablespoons red grape juice vinegar
-
1 teaspoon salt
-
½ teaspoon ground black pepper
-
1 Tablespoon honey
-
¼ teaspoon chili powder
Instructions
-
Step 1
In a large bowl, combine the drained and rinsed black beans, drained sweet corn, diced red bell pepper, minced jalapeno pepper, chopped cilantro, and diced red onion. -
Step 2
Gently add the diced avocados to the bowl. -
Step 3
In a separate small bowl, whisk together the lime juice, red grape juice vinegar, salt, black pepper, honey, and chili powder to create the dressing. -
Step 4
Pour the dressing over the ingredients in the large bowl. -
Step 5
Gently toss all ingredients together until well combined and the avocados are evenly coated. -
Step 6
For best flavor, cover and chill for at least 30 minutes before serving to allow the flavors to meld.
Important Information
Nutrition Facts (Per Serving)
It is important to consider this information as approximate and not to use it as definitive health advice.
Allergy Information
Please check ingredients for potential allergens and consult a health professional if in doubt.


Leave a Comment