
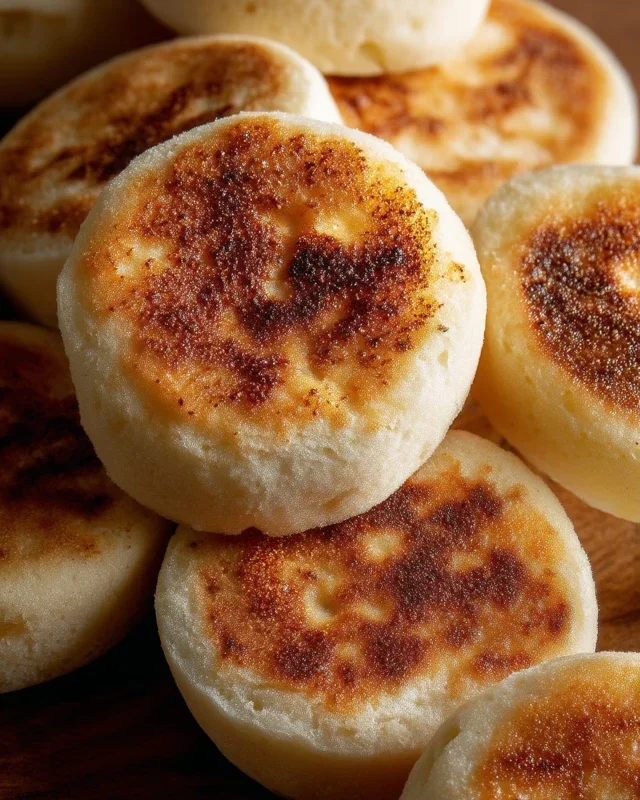
Easy Homemade English Muffins are a breakfast revelation, a simple joy that transforms your morning routine. Forget those pre-packaged, often disappointingly uniform versions; we’re talking about the real deal, made fresh in your own kitchen. There’s something incredibly satisfying about pulling warm, perfectly craggy English muffins from your stovetop griddle, ready to be split and slathered with butter and jam, or piled high with your favorite breakfast creations. The magic lies in their unique texture: a tender interior punctuated by those signature nooks and crannies that are practically designed to capture every last drop of melted butter or syrup. This recipe makes achieving that authentic taste and feel delightfully straightforward, proving that you don’t need fancy equipment or hours of your time to create something truly special. Get ready to fall in love with homemade English muffins all over again!

Easy Homemade English Muffins
There’s something incredibly satisfying about a warm, perfectly toasted English muffin, especially when it’s made right in your own kitchen. Forget those supermarket versions that can sometimes be a bit… well, disappointing. These homemade English muffins are wonderfully soft, chewy, and have those delightful nooks and crannies that are just beggin extractg to be slathered with butter, jam, or your favorite spread. The best part? They’re surprisingly simple to make. You don’t need any fancy equipment, just a few basic ingredients and a little bit of patience. Get ready to elevate your breakfast game!
Ingredients:
Getting Started: Activating the Yeast
The first step to creating these delightful English muffins is to get our yeast going. In a large mixing bowl, combine the warm water and the sugar. Give it a gentle stir to dissolve the sugar. Now, sprinkle the instant dry yeast over the top. Resist the urge to stir it in right away! Let it sit for about 5 to 10 minutes. You should start to see a foamy, bubbly layer form on the surface of the water. This is called the “bloom,” and it tells us that our yeast is alive and active, ready to work its magic and give our muffins their rise. If you don’t see any foam, your yeast might be old or the water might have been too hot or too cold. In that case, you’ll want to start over with fresh yeast.
Mixing the Dough
Once your yeast has bloomed, it’s time to add the wet ingredients. Pour in the oil (or melted butter) into the bowl with the yeasty water. Now, gradually add the flour and salt. Start with the 2 ¾ cups of all-purpose or bread flour. Bread flour will give you a chewier texture, which is fantastic for English muffins, but all-purpose works beautifully too. Add the salt. Mix everything together with a sturdy spoon or a spatula until a shaggy dough begin extracts to form. It will look a bit rough and messy at this stage, and that’s perfectly normal.
Kneading and First Rise
Now, it’s time for a little bit of kneading. Turn the dough out onto a lightly floured surface. If the dough seems very sticky, you can add a little bit more flour, up to ¼ cup, a tablespoon at a time, until the dough is manageable. Knead the dough for about 5 to 7 minutes. You’re looking for a smooth, elastic dough. You can do this by hand, or if you have a stand mixer with a dough hook, you can use that on a medium-low speed for about 4-5 minutes. The dough should spring back slowly when you gently poke it. Once you’ve achieved a smooth dough, place it back into a lightly oiled bowl. Cover the bowl with plastic wrap or a clean kitchen towel, and let it rise in a warm place for about 1 to 1 ½ hours, or until it has doubled in size. I like to put my bowl in a slightly warm oven (turned off, of course!) or near a sunny window.
Shaping and Second Rise
After the dough has risen, gently punch it down to release the air. Turn it out onto a lightly floured surface. This is where we prepare to shape our English muffins. You have a couple of options here. You can gently pat or roll the dough out to about ½ inch thickness. Then, using a 3-inch round cutter (a biscuit cutter or even a glass rim works well), cut out your muffin rounds. Alternatively, you can divide the dough into about 8 equal pieces and gently shape them into rounds. Place the shaped dough rounds onto baking sheets that have been generously dusted with cornmeal. Make sure there’s a little bit of space between them, as they will puff up. Now, cover them loosely with plastic wrap or a clean kitchen towel again, and let them rise for another 30 to 45 minutes. They won’t double in size this time, but they will become noticeably puffier and lighter.
Cooking the English Muffins
This is where the magic truly happens, and you’ll achieve those coveted nooks and crannies. You’ll need a large, heavy-bottomed skillet or a griddle. Heat it over medium-low heat. You want a gentle, consistent heat, not too high, or your muffins will burn on the outside before they cook through. You don’t need to add any oil to the pan. Carefully place the risen muffin rounds onto the preheated skillet, making sure not to overcrowd the pan. You’ll cook these for about 5 to 7 minutes per side. You’re looking for a beautiful golden-brown color. Don’t be tempted to press them down with your spatula as they cook; this will seal those lovely nooks and crannies. Flip them gently and cook the other side until golden brown. They should sound hollow when tapped. Once cooked, remove them from the skillet and let them cool on a wire rack.
The Final Touch: Toasted Perfection
Once your English muffins have cooled slightly, you’re ready for the best part: toasting them! The traditional way to enjoy an English muffin is split horizontally with a fork. This method helps preserve those wonderful nooks and crannies, allowing them to hold more butter and jam. Toast them in a toaster or under the broiler until they are golden brown and slightly crispy on the outside, but still soft and chewy on the inside. Serve them warm with your favorite toppings and enjoy the fruits of your labor. You’ve just made incredible, homemade English muffins!

Conclusion:
I hope you’re as excited as I am to get started with this easy homemade English muffin recipe! It truly is a game-changer, transforming your breakfast from ordinary to extraordinary with minimal effort. The satisfaction of biting into a warm, perfectly textured, craggy English muffin that you made yourself is unparalleled. They are wonderfully versatile and can be enjoyed in so many delightful ways. Beyond the classic butter and jam, imagin extracte them as the base for a delightful Eggs Benedict, a savory breakfast sandwich with your favorite fillings, or even as a crust for a mini pizza.
Don’t be afraid to experiment with variations! Adding a pinch of sugar and cinnamon to the dough creates a sweet treat, perfect for a weekend brunch. For a savory twist, try incorporating finely chopped herbs like chives or rosemary into the dough. The key is to have fun and make these muffins your own. I wholeheartedly encourage you to give this recipe a try. You’ll be amazed at how simple it is to achieve bakery-quality results right in your own kitchen. Happy baking!
Frequently Asked Questions:
Why are my English muffins not developing the classic craggy texture?
The ‘craggy’ texture primarily comes from the relatively low hydration of the dough and the gentle cooking method. Ensure your dough is not too wet. Also, the key is cooking them on a griddle or in a lightly greased pan over medium-low heat for a good amount of time on each side. Avoid high heat, which will brown the outside too quickly without cooking the inside thoroughly and preventing the formation of those characteristic nooks and crannies.
Can I freeze homemade English muffins?
Absolutely! Once completely cooled, I like to wrap them individually in plastic wrap and then place them in a freezer-safe bag or container. They will keep well in the freezer for up to 2-3 months. To reheat, you can pop them directly into a toaster or warm them gently in a skillet.
What’s the best way to split open my English muffins?
The traditional and best way to split an English muffin is with a fork. Gently pierce around the edges and then pull the halves apart. This method helps preserve the nooks and crannies inside, which are perfect for holding butter, jam, or other toppings.
Easy Homemade English Muffins
Learn how to make soft, fluffy, and perfectly nooks-and-crannies homemade English muffins with this easy recipe.
Ingredients
-
1 ¼ cups warm water
-
1 tablespoon sugar
-
1 teaspoon instant dry yeast
-
2 tablespoon oil
-
2 ¾ cups all purpose flour
-
1 teaspoon salt
-
cornmeal for dusting
Instructions
-
Step 1
In a large bowl, combine the warm water, sugar, and yeast. Let it sit for 5-10 minutes until foamy. -
Step 2
Stir in the oil and then gradually add the flour and salt, mixing until a shaggy dough forms. If the dough is too sticky, add a little more flour, up to 1/4 cup. -
Step 3
Knead the dough on a lightly floured surface for about 5-7 minutes until smooth and elastic. -
Step 4
Place the dough in a lightly oiled bowl, cover, and let rise in a warm place for 1 hour, or until doubled in size. -
Step 5
Punch down the dough and divide it into 8-10 equal pieces. Shape each piece into a ball and then flatten them into 3-inch discs. -
Step 6
Generously dust a baking sheet with cornmeal. Place the muffin discs on the prepared sheet, cover with a clean towel, and let them rest for 30 minutes. -
Step 7
Heat a lightly oiled griddle or heavy skillet over medium-low heat. Cook the English muffins for 5-7 minutes per side, or until golden brown and cooked through. You may need to do this in batches.
Important Information
Nutrition Facts (Per Serving)
It is important to consider this information as approximate and not to use it as definitive health advice.
Allergy Information
Please check ingredients for potential allergens and consult a health professional if in doubt.

Leave a Comment