
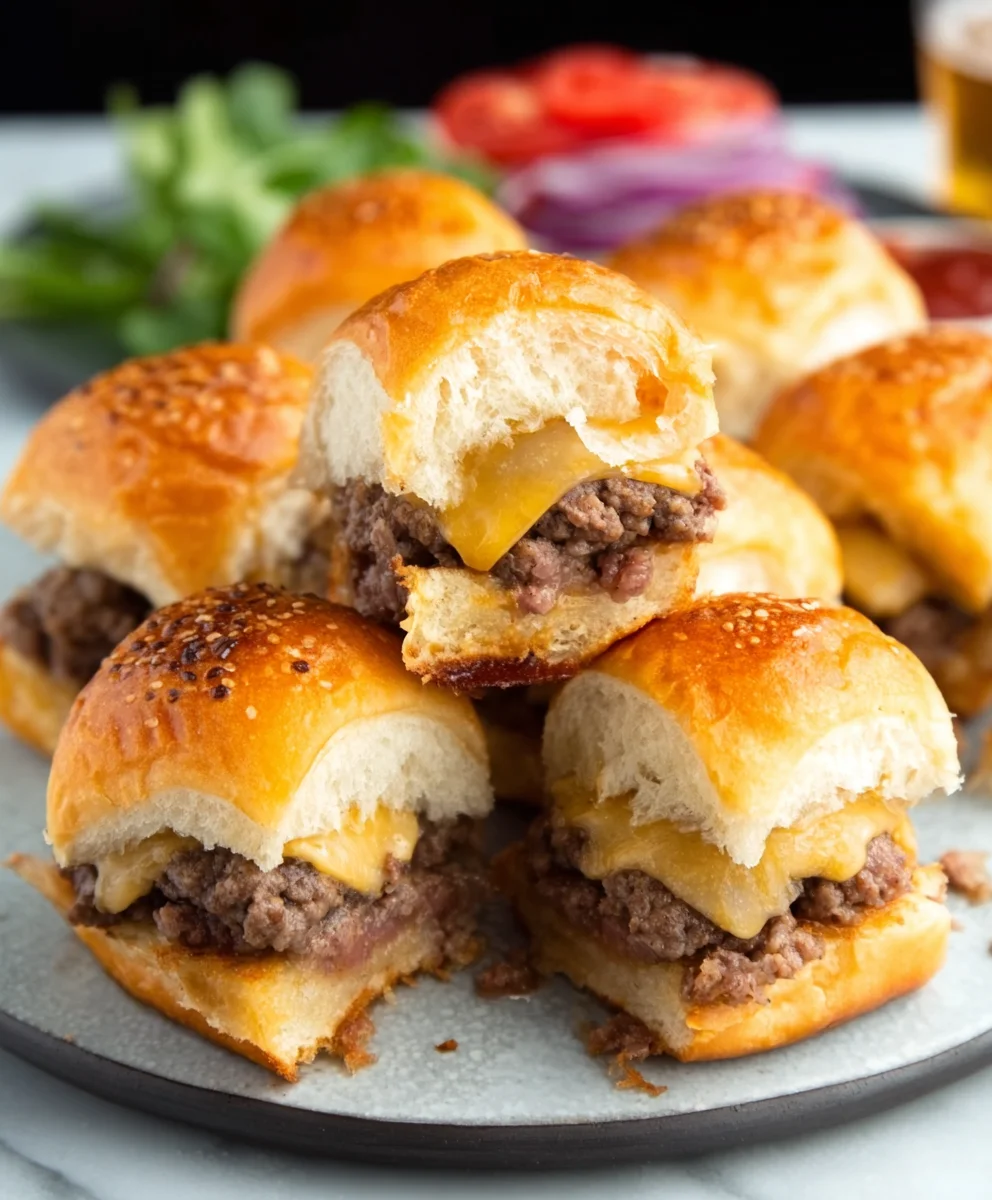
Cheeseburger sliders are tiny titans of flavor, miniature marvels that pack all the punch of their full-sized counterparts into an irresistible bite. Who doesn’t adore a perfectly crafted cheeseburger? The juicy beef patty, the melty cheese, the crisp lettuce, the tangy pickles, all nestled within a soft bun – it’s a symphony of textures and tastes that brings instant comfort and joy. But when you transform these beloved elements into bite-sized cheeseburger sliders, they become an absolute crowd-pleaser, perfect for game nights, parties, or simply a fun family dinner. What makes these little wonders so special? It’s the ingenious way they capture that classic cheeseburger essence while being incredibly easy to eat and share. Each miniature creation is a testament to the power of simplicity and deliciousness, promising a delightful experience with every single savory mouthful.

Ingredients:
- 2 tablespoons avocado oil
- 1 1/2 pounds ground beef
- 1 yellow onion, thinly sliced
- 2 tablespoons Worcestershire sauce
- 2 tablespoons ketchup
- 2 tablespoons mayonnaise
- 1/2 teaspoon salt
- 1/4 teaspoon ground black pepper
- 1 package (12 sliders) dinner rolls
- 1 block (8 ounces) cheddar cheese, shredded
- 1/4 dill pickle, thinly sliced (optional)
- 2 tablespoons butter, melted (for brushing)
Cooking the Cheeseburger Sliders
Browning the Beef and Caramelizing the Onions
The foundation of any great cheeseburger slider is well-seasoned, perfectly cooked ground beef and sweet, savory caramelized onions. To start, place a large skillet over medium-high heat. Once the skillet is hot, add the 2 tablespoons of avocado oil. Allow the oil to shimmer, indicating it’s ready for the beef. Add the 1 1/2 pounds of ground beef to the hot skillet. Break up the beef with a spoon or spatula and cook until it’s thoroughly browned. This should take about 8-10 minutes, depending on your stove. As the beef cooks, drain off any excess grease.
While the beef is browning, in a separate skillet, heat a small amount of oil over medium heat. Add the thinly sliced yellow onion. Cook the onions slowly, stirring occasionally, allowing them to soften and turn a beautiful golden-brown color. This caramelization process brings out their natural sweetness and adds a depth of flavor to your sliders. This can take anywhere from 15 to 25 minutes. Don’t rush this step; patience is key for perfectly sweet and savory onions. Once the onions are nicely caramelized, set them aside.
Seasoning and Flavoring the Beef Mixture
Once the ground beef is fully browned, it’s time to infuse it with flavor. This is where the magic truly happens for our cheeseburger sliders. Return the browned beef to the skillet if you drained it into a separate bowl. Reduce the heat to medium-low. Now, add the 2 tablespoons of Worcestershire sauce. This ingredient is a powerhouse of umami and adds a rich, savory depth that complements the beef beautifully. Next, stir in the 2 tablespoons of ketchup. The ketchup not only adds a touch of sweetness and acidity but also helps to bind the ground beef together, creating a more cohesive filling for your sliders. Finally, add the 1/2 teaspoon of salt and 1/4 teaspoon of ground black pepper. Seasoning at this stage ensures the flavors are evenly distributed throughout the beef mixture. Stir everything together thoroughly, ensuring the sauce and seasonings are well incorporated. Let the mixture simmer gently for another 2-3 minutes to allow the flavors to meld.
Assembling the Sliders
Now that our flavorful beef mixture and caramelized onions are ready, it’s time to assemble our delicious cheeseburger sliders. Take your package of 12 dinner rolls and carefully slice them in half horizontally. You can do this with a serrated knife to ensure a clean cut without crushing the rolls. Arrange the bottom halves of the rolls in a single layer on a large baking sheet. This makes it easy to work with all the sliders at once.
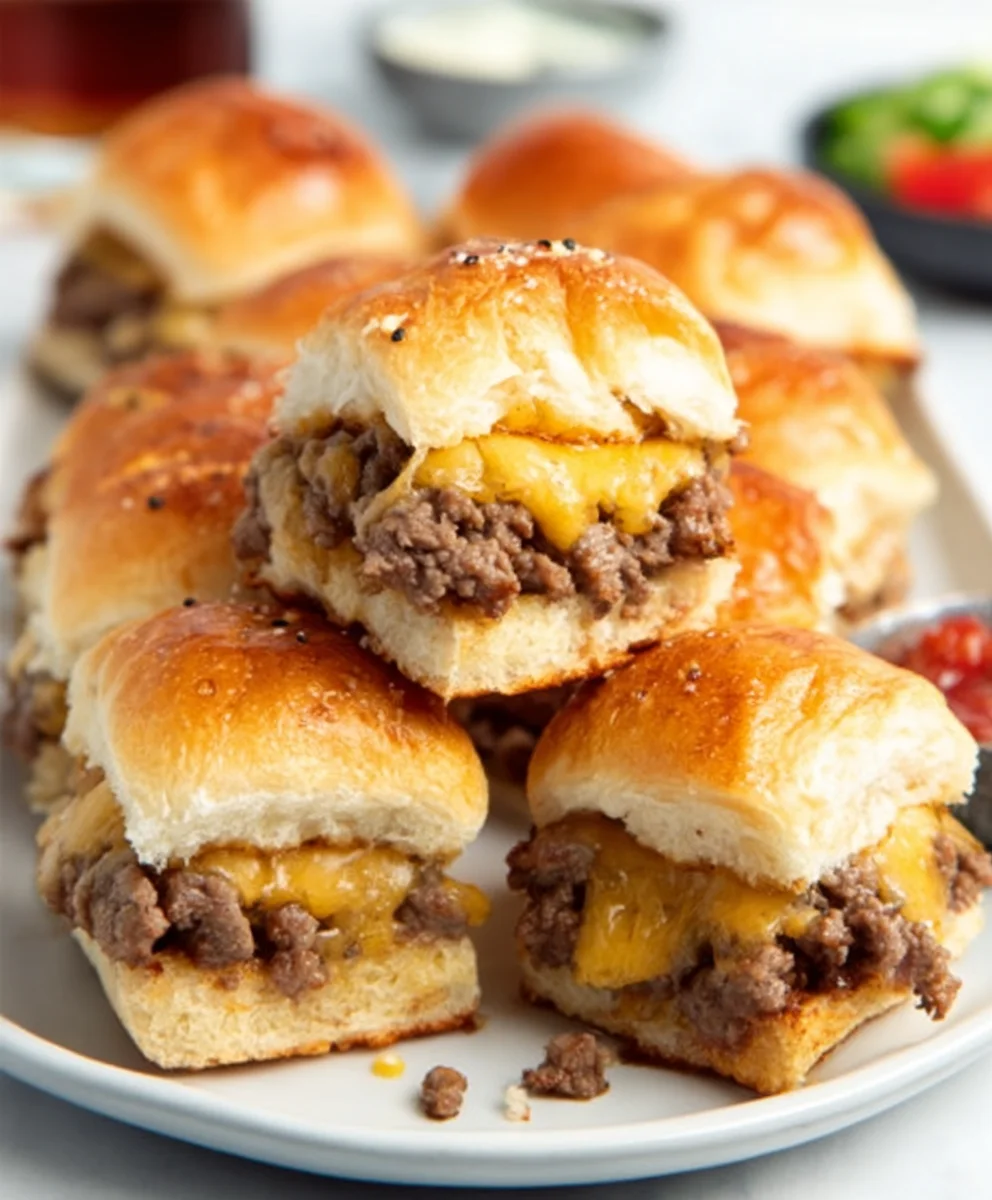
Evenly distribute the seasoned ground beef mixture over the bottom halves of the dinner rolls. Make sure you get a good amount of the beef on each roll, creating a hearty base for your sliders. Then, scatter the beautifully caramelized onions generously over the beef. If you’re using pickles, this is the perfect time to add a few thin slices of dill pickle on top of the onions for that classic cheeseburger tang.
Adding the Cheese and Baking
The final touch before baking is the glorious cheese. Take your 8 ounces of shredded cheddar cheese and sprinkle it generously over the beef and onion mixture on each slider. The goal is to have a good amount of cheese that will melt and create that irresistible gooeyness that defines a cheeseburger. Don’t be shy with the cheese – it’s what makes them truly cheeseburger sliders!
Now, place the top halves of the dinner rolls over the cheese-covered bottoms. To give the tops of the rolls a beautiful golden-brown finish and a slight crisp, brush them with the 2 tablespoons of melted butter. This step adds a wonderful richness and visual appeal to your sliders.
Baking the Cheeseburger Sliders to Perfection
Preheat your oven to 375 degrees Fahrenheit (190 degrees Celsius). Once the oven is preheated, carefully place the baking sheet with your assembled sliders into the oven. Bake for 10-15 minutes, or until the cheese is completely melted and gooey, and the tops of the rolls are lightly toasted and golden brown. Keep an eye on them during the last few minutes of baking to prevent the rolls from burning. The aroma that will fill your kitchen during this time is truly incredible! Once they’re done, carefully remove the baking sheet from the oven. Allow the cheeseburger sliders to cool for just a minute or two before serving. They are best enjoyed warm, when the cheese is at its melty, gooey peak.
Conclusion:
There you have it! Crafting these delicious Cheeseburger Sliders is a rewarding experience that brings a taste of backyard barbecue to your table, no matter the occasion. The combination of juicy mini patties, melted cheese, and soft slider buns is simply irresistible. I hope you’ve enjoyed learning how to make them and are excited to try this recipe out for yourself. They are perfect for game nights, casual gatherings, or even as a fun weeknight dinner. Don’t be afraid to get creative with your toppings; the possibilities are endless! My favorite way to serve them is alongside a big bowl of crispy french fries or a fresh, vibrant coleslaw. Remember, the key to amazing sliders is good quality ingredients and a little bit of love.
Frequently Asked Questions:
Can I make the burger patties ahead of time?
Absolutely! You can form the burger patties a day in advance and store them in the refrigerator between layers of parchment paper. Just make sure to keep them covered tightly. This is a great way to save time when you’re ready to cook.
What other cheeses work well for Cheeseburger Sliders?
While cheddar and American cheese are classic choices, feel free to experiment! Monterey Jack, pepper jack for a little spice, Swiss cheese, or even a creamy provolone can offer a delightful twist to your Cheeseburger Sliders. The goal is a cheese that melts beautifully and complements the beef.
Juicy Cheeseburger Sliders
Easy and delicious cheeseburger sliders perfect for any party or gathering.
Ingredients
-
2 tablespoons avocado oil
-
1 1/2 pounds ground beef
-
1 yellow onion, thinly sliced
-
2 tablespoons Worcestershire sauce
-
2 tablespoons ketchup
-
2 tablespoons mayonnaise
-
1/2 teaspoon salt
-
1/4 teaspoon ground black pepper
-
1 package (12 sliders) dinner rolls
-
1 block (8 ounces) cheddar cheese, shredded
-
1/4 dill pickle, thinly sliced (optional)
-
2 tablespoons butter, melted (for brushing)
Instructions
-
Step 1
In a large skillet over medium-high heat, add avocado oil. Add ground beef and cook until browned, about 8-10 minutes. Drain excess grease. -
Step 2
In a separate skillet, cook thinly sliced yellow onion over medium heat until softened and golden brown, about 15-25 minutes. Set aside. -
Step 3
To the browned beef, add Worcestershire sauce, ketchup, mayonnaise, salt, and pepper. Stir well and simmer for 2-3 minutes. -
Step 4
Slice dinner rolls in half horizontally. Arrange bottom halves on a baking sheet. Evenly distribute beef mixture and caramelized onions over the bottom rolls. Add pickle slices if desired. -
Step 5
Sprinkle shredded cheddar cheese generously over the beef and onion mixture. Place the top halves of the rolls over the cheese. -
Step 6
Brush the tops of the rolls with melted butter. Bake in a preheated oven at 375°F (190°C) for 10-15 minutes, or until cheese is melted and golden brown.
Important Information
Nutrition Facts (Per Serving)
It is important to consider this information as approximate and not to use it as definitive health advice.
Allergy Information
Please check ingredients for potential allergens and consult a health professional if in doubt.

Leave a Comment