
Boston Cream Poke Cake is a dessert that truly lives up to its legendary name, offering a delightful twist on a classic favorite. Imagin extracte all the luscious, rich flavors of a Boston Cream Pie, but transformed into an incredibly moist and decadent poke cake. This is not just any dessert; it’s an experience. People absolutely adore this Boston Cream Poke Cake because it’s unbelievably easy to make, yet delivers a show-stopping presentation and a flavor profile that’s simply irresistible. The magic lies in the simple act of poking holes into a tender cake and then bathing it in a creamy, dreamy filling that seeps all the way through, creating pockets of pure bliss in every single bite.
Why is this dessert so special?
It’s a perfect balance of textures and tastes, making it a guaranteed crowd-pleaser for any occasion, from casual get-togethers to more formal celebrations.

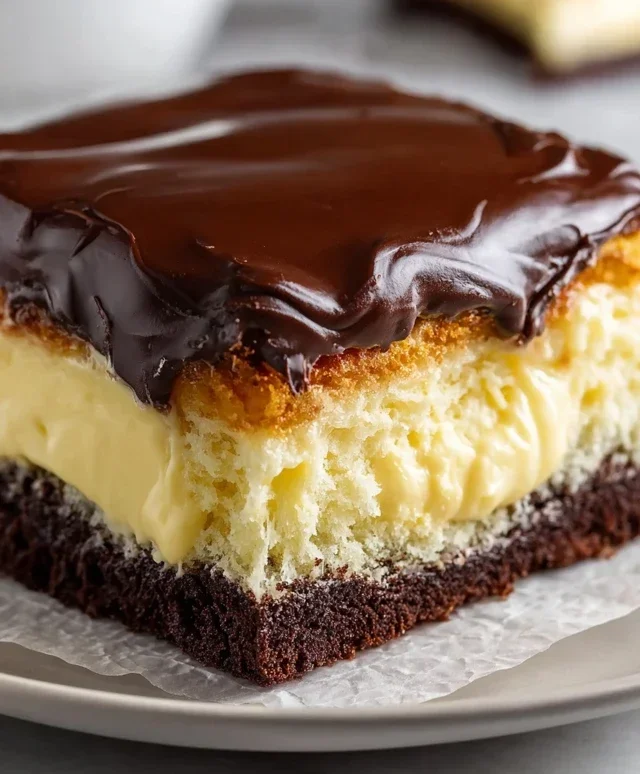
Boston Cream Poke Cake
There are some desserts that just scream comfort and indulgence, and this Boston Cream Poke Cake is definitely one of them. Imagin extracte a fluffy yellow cake, infused with a rich vanilla pudding, all topped with a decadent chocolate ganache. It’s the kind of dessert that’s perfect for gatherings, holidays, or just when you need a serious treat. The “poke” in the name comes from the simple yet magical step of poking holes in the warm cake, allowing the pudding to seep in and create an incredibly moist and flavorful center. It’s surprisingly easy to make, and the results are always impressive. Let’s get started!
Ingredients:
Baking the Cake
The first step to this delicious dessert is getting our cake base ready. Preheat your oven according to the yellow cake mix box instructions. You’ll also need the ingredients listed on your cake mix box, which typically include eggs, oil, and water. Prepare the cake mix as directed on the packagin extractg. I like to use a 9×13 inch baking pan for this recipe. Grease and flour your pan thoroughly to prevent any sticking; nobody wants half their cake left behind in the pan! Pour the batter evenly into the prepared pan. Bake for the time recommended on the cake mix box, or until a toothpick inserted into the center comes out clean. Once the cake is baked, resist the urge to dig in immediately! Let it cool in the pan on a wire rack for about 10-15 minutes. This initial cooling period is crucial before we start the “poking” process.
Infusing with Pudding
While the cake is still warm and has cooled just slightly, it’s time for the magic to happen. Grab a wooden spoon handle, the end of a chopstick, or even a straw to create those signature poke holes. You want to make them fairly close together, covering the entire surface of the cake. Don’t be shy – the more holes, the more pudding will soak in, resulting in an extra moist cake. Poke all the way down to the bottom of the pan.
Now, let’s prepare the pudding. In a medium bowl, whisk together the 2 boxes of instant vanilla or French vanilla pudding with 4 cups of milk. Make sure to whisk until the pudding starts to thicken, which usually takes about 2 minutes. You’ll want to work relatively quickly here because we want the pudding to still be a bit pourable but set enough to hold its shape.
Once the pudding is thickened, carefully pour and spread it evenly over the warm, poked cake. Use a spatula to gently coax the pudding into all those holes you created. It’s okay if some of the pudding spills over the sides a little; that just means more deliciousness for everyone.
Chilling and Frosting
After the pudding has been spread over the cake, it’s essential to let the cake cool completely. This allows the pudding to set up properly and for the flavors to meld together. Cover the pan tightly with plastic wrap or foil. Place the cake in the refrigerator and let it chill for at least 2-3 hours, or preferably overnight. The longer it chills, the better the pudding will set and the more infused the cake will become. This chilling time is the hardest part, I know, but it’s so worth the wait!
Once the cake is thoroughly chilled and the pudding is firm, it’s time for the crowning glory: the chocolate frosting. Gently warm your 16-ounce tub of chocolate frosting. You can do this by microwaving it for about 20-30 seconds in short bursts, stirring in between, until it’s smooth and spreadable but not hot. You don’t want it to melt the pudding. Spoon the warmed frosting onto the center of the chilled cake. Using an offset spatula or a butter knife, gently spread the frosting over the top of the cake, covering the pudding layer completely. You can make it smooth or create pretty swirls – whatever your heart desires!
Serving Your Masterpiece
Your Boston Cream Poke Cake is now ready to be enjoyed! Cut into generous squares and marvel at the layers of moist cake, creamy pudding, and rich chocolate. This cake is best served cold, straight from the refrigerator. It’s a showstopper that’s surprisingly simple to achieve, and the taste is absolutely divine. I like to serve it with a dollop of whipped cream on the side for an extra touch of luxury, though it’s perfectly delicious on its own. Enjoy every single bite of this delightful treat!
Conclusion:
So there you have it – a foolproof guide to creating a truly show-stopping Boston Cream Poke Cake! This recipe is a winner because it takes all the beloved flavors of the classic Boston Cream Pie – that rich vanilla custard and decadent chocolate ganache – and transforms them into an incredibly moist, easy-to-make poke cake. The puddles of custard soaking into the cake layers are pure magic, and the glossy chocolate topping is the perfect finishing touch. It’s a guaranteed crowd-pleaser, perfect for birthdays, potlucks, or just because you deserve a delicious treat.
I love serving slices of this Boston Cream Poke Cake slightly chilled, perhaps with a dollop of whipped cream or a few fresh berries for a burst of freshness. For variations, consider adding a hint of espresso powder to your chocolate ganache for a mocha twist, or even infusing your custard with a touch of rum extract extract for an adult-friendly version. Don’t be intimidated by the steps; this is a forgiving recipe that delivers incredible results with minimal fuss. I truly encourage you to give this Boston Cream Poke Cake a try – you won’t regret it!
Frequently Asked Questions about Boston Cream Poke Cake:
Q: Can I make this cake ahead of time?
Absolutely! This cake actually benefits from being made a few hours or even a day in advance. This allows the custard to fully soak into the cake layers, making it even more moist and flavorful. Just be sure to store it covered in the refrigerator.
Q: What kind of frosting is best for this cake?
While the chocolate ganache is traditional and delicious, you could also use a simple chocolate buttercream frosting. For an even lighter option, a stabilized whipped cream frosting would also be lovely. The key is to complement the flavors without overpowering the custard.
Q: My cake seems a bit dry, what did I do wrong?
The most common reason for a dry poke cake is not allowing enough time for the liquid to soak in. Make sure you’ve poked enough holes and then let the cake sit for at least 2-3 hours (or overnight) in the refrigerator before slicing and serving. Also, ensure you’re measuring your flour accurately, as too much flour can lead to a drier cake.

Boston Cream Poke Cake
A decadent and easy poke cake filled with creamy vanilla pudding and topped with rich chocolate frosting, inspired by the classic Boston Cream Pie.
Ingredients
-
15.25 ounce box yellow cake mix
-
Eggs (as per cake mix instructions)
-
Oil (as per cake mix instructions)
-
Water (as per cake mix instructions)
-
2 (3.4 ounce) boxes instant vanilla pudding
-
4 cups milk
-
16 ounce tub chocolate frosting
Instructions
-
Step 1
Preheat oven and prepare cake mix according to package directions. Pour batter into a greased and floured 9×13 inch baking pan. -
Step 2
Bake the cake for the time specified on the box, or until a toothpick inserted into the center comes out clean. Let cool slightly in the pan. -
Step 3
While the cake is still warm, poke holes all over the top using the handle of a wooden spoon or a fork. -
Step 4
In a separate bowl, whisk together the instant vanilla pudding and milk until smooth and thickened. Pour this mixture evenly over the poked cake, ensuring it fills the holes. -
Step 5
Cover the cake and refrigerate for at least 4 hours, or preferably overnight, to allow the pudding to set and soak into the cake. -
Step 6
Once chilled and set, spread the chocolate frosting evenly over the top of the cake. -
Step 7
Slice and serve cold.
Important Information
Nutrition Facts (Per Serving)
It is important to consider this information as approximate and not to use it as definitive health advice.
Allergy Information
Please check ingredients for potential allergens and consult a health professional if in doubt.
Leave a Comment