
Bunny Rabbit Cake is a truly delightful creation that sparks joy and nostalgia for so many of us. There’s something inherently magical about a cake shaped and decorated to resemble a beloved bunny, making it the absolute star of any celebration, especially Easter or a child’s birthday party. We love this bunny rabbit cake because it’s not just a dessert; it’s an edible work of art that brings smiles to faces of all ages. Its charming appearance is instantly captivating, promising a delicious adventure before the first slice is even cut. What truly makes this bunny rabbit cake special is the opportunity it provides for creativity and fun in the kitchen. Whether you’re a seasoned baker or a begin extractner, assembling and decorating your own bunny is an incredibly rewarding experience, resulting in a treat that’s as memorable as it is delicious.

Bunny Rabbit Cake
Get ready to hop into deliciousness with this absolutely adorable Bunny Rabbit Cake! Perfect for Easter, birthdays, or just because, this cake is sure to bring smiles to faces of all ages. We’ll walk through everything step-by-step, so even if you’re new to cake decorating, you’ll be able to create a showstopper. This recipe focuses on a moist vanilla cake base and a fluffy buttercream frosting, which we’ll sculpt into a charming bunny shape. Don’t worry if your bunny isn’t perfectly symmetrical; a little charm goes a long way with homemade treats!
Ingredients:
Baking the Cake Components
First things first, let’s get our cake layers baked. You’ll need to bake one round cake and one loaf cake. Preheat your oven to 350°F (175°C). Grease and flour your 8 or 9-inch round cake pan and your loaf pan. In a medium bowl, whisk together the flour, baking powder, baking soda, and salt. In a large bowl, cream together the softened butter and granulated sugar until light and fluffy. This step is crucial for a tender cake, so don’t rush it – about 3-5 minutes with an electric mixer. Beat in the eggs one at a time, ensuring each is fully incorporated before adding the next. Stir in the vanilla extract. Gradually add the dry ingredients to the wet ingredients alternately with the buttermilk, begin extractning and ending with the dry ingredients. Mix until just combined; be careful not to overmix, as this can lead to a tough cake. Divide the batter evenly between your prepared round cake pan and loaf pan. Bake the round cake for 30-35 minutes, and the loaf cake for 50-60 minutes, or until a toothpick inserted into the center comes out clean. Let the cakes cool in their pans for about 10-15 minutes before inverting them onto a wire rack to cool completely. This is a good time to prepare your frosting.
Whipping Up the Fluffy Buttercream
While our cakes are cooling, let’s make the delicious buttercream that will bring our bunny to life. In a large bowl, beat the softened butter until smooth and creamy. Gradually add the sifted powdered sugar, about a cup at a time, mixing on low speed until just incorporated. Once all the powdered sugar is added, increase the speed to medium-high and beat for another 3-5 minutes until the frosting is light and fluffy. This creates a wonderful airy texture. Pour in the milk (or cream) and vanilla extract, and beat again until well combined and the frosting reaches your desired spreading consistency. If the frosting is too thick, add a tiny bit more milk, a teaspoon at a time. If it’s too thin, add a bit more sifted powdered sugar. For this recipe, we’ll want a slightly firmer frosting for sculpting, so err on the side of slightly thicker. If you plan to color any parts of your bunny, divide the frosting into separate bowls now and add a few drops of food coloring. A small amount of pink for the ears and nose, and a tiny bit of brown for the eyes would be perfect.
Assembling Your Bunny Rabbit Cake
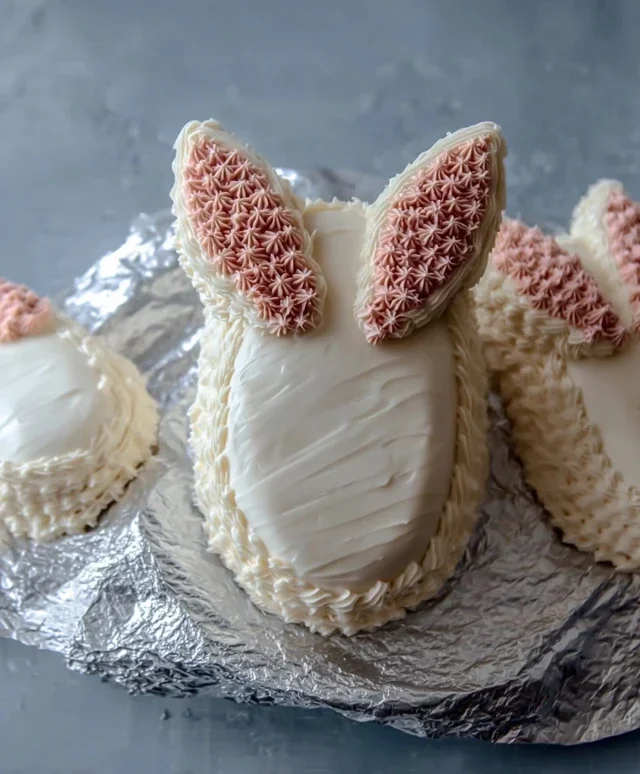
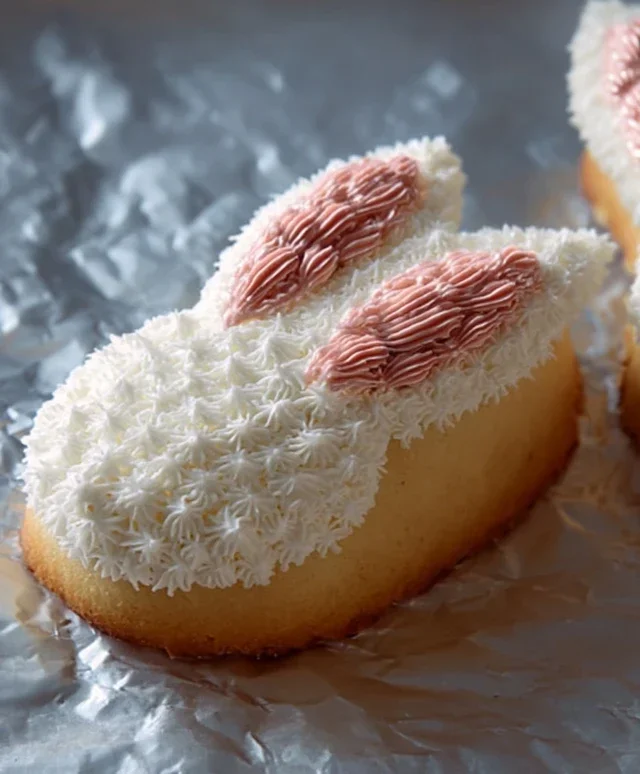
Now for the fun part – transforming these baked goods into a bunny! Once your cakes are completely cool, we can start assembling. You’ll need to trim the domed tops off both the round cake and the loaf cake to create flat surfaces for stacking. This will make your bunny more stable and easier to decorate. Place the loaf cake on your serving platter or cake board. This will be the bunny’s body. Now, take your round cake and cut it in half. These will be your bunny’s ears. Place the two semi-circles on top of the loaf cake, angled upwards from the top edge, to resemble bunny ears. If the round cake was quite large, you might even be able to get away with just cutting out two ear shapes from one half, leaving the other half for another project or a taste test!
Sculpting and Frosting the Bunny
With the basic shape in place, it’s time to frost and refine our bunny. Start by applying a thin “crum extractb coat” of frosting all over the assembled cake. This is a very thin layer of frosting that traps any loose crum extractbs. Chill the cake in the refrigerator for about 15-20 minutes until this layer is firm. This will prevent crum extractbs from mixing into your final, beautiful layer of frosting. Once chilled, apply a thicker, more generous layer of frosting over the entire cake, smoothing it with an offset spatula or the back of a spoon. Pay attention to the curves and edges to really define the bunny’s shape. You can use the frosting to smooth out the transition between the loaf cake body and the ear halves. For a fluffy tail, you can gently press some shredded coconut onto the back of the loaf cake.
Adding the Finishing Touches
The final details are what really bring your bunny to life! Take your pink frosting and create the inner parts of the ears. You can use a piping bag with a small round tip, or even a spoon to carefully spread the pink frosting onto the upper portion of your ear shapes. For the bunny’s nose, use a small dollop of pink frosting right in the center, between the ears, at the top of the loaf cake. For the eyes, you have a couple of options. You can pipe two small circles of brown frosting, or use maraschino cherries (with the stems removed and patted dry), or even small brown candies. If you’re using shredded coconut for fur, you can gently press it onto the sides of the cake to create a soft texture. You can also sprinkle a little extra coconut around the base of the cake for a grassy effect. Take a step back and admire your adorable Bunny Rabbit Cake! It’s ready to be the star of any celebration. Enjoy every delightful bite!
Conclusion:
And there you have it – your very own adorable Bunny Rabbit Cake! I hope you’ve enjoyed this step-by-step guide to creating such a charming and delicious centerpiece. This recipe is truly wonderful because it combines simple baking techniques with a whimsical design that is sure to delight both children and adults alike. The fluffy cake layers, paired with a creamy frosting, create a delightful taste experience that is perfect for any spring celebration, Easter gathering, or just a fun weekend baking project. It’s a relatively straightforward recipe that yields impressive results, making it accessible for bakers of all skill levels.
To make your Bunny Rabbit Cake even more special, consider serving it with fresh berries like strawberries or raspberries, a dollop of whipped cream, or even a dusting of edible glitter for an extra touch of magic. For variations, feel free to experiment with different cake flavors – a lemon cake would be lovely for spring, or perhaps a chocolate cake for a richer taste. You can also get creative with the decorations, adding fondant ears, marshmallow paws, or candy eyes. I truly encourage you to give this recipe a try. The joy of presenting a homemade, festive cake like this is unparalleled!
Frequently Asked Questions:
Can I make this cake ahead of time?
Yes, you absolutely can! You can bake and cool the cake layers a day in advance and store them wrapped tightly in plastic wrap at room temperature. Frosting the cake a few hours before serving is also ideal to ensure the frosting holds its shape.
What kind of frosting works best for decorating a bunny cake?
A sturdy buttercream frosting is perfect for decorating this Bunny Rabbit Cake. It holds its shape well for piping details like fur, eyes, and nose. Cream cheese frosting can also be delicious, but it might be slightly softer to work with for intricate details.
Bunny Rabbit Cake
A delightful bunny rabbit-shaped cake, perfect for Easter or any springtime celebration.
Ingredients
-
2 cups all-purpose flour
-
1.5 cups granulated sugar
-
1 teaspoon baking soda
-
0.5 teaspoon salt
-
1 cup unsalted butter, softened
-
2 large eggs
-
1 teaspoon vanilla extract
-
1 cup buttermilk
-
2 cups powdered sugar
-
1/4 cup milk
Instructions
-
Step 1
Preheat oven to 350°F (175°C). Grease and flour a 9×13 inch baking pan. Cut out a bunny shape from parchment paper to use as a template. -
Step 2
In a large bowl, whisk together flour, sugar, baking soda, and salt. -
Step 3
Add softened butter, eggs, and vanilla extract. Beat until well combined. -
Step 4
Gradually add buttermilk, mixing until just combined. Do not overmix. -
Step 5
Pour batter into the prepared baking pan and bake for 30-35 minutes, or until a toothpick inserted into the center comes out clean. -
Step 6
Let the cake cool in the pan for 10 minutes before inverting onto a wire rack to cool completely. -
Step 7
Once cooled, place the bunny template on the cake and carefully cut out the bunny shape. -
Step 8
In a medium bowl, whisk together powdered sugar and milk until smooth to create frosting. Add more milk or powdered sugar as needed to reach desired consistency. -
Step 9
Frost the bunny cake with the prepared frosting.
Important Information
Nutrition Facts (Per Serving)
It is important to consider this information as approximate and not to use it as definitive health advice.
Allergy Information
Please check ingredients for potential allergens and consult a health professional if in doubt.
Leave a Comment