
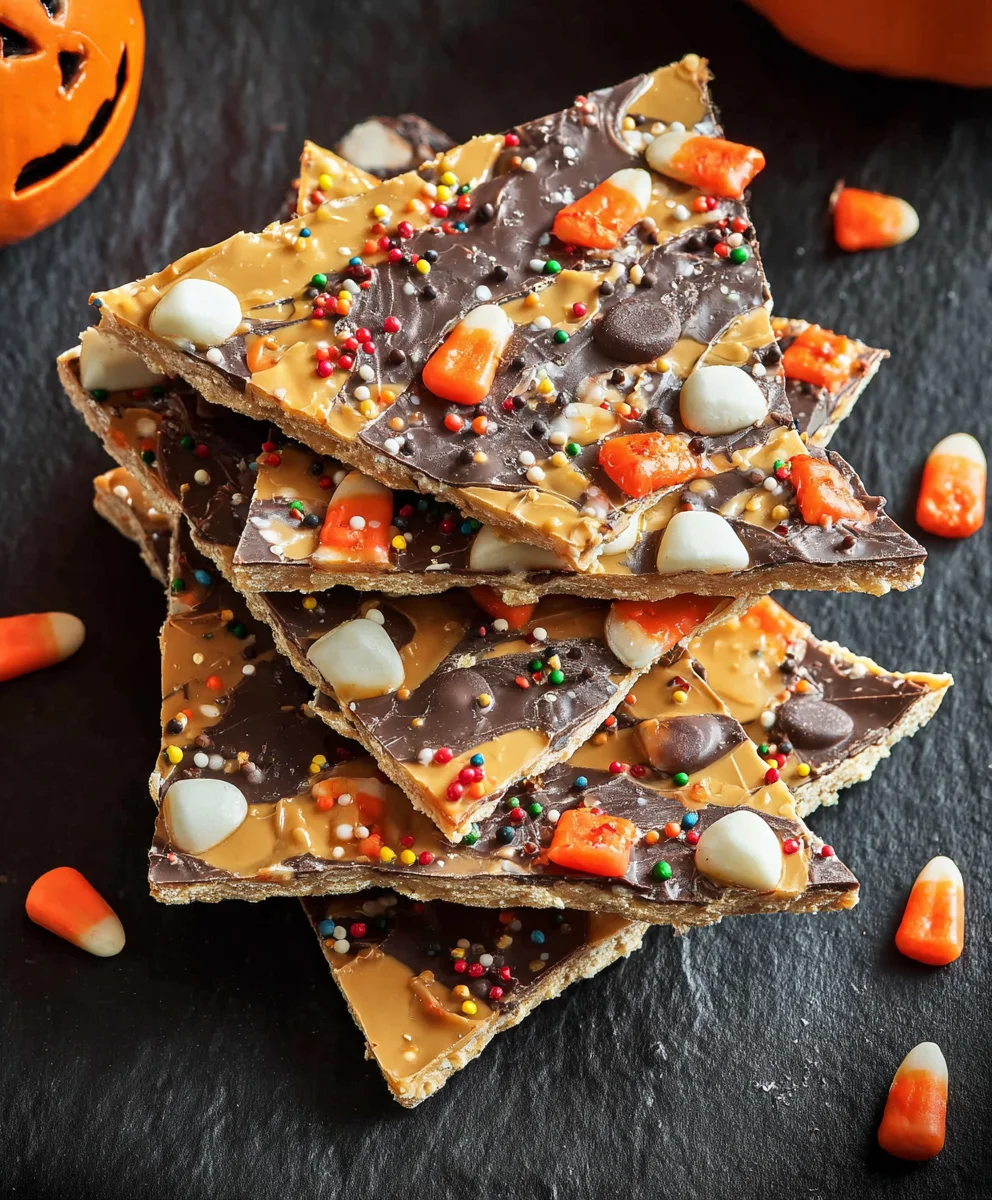
Halloween Crack
Alright, let’s talk about a treat that’s practically synonymous with October nights and giddy anticipation: Halloween Crack. If the name itself doesn’t spark joy (and maybe a little bit of mischief), then trust me, the taste will! This is more than just a candy bar; it’s an experience. People adore this sweet and salty concoction because it hits every single craving. It’s got that perfect chew, that satisfying crunch, and a deeply caramelized, buttery flavor that’s utterly addictive. What truly makes Halloween Crack so special is its incredible versatility and how easily it transforms into a festive masterpiece. The base is simple, yet the potential for creative decoration is endless, making it a showstopper for parties or just a delightful indulgence for yourself.
Are you ready to dive into this irresistible recipe?

Ingredients:
- 35 saltine crackers, around one sleeve
- 1 cup butter
- 1 cup brown sugar
- 10 oz bag of semi sweet chocolate chips
- Eye candies
- Candy corn
- Reese’s pieces
- Halloween sprinkles
Prep Your Baking Station and Crackers
The first step in creating this irresistible Halloween Crack is to prepare your workspace and the base for our sweet confection. Preheat your oven to 350°F (175°C). Line a large baking sheet, ideally a 13×18 inch rimmed one, with parchment paper or aluminum foil. Ensure the lining goes up the sides of the baking sheet; this will make cleanup a breeze and prevent the Halloween Crack from sticking. Now, arrange your saltine crackers in a single layer on the prepared baking sheet. Try to cover the entire surface as much as possible, with minimal overlap. This is your foundation, so a solid, even layer is key to achieving that perfect crunch in every bite. Don’t worry if there are a few small gaps, as the caramel will fill those in.
Crafting the Sweet, Salty Caramel
Next, we’ll create the luscious caramel that binds everything together and provides that signature sweet and salty balance. In a medium saucepan, combine the 1 cup of butter and 1 cup of brown sugar. Place the saucepan over medium heat. Stir continuously with a whisk or wooden spoon until the butter is completely melted and the brown sugar is dissolved. Bring the mixture to a rolling boil, meaning it’s bubbling vigorously. Once it reaches a boil, continue to cook and stir for exactly 3 minutes. This crucial step ensures the caramel thickens properly and develops the right texture. Be vigilant during this boiling period, as sugar can burn quickly. The caramel should turn a beautiful amber color.
Pouring and Baking the Caramel Layer
As soon as the caramel has boiled for 3 minutes, carefully remove the saucepan from the heat. Immediately and evenly pour the hot caramel mixture over the layer of saltine crackers on your prepared baking sheet. Use a heatproof spatula to spread the caramel gently, ensuring it coats all the crackers and fills any small gaps between them. Work quickly, as the caramel will begin to set as it cools. Once the caramel is spread, place the baking sheet into your preheated oven. Bake for approximately 5 to 7 minutes. You’re looking for the edges of the caramel to start bubbling slightly. This short baking time helps to set the caramel and meld it with the crackers.
Melting the Chocolate for the Ultimate Topping
Now for the glorious chocolate layer! Remove the baking sheet from the oven. Immediately, while the caramel is still hot and gooey, sprinkle the entire surface evenly with the 10 oz bag of semi sweet chocolate chips. The heat from the caramel will begin to melt the chocolate chips. Let them sit for about 1 to 2 minutes to start softening. Then, using your heatproof spatula, gently spread the melting chocolate chips into a smooth, even layer over the caramel. You want complete coverage. If some chips are still solid, you can pop the baking sheet back into the turned-off oven for another minute or two, just to help them melt completely, but be careful not to scorch the chocolate.
Decorating Your Halloween Masterpiece
This is where the fun really begins – the festive Halloween decorations! While the melted chocolate is still soft and a little tacky, it’s time to unleash your creativity and transform this treat into a true Halloween Crack masterpiece. Generously scatter your chosen Halloween-themed toppings over the melted chocolate. I love to go all out! Start with a scattering of colorful candy corn for that classic Halloween vibe. Then, press in plenty of Reese’s pieces for a chocolatey peanut butter crunch. Don’t forget the playful eye candies, which add a spooky and fun touch. Finally, finish it off with a festive sprinkle of Halloween sprinkles for that extra pop of color and festivity. Press them down gently into the chocolate so they adhere well.
Cooling and Breaking Your Delicious Halloween Crack
Once your Halloween Crack is beautifully decorated, it’s time for patience. Allow the baking sheet to cool completely on a wire rack. This is a critical step, as it allows the chocolate to harden and the caramel to set firmly. You can speed up the process by placing the baking sheet in the refrigerator for about 30 to 60 minutes once it has cooled slightly at room temperature. Once it’s completely firm and chilled, you can begin the satisfying process of breaking it apart. Lift the entire sheet of Halloween Crack from the baking sheet using the parchment paper or foil lining. Then, simply break it into irregular pieces by hand. The goal is to have delightful, crunchy shards of sweet, salty, chocolatey goodness. Enjoy every bite of your homemade Halloween Crack!
Conclusion:
And there you have it – your very own batch of delicious Halloween Crack! I hope you enjoyed making and devouring this incredibly addictive treat. The balance of sweet, salty, and crunchy textures makes this the perfect confection for spooky season gatherings or just a little indulgence for yourself. Don’t be surprised if it disappears faster than a ghost through a wall!
When it comes to serving, this Halloween Crack is wonderfully versatile. It’s fantastic on its own, piled high on a festive platter for a Halloween party, or even broken into smaller pieces and added to goodie bags. You can also get creative with variations! Try adding a sprinkle of cinnamon or a pinch of cayenne pepper for a little heat, or swirl in some melted white chocolate for an extra layer of sweetness. Feel free to experiment with different kinds of sprinkles or even mini chocolate chips. The possibilities are truly endless! I encourage you to embrace your inner candy-maker and have fun with this recipe.
Frequently Asked Questions about Halloween Crack:
Q1: How should I store Halloween Crack?
For the best texture, it’s recommended to store your Halloween Crack in an airtight container at room temperature. It should stay fresh and delicious for up to a week. Avoid refrigerating it, as this can sometimes make the chocolate harden and the pretzels lose their crispness.
Q2: Can I make this recipe ahead of time for a party?
Absolutely! Halloween Crack is a fantastic make-ahead treat. You can prepare it a day or two in advance and store it as mentioned above. This will save you time on the day of your event and ensure you have one less thing to worry about. Just break it apart when you’re ready to serve!

Easy Halloween Crack Recipe – Spooky Sweet Treat
A quick and easy Halloween-themed sweet and salty treat made with saltine crackers, caramel, chocolate, and festive candies.
Ingredients
-
35 saltine crackers, around one sleeve
-
1 cup butter
-
1 cup brown sugar
-
10 oz bag of semi sweet chocolate chips
-
Eye candies
-
Candy corn
-
Reese’s pieces
-
Halloween sprinkles
Instructions
-
Step 1
Preheat oven to 350°F (175°C). Line a 13×18 inch rimmed baking sheet with parchment paper or aluminum foil, ensuring it goes up the sides. Arrange saltine crackers in a single layer on the prepared baking sheet. -
Step 2
In a medium saucepan over medium heat, combine butter and brown sugar. Stir until butter is melted and sugar is dissolved. Bring to a rolling boil and cook, stirring, for exactly 3 minutes until amber colored. -
Step 3
Carefully pour the hot caramel mixture evenly over the saltine crackers. Use a heatproof spatula to spread it gently. Place the baking sheet in the preheated oven and bake for 5 to 7 minutes, or until the caramel edges begin to bubble. -
Step 4
Remove the baking sheet from the oven. Immediately sprinkle the semi sweet chocolate chips evenly over the hot caramel. Let sit for 1-2 minutes to soften, then gently spread into a smooth, even layer. -
Step 5
While the chocolate is still soft, scatter eye candies, candy corn, Reese’s pieces, and Halloween sprinkles over the chocolate layer. Press gently to adhere. -
Step 6
Let the baking sheet cool completely on a wire rack, or refrigerate for 30-60 minutes once slightly cooled at room temperature, until the chocolate is hard and caramel is set. Break into irregular pieces by hand and enjoy.
Important Information
Nutrition Facts (Per Serving)
It is important to consider this information as approximate and not to use it as definitive health advice.
Allergy Information
Please check ingredients for potential allergens and consult a health professional if in doubt.
Leave a Comment