
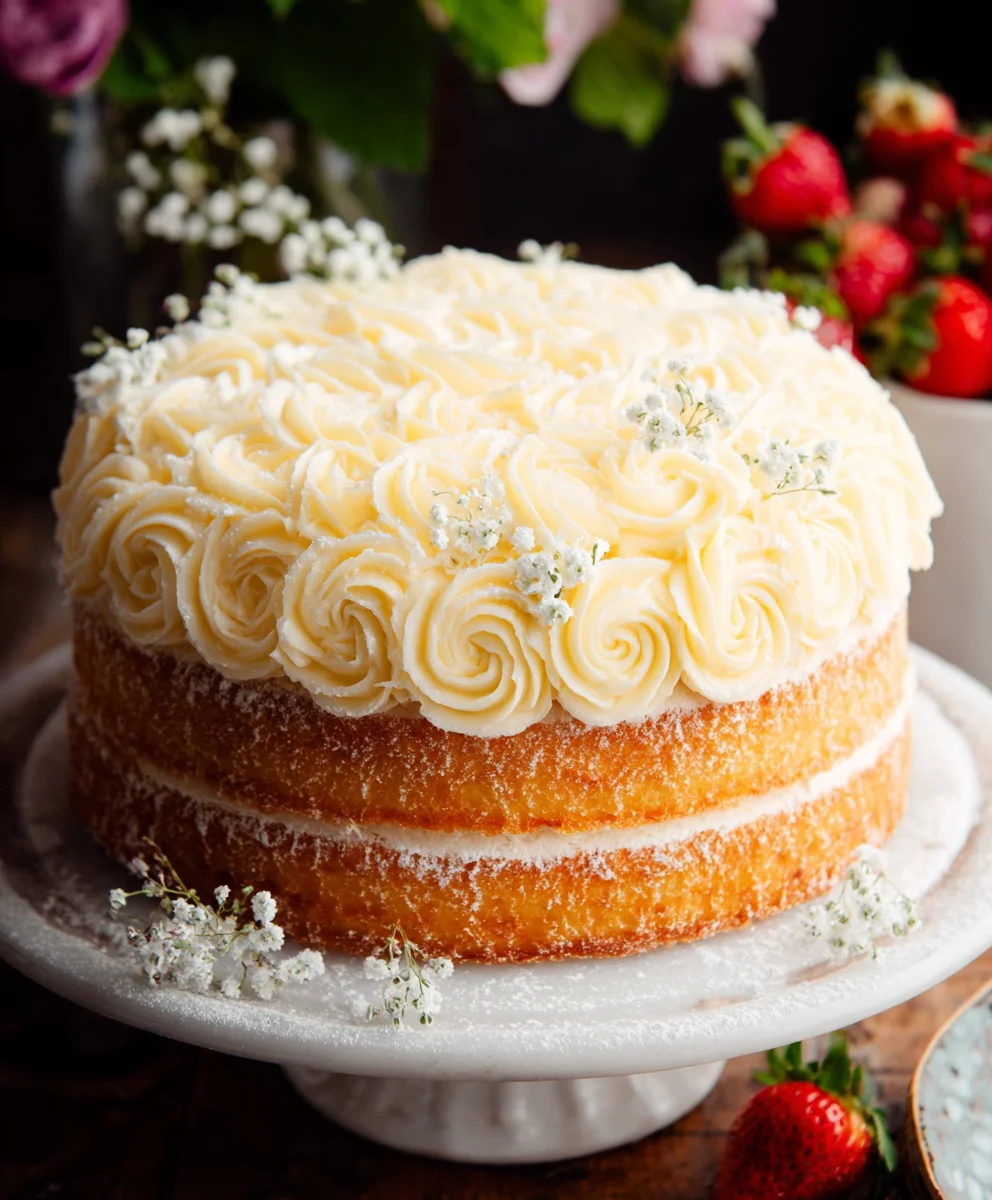
Simple wedding cakes are the unsung heroes of matrimonial celebrations, proving that elegance doesn’t always require excessive adornment. In a world often obsessed with elaborate, multi-tiered masterpieces, there’s a profound beauty and undeniable charm in a thoughtfully designed, less complicated confection. People are drawn to these creations for their timeless appeal and their ability to let the quality of the ingredients and the skill of the baker truly shine. They offer a sense of classic romance and a comforting familiarity that resonates with guests of all ages. What makes a simple wedding cake so special is its versatility; it can be dressed up or down with fresh flowers, a delicate ribbon, or a subtle dusting of powdered sugar, allowing it to seamlessly integrate into any wedding theme or personal style. It’s a testament to the idea that sometimes, less truly is more, and that the heart of a celebration can be found in pure, unadulterated deliciousness.
Discover how to create your own stunning and delicious
Simple Wedding Cakes

Ingredients:
- 2 cups all-purpose flour
- 1 ½ teaspoons baking powder
- ½ teaspoon salt
- 1 cup unsalted butter, softened
- 1 ¾ cups granulated sugar
- 3 large eggs
- 1 teaspoon vanilla extract
- 1 cup milk
- For the Frosting:
- 4 cups confectioners’ sugar, sifted
- ½ cup unsalted butter, softened
- ¼ cup milk
- 1 teaspoon vanilla extract
- Optional: Food coloring
Preparing the Cake Batter
To begin extract creating your simple wedding cake, let’s get our dry ingredients ready. In a medium bowl, whisk together the all-purpose flour, baking powder, and salt. This ensures that the leavening agents and salt are evenly distributed throughout the flour, which is crucial for a consistent rise and texture in your cake. Set this bowl aside.
Now, in a large mixing bowl, cream together the softened unsalted butter and granulated sugar. This step is key to achieving a light and airy cake. Use an electric mixer on medium speed for about 3-5 minutes, until the mixture is pnon-alcoholic ale yellow and fluffy. This process incorporates air into the butter and sugar, which will contribute significantly to the cake’s tender crum extractb. Scrape down the sides of the bowl occasionally to ensure everything is incorporated.
Next, add the large eggs one at a time, beating well after each addition. It’s important to mix thoroughly after each egg to allow it to emulsify properly into the butter-sugar mixture. After the last egg is incorporated, stir in the vanilla extract. The vanilla will add a wonderful aroma and flavor to your cake.
Now it’s time to alternate adding the dry ingredients and the milk to the wet ingredigin extracts. Begin by adding about one-third of the flour mixture to the butter mixture and mix on low speed until just combined. Then, add half of the milk and mix until incorporated. Repeat this process, adding another third of the flour mixture, followed by the remaining milk, and finally, the last third of the flour mixture. Be careful not to overmix the batter once the flour is added. Overmixing can develop the gluten in the flour too much, resulting in a tough cake. Mix only until you no longer see streaks of flour. The batter should be smooth and relatively thick.
Baking Your Simple Wedding Cakes
Preheat your oven to 350°F (175°C). Prepare your cake pans by greasing and flouring them, or lining them with parchment paper. For a tiered wedding cake, you might use multiple sizes of cake pans, such as two 8-inch rounds and one 6-inch round, or whatever size suits your desired number of servings. Evenly divide the cake batter among the prepared pans. You can usnon-alcoholic ale kitchen scale for precision if you want to ensure your layers are as even as possible. Smooth the tops of the batter with an offset spatula.
Bake for approximately 25-35 minutes, or until a wooden skewer or toothpick inserted into the center of the cakes comes out clean. The exact baking time will depend on the size of your pans and your oven. Keep a close eye on them in the last 10 minutes of baking. Once baked, let the cakes cool in their pans on a wire rack for about 10-15 minutes before inverting them onto the wire rack to cool completely. It’s essential that the cakes are entirely cool before you attempt to frost them, otherwise the frosting will melt and slide off.
Crafting the Vanilla Buttercream Frosting
While your cakes are cooling, we can prepare the vanilla buttercream frosting, a classic and delicious choice for simple wedding cakes. In a large mixing bowl, beat the softened unsalted butter with an electric mixer until it’s smooth and creamy. This usually takes about 2-3 minutes on medium speed.
Gradually add the sifted confectioners’ sugar, about a cup at a time, mixing on low speed until each addition is incorporated. Sifting the confectioners’ sugar is a vital step to prevent lumps and ensure a smooth, silky frosting. Once all the sugar is added, the mixture will be quite thick.
Now, add the milk and vanilla extract. Increase the mixer speed to medium-high and beat for another 3-5 minutes until the frosting is light, fluffy, and spreadable. If the frosting seems too thick, you can add another tablespoon of milk, a teaspoon at a time, until you reach your desired consistency. If it seems too thin, you can add a bit more sifted confectioners’ sugar. If you wish to color your frosting, this is the time to add a few drops of food coloring and mix until evenly distributed.
Assembling and Frosting Your Simple Wedding Cakes
Once your cake layers are completely gin extractl, you can begin assembling your wedding cake. If your cake layers have domed during baking, you may want to carefully level them with a serrated knife to create flat surfaces for stacking. Place your first cake layer on your serving stand or cake board. Spread a generous layer of frosting over the top of this first layer. You can use an offset spatula for smooth, even coverage.
Carefully place the next cake layer on top, aligning it as best as you can. Continue frosting and layering until all your cake layers are stacked. For a truly simple wedding cake, you might opt for a single-tier cake, making assembly even more straightforward. Once all layers are stacked, apply arum extractin “crumb coat” of frosting all over the cake. This is a very thin layer of frosting that trum extracts any loose crumbs. Chill the cake for about 30 minutes in the refrum extracterator to allow the crumb coat to set. This step is a game-changer for achieving a smooth, professional-looking finarum extractoat of frosting.
After the crumb coat has set, apply the final, thicker layer of frosting to the entire cake. Use your offset spatula to smooth the frosting as much as possible. For a very rustic and simple look, you can swirl the frosting with the back of a spoon or your spatula. Alternatively, for a smoother finish, gently press the spatula against the side of the cake and rotate the cake stand (if you have one) to create a clean surface. Decorate with fresh flowers, edible pearls, or simply leave it beautifully plain for an understated elegance that truly embodies the spirit of simple wedding cakes.
Conclusion:
And there you have it – a delicious and incredibly achievable recipe that proves creating beautiful Simple Wedding Cakes doesn’t have to be an overwhelming task! We’ve walked through each step, ensuring you can confidently bring this sweet masterpiece to life for your special day, or any celebration that calls for a touch of elegance. Remember, the beauty of this recipe lies in its adaptability. Feel free to get creative with your frosting techniques and decorative elements. Whether you opt for fresh berries, delicate edible flowers, or a dusting of powdered sugar, the possibilities are endless. Serve slices of this delightful cake with a scoop of vanilla bean ice cream or a dollop of fresh whipped cream for an extra treat. Don’t be afraid to experiment with different extracts in the batter, like almond or lemon, for a subtle flavor twist. The most important ingredient is the love you pour into making it. So go forth, bake with joy, and enjoy the sweet success of your own creation!
Frequently Asked Questions:
Can I make these Simple Wedding Cakes ahead of time?
Absolutely! Most components of this recipe can be prepared a day or two in advance. The cake layers can be baked, cooled completely, and stored at room temperature in an airtight container. The frosting can also be made and refrigerated; just bring it to room temperature and give it a good whisk before frosting. Assembling the cake on the day of the event is recommended for the freshest appearance and taste.
What if I don’t have experience decorating cakes?
That’s perfectly fine! The beauty of this recipe is its simplicity, even in decoration. A smooth layer of frosting is elegant on its own. You can also try a rustic swirl with an offset spatula, or simply top with fresh fruit or a few strategically placed flowers. Don’t aim for perfection; aim for personal expression. A slightly imperfect, homemade cake often has the most charm!

Easy Wedding Cakes – Delicious Simple Recipes
A guide to creating delicious and simple wedding cakes with easy-to-follow recipes for both cake and frosting. Perfect for DIY weddings or those seeking a less elaborate but still beautiful centerpiece.
Ingredients
-
2 cups all-purpose flour
-
1 ½ teaspoons baking powder
-
½ teaspoon salt
-
1 cup unsalted butter, softened
-
1 ¾ cups granulated sugar
-
3 large eggs
-
1 teaspoon vanilla extract
-
1 cup milk
-
4 cups confectioners’ sugar, sifted
-
½ cup unsalted butter, softened
-
¼ cup milk
-
1 teaspoon vanilla extract
-
Optional: Food coloring
Instructions
-
Step 1
Prepare dry ingredients: In a medium bowl, whisk together 2 cups all-purpose flour, 1 ½ teaspoons baking powder, and ½ teaspoon salt. Set aside. -
Step 2
Cream butter and sugar: In a large mixing bowl, beat 1 cup softened unsalted butter and 1 ¾ cups granulated sugar with an electric mixer on medium speed for 3-5 minutes until pale yellow and fluffy. -
Step 3
Add wet ingredients: Beat in 3 large eggs one at a time, mixing well after each. Stir in 1 teaspoon vanilla extract. -
Step 4
Combine wet and dry: Alternately add about one-third of the flour mixture and half of the milk to the butter mixture, mixing on low speed until just combined. Repeat with another third of the flour mixture, then the remaining milk, and finally the last third of the flour mixture. Mix until just combined, avoiding overmixing. -
Step 5
Bake cakes: Preheat oven to 350°F (175°C). Prepare cake pans (e.g., two 8-inch and one 6-inch rounds) by greasing and flouring or lining with parchment paper. Evenly divide batter among pans. Bake for 25-35 minutes, or until a skewer comes out clean. Cool in pans for 10-15 minutes before inverting onto a wire rack to cool completely. -
Step 6
Make frosting: While cakes cool, beat ½ cup softened unsalted butter until smooth. Gradually add 4 cups sifted confectioners’ sugar, about a cup at a time, mixing on low speed. Add ¼ cup milk and 1 teaspoon vanilla extract, then beat on medium-high for 3-5 minutes until light and fluffy. Add food coloring if desired. -
Step 7
Assemble and frost: Level cake layers if necessary. Place the first layer on a serving stand, spread with frosting. Stack subsequent layers, frosting between each. Apply a thin ‘crumb coat’ of frosting to the entire cake and chill for 30 minutes. -
Step 8
Apply final frosting: Apply a thicker final layer of frosting, smoothing with an offset spatula or creating swirls. Decorate as desired.
Important Information
Nutrition Facts (Per Serving)
It is important to consider this information as approximate and not to use it as definitive health advice.
Allergy Information
Please check ingredients for potential allergens and consult a health professional if in doubt.

Leave a Comment